Chapter
10
Programming
Applications for Your Epson Printer
You may not be the type of person who enjoys having others do your work for you. Or maybe you feel constrained by the limits an application program like a word processor instills when you feel like communicating with your printer. Or maybe you're just plain creative and want to use your printer as a pallet for expressing yourself. Whatever your motivation, this chapter will explore the ways in which you can use your Atari computer and Epson printer to do more than print letters.
COMMUNICATING WITH YOUR EPSON PRINTER THROUGH BASIC
Your Atari computer can communicate with your Epson printer in two different ways. The easiest is through a modification of your old friend the PRINT statement, LPRINT. LPRINT means Line PRINT and it tells your computer to send a string of characters to your printer. Make sure your printer is on and try typing this BASIC program line:
LPRINT;
"I'm your Epson printer. How are you?"
Your printer should come to life and begin asking about your health. If it doesn't, make sure it's on and check the connections between it and your Atari computer.
Another way to send text to your printer is by opening it like a file and then printing information to it as you would to a data file. Begin by catching its attention with this line:
OPEN
#1,8,0,"P:"
This line states that you are opening a file and naming it #1. The 8 indicates that you'll be outputting to that file. The 0 position will be ignored in this case, so it is working as a place-holder. The "P:" at the end of the line signifies that the information will be sent to the printer.
Once you have OPENed the file with the previous line, you can send information to your Epson printer to be printed by using a PRINT#1 command. This is similar to the LPRINT statement in this function, but the same PRINT#1 command can be used to send information to a disk drive, monitor, or modem, depending upon how you define the output port in the OPEN statement.
When you have completed your printing, close the file with a CLOSE #1 command at the end of the program. Here's a program to try:
10
OPEN #1,8,0,"P:"
20 PRINT #1; "I'm your Epson printer. How are you?"
30 CLOSE #1
20 PRINT #1; "I'm your Epson printer. How are you?"
30 CLOSE #1
Run this program and see if it works. If it doesn't, check that you've copied the program exactly. If you want to see your program again, type LIST. This will cause a listing of your program to scroll up your screen.
You can also print a listing of your whole program on your printer. Type LIST "P:". This is particularly handy when you're writing programs. It's much easier to find mistakes in long programs when you can leaf through pages of printed listings than trying to pick out the problems as they scroll up the computer screen.
If your Epson printer has the SelecType feature, you can use some of its type styles to make your listings more readable. Use the Double-Strike mode if your printer ribbon is getting a bit light. Compressed mode can improve the readability of your listings by fitting up to 132 characters on a line.
The Near-Letter Quality style improves readability in a couple of ways. First, the finely formed letters are more distinct and easier to read. Second, all of these letters will print in lower-case. This is because NLQ prints in the Upper/Lower-case mode which will be explained later. It looks a little strange to a seasoned programmer, but it is definitely easier to read.
USING CONTROL CHARACTERS
Your Atari communicates with your Epson printer through the use of numbers. As words have specific meaning to us, various numbers have specific meanings to our computers. The language they speak is ASCII (American Standard Code for Information Interchange).
There is an ASCII chart in the Appendix of this book. This chart translates the decimal codes from zero through 255 into their printed character representation. Some of the codes have no printed representation. They may be used to send messages to the printer or they may have no meaning to the printer whatsoever.
You can use these ASCII codes to control your Epson printer into doing your bidding. These codes are sent to your printer through BASIC using the CHR$ function. A typical statement would read:
PRINT#1;
CHR$(76) or LPRINT, CHR$(76)
This statement tells your printer to print the letter L. Substituting the number 76 with 60 would print an < symbol. Either way, these numbers take the place of the actual symbol. It may seem strange to represent a letter with a number, but the printer knows exactly what is meant.
Messages are sent in the same manner. PRINT#1, CHR$(10) tells the printer to advance down the page one line (LINE FEED). In Chapter 4, you used the value of 14 to set the printer into the expanded print mode. There is a whole selection of printer control codes that can be sent in this manner.
Here's a list of the non-printing messages the Atari computer can send to the Epson printer.
CHR$
Function
8 Backspace
9 Horizontal tab move
10 Line feed
11 Vertical tab
12 Form feed
13 Carriage return
14 Turn on expanded character pitch
15 Turn on compressed character pitch
16 Tab setting
17 Turn on upper/lower case (cursor down) mode
18 Turn off compressed character pitch
20 Turn off expanded character pitch
26 Repeat graphics data
27 Escape
Figure 10.1 Print Control Characters
SPACING ON THE HORIZONTAL PLANE
There are a number of ways to position printing horizontally. Some of these may already be familiar to you as commands for formatting text on the screen. Don't be fooled into thinking that these commands will act the same on your printer because in some cases they won't.
There are two punctuation marks used for formatting printed output; the comma and semicolon. On the screen, the comma causes output to be lined up in four columns. These columns are the beginning of print zones. Each print zone is ten spaces wide. They begin in columns 1, 11, 21, and 31. This program will demonstrate how the comma works in formatting screen output.
10 DATA A,B,C,D,E,F,6,H,I,J,K,L,M,N,O,P
20 FOR T = 1 TO 16
30 READ A$
40 PRINT A$,
50 NEXT T
60 PRINT "0123456789012345678901234567890123456789"
Figure 10.2 Screen Formatting with Commas
This program shows how it will print numbers in columns:
10 FOR T = 1 TO 16
20 PRINT T,
30 Next T
40 Print "0123456789012345678901234567890123456789"
Figure 10.3 Screen Formatting with Commas
Notice the numbers are lined up in columns 1, 11, 21, and 31. This is because every number is preceded by a space for a positive or negative sign. This space is blank in this case because it is positive.
Now let's try using the comma when printing to your Epson printer using the LPRINT statement:
5 DIM A$(1)
10 DATA A,B,C,D,E,F,G,H,I,J,K,L,M,N,O,P
20 FOR T=1 TO 16
30 READ A$
40 LPRINT ,A$,
50 NEXT T
55 LPRINT ," "
60 LPRINT , "0123456789012345678901234567890123456789012345678901234567890"
Figure 10.4 Printer Formatting with Commas
Depending upon your style of Epson printer, your output may have printed in the intended horizontal manner or each of the letters may have been printed on its own separate line. If the latter is the case, it is due to an idiosyncrasy of the way your Atari computer sends information to the printer. To overcome this, use the PRINT#1: command instead of the LPRINT statement to send information to the printer. Your modified program might look like this:
5 DIM A$(1)
10 DATA A,B,C,D,E,F,G,H,I,J,K,L,M,N,O,P
15 OPEN #1,8,9,"P:"
20 FOR T=1 TO 16
30 READ A$
40 PRINT #1,A$
50 NEXT T
55 PRINT #1, " "
60 PRINT #1,"0123456789012345678901234567890123456789012345678901234567890"
70 CLOSE #1
Figure 10.5 Modified Formatting with Commas
Notice that the letters aren't lined up. Instead, they each have ten spaces between them. After the "H" in the first line, there were only two spaces so your printer used eight additional spaces on the next line and printed the "I" in column 9.
This type of formatting is not very useful for printing multiple lines, but it is quite handy for single lines of output.
Another form of punctuation used for formatting is the semicolon. This is used for printing letters, numbers or words immediately after one another. Try this program to see what I mean:
10
OPEN #1,8,0,"P:"
20 PRINT #1;"THIS ";
30 PRINT #1;"IS ";
40 PRINT #1;"ON ";
50 PRINT #1;"ONE ";
60 PRINT #1;"LINE "
70 CLOSE #1
20 PRINT #1;"THIS ";
30 PRINT #1;"IS ";
40 PRINT #1;"ON ";
50 PRINT #1;"ONE ";
60 PRINT #1;"LINE "
70 CLOSE #1
Figure 10.6 Printer Formatting with Semicolons
The Comma and Semicolon are helpful in formatting your printed material. There are times, however, when you want to be specific about exact location. TAB and SPC handle this quite nicely.
GRAPHICS
Before any graphics can be printed on your Epson printer, it must be switched from the default text code to the graphics mode. This mode is used for printing patterns of dots which don't necessarily represent letters. These patterns can be used to create custom characters or combined to produce full-page illustrations.
As I explained previously in Chapter 1, The print head is comprised of a column of nine pins. In the graphic mode you are able to address only the top eight. Each of the pins has a number assigned to it. See the figure below.
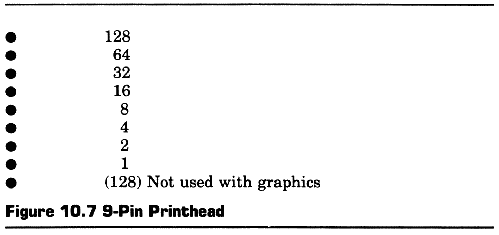
Each of these pins may be indivdually controlled by sending its value to the printer. To signify the number 1 pin you send the value of 1 to your printer. Striking with the number 16 pin requires you to use the number 16. This process is rather straight forward.
It becomes a little trickier when you want to shoot forth more than one pin at a time. This configuration of eight pins will yield 256 combinations. Each of these combinations can be represented by adding together the value of the pins. That value is then sent to the printer to tell it to fire the pins totaling the selected value. The combination of the top and bottom pins would be represented by the value of 129 ((1 + 128) = 129).
Here are a few examples of calculating the print code for particular pin combinations:
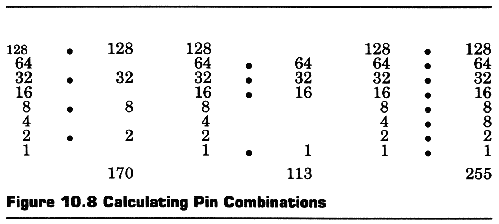
With this computational concept in mind, it's time to begin taking control of your Epson printer and design your own graphic images.
DESIGNING YOUR OWN GRAPHICS
Let's begin with something simple. Earlier you calculated 129 as the code for printing the number 1 and number 128 pins together. Let's use this code to print two parallel lines a hundred dots long.
10
OPEN #1,8,0,"P:"
20 PRINT #1;CHR$(27);"K";CHR$(101);CHR$(0);
30 FOR T=1 TO 100
40 PRINT #1,CHR$(128);
50 NEXT T
60 CLOSE #1
20 PRINT #1;CHR$(27);"K";CHR$(101);CHR$(0);
30 FOR T=1 TO 100
40 PRINT #1,CHR$(128);
50 NEXT T
60 CLOSE #1
Figure 10.9 Two Parallel Lines
Run this program and you will be the proud owner of two parallel lines, each a hundred dots long. Before your printer could separately address those pins, you had to switch it from the default text mode to a Graphics Mode. The CHR$(27);"K" in line 20 selects the Single-Density Graphics Mode (60 dots per horizontal inch). This is only one of four graphics density modes available for use with your Atari computer.
| MODE |
Density |
Code |
Description |
Speed |
| 0 |
Single |
CHR$(27):"K" |
60
dots/inch 480 dots/8" line |
16 |
| 1 |
Low-Speed Double |
CHR$(27):"L" |
120
dots/inch 960 dots/8" line |
8 |
| 2 |
High-Speed Double |
CHR$(27):"Y" |
120
dots/inch 960 dots/8" line |
16 |
| 3 |
Quadruple |
chr$(27):"Z" |
240
dots/inch 1920 dots/8" line |
8 |
The two numbers following the "K," CHR$(101); CHR$(0), determine the number of columns reserved for graphics. In this case, 101 columns are reserved. The first number can be anything up to and including 255. Numbers greater than 255 can be depicted by including the multiple of 256 in the second number spot and then use the first number spot to display the balance. If you wanted to reserve a full line (480 columns) in Single Density, it would look like this:
PRINT#1; CHR$(27); "K"; CHR$(224); CHR$(1);
Lines 30 through 50 make up a print loop in which the top and bottom pins are fired simultaneously 100 times. The semicolon after CHR$(129) serves to turn the print loop into one continuous string and to perpetuate the effects of the graphics mode command from line 20.
Line 60 empties the printer buffer and closes the printer as a file.
PRINTING AS A PICTURE
Designing your own graphic character is a matter of planning, plotting and programming. At first it may sound a bit complicated but take heart. After you've completed a couple of pictures, the whole process will seem amazingly simple.
Begin by selecting the figure you wish to design. I suggest for your first few that you use curveless figures composed mainly of vertical and horizontal lines. These shapes are easier to create in the grid-bound world of your Epson printer than circles and curves.
For demonstration reasons, I have chosen to create a picture of a floppy disk. I begin by plotting the picture on pieces of graph paper or the grid shown in Figure 10.9. The dimensions of your grid are virtually limitless, but since this is the first picture, I have limited my floppy diskette to a 7 x 7 square.
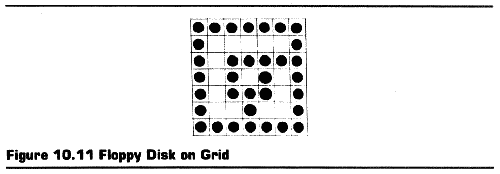
Once you have plotted your picture, it's time to pull out your calculator to turn these dots into numbers so that you may feed them to the Epson printer. Notice the numbers running down the side of the graph. They correspond to the values of the seven pins on the print head. Since you want the pins to strike everywhere you have drawn a dot, you must add the values of the pins in each of those columns.
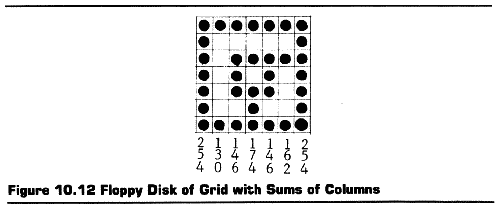
Now take these values and plug them into a program that is similar to the one used to print the double lines using pins 1 and 64. This program uses a READ-DATA statement to input the values into the PRINT#1, command in line 20. This method is quite handy in programs like these where great amounts of data have to be input.
2
REM FLOPPYDISK
5 REM SAVE "D1:FLOPPYDISK"
10 OPEN #1,8,0,"P:"
20 PRINT #1;CHR$(27);"K";CHR$(8);CHR$(0);
30 READ A
35 IF A=0 THEN 60
40 PRINT #1;CHR$(A);
50 GOTO 30
60 PRINT #1;
70 CLOSE #1:END
80 DATA 254,130,146,174,146,162,254,0
5 REM SAVE "D1:FLOPPYDISK"
10 OPEN #1,8,0,"P:"
20 PRINT #1;CHR$(27);"K";CHR$(8);CHR$(0);
30 READ A
35 IF A=0 THEN 60
40 PRINT #1;CHR$(A);
50 GOTO 30
60 PRINT #1;
70 CLOSE #1:END
80 DATA 254,130,146,174,146,162,254,0
Figure 10.13 Listing of Floppy Disk
Notice the DATA line ends with a 0 (zero). This indicates the end of the data. Without it, you will receive an "OUT OF DATA" error message. Also notice the semicolons at the ends of lines 20 and 50. These are easy to forget but necessary to the program.
MAKING IT BIGGER
Don't be dismayed by the small size o£ your floppy disk. Remember that you're only creating figures the size of a letter on the typewritten page. It is possible to make your floppy disk larger, however, by drawing it to scale on a larger grid. Let's make it four times as large.
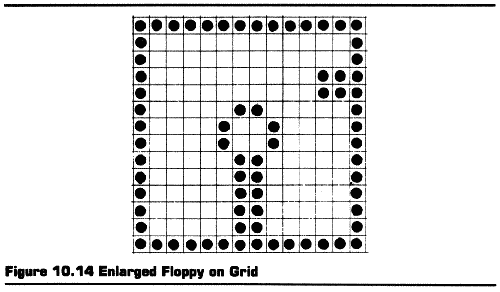
Figure 10.6 shows the floppy disk drawn in a 4:1 scale. This means that for every pin on the first drawing, you will use four pins on this drawing. It is twice as long and twice as tall. Because it's twice as tall, it will be printed on two horizontal lines. The sums of the pins must be calculated for the top half and then for the bottom half.
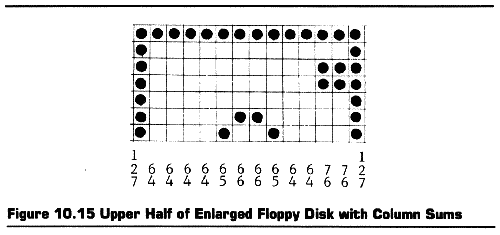
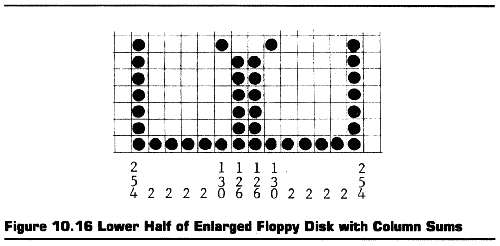
Take these values and insert them into the program used to create your first floppy disk picture.
This program is similar to your original floppy disk program except it uses more data. The data in lines 80 and 90 print the top half of the floppy and lines 100 and 110 direct the printing of the bottom half.
2 REM BIGFLOPPY
5 REM SAVE "D1:BIGFLOPPY"
10 OPEN #1,8,0,"P:"
20 PRINT #1;CHR$(27);"K";CHR$(15);CHR$(0);
30 READ A
35 IF A=0 THEN 60
37 IF A=1 THEN PRINT #1,:GOTO 30
40 PRINT #1;CHR$(A);
50 GOTO 30
60 PRINT #1;
70 CLOSE #1:END
80 DATA 127,64,64,64,64,65,66
90 DATA 66,65,64,64,76,76,127,1
100 DATA 254,2,2,2,2,1.30,126
110 DATA 126,130,2,2,2,2,254,0
Figure 10.17 Listing of BigFloppy
Notice the 1 at the end of the DATA line 90. This indicates the end of a line of printing. When line 37 recognizes the 1, it inserts a carriage return with a PRINT#1, statement. This advances the paper one line and positions the print head for printing the bottom half of the floppy. You may use this method to print graphics on multiple lines.
Now Run the Program
Creating your own printed graphics can be quite rewarding. Your Epson printer makes it easy to advance beyond using a printer for merely letter writing. It allows you to use it as a pallet for your imagination.
You've seen how versitile your computer system has been around the house and in school. The next section will cover how it can help in running your business. It will discuss word processing around the office as well as around the world.
Return to Table of Contents | Previous Chapter | Next Chapter

