Chapter
1
This
is Your Epson
Printer
Most people think of a printer merely as something attached to a computer. But a printer is much more than that. It is the means by which your work is transferred from its electronic form to a printed form. It creates the finished product that others see. It is the Fingerprint of your work.
Epson, Inc. is one of the leading printer manufacturers in the world. It first made its impact in the printer industry with its series of "dot-matrix" printers. Epson's dot-matrix printers have set an industry standard by which competitors are measured. These printers include the MX, RX, FX, LX, JX, LQ and HomeWriter lines.
THE MX PRINTERS
The MX printers were the original line of printers introduced by Epson. This line contained one of the most popular printers of all time, the MX-80. IBM chose a modification of the Epson MX-80 to accompany its introduction of the IBM PC in August of 1981.
There were two basic versions of the MX printer: the MX-80 and the MX-100. The MX-80 printed at 80 characters per second and used 8 1/2" wide continuous paper with tractor-feed perforations along the edges. It had no roller platen like a typewriter, so it could not push paper through the printer. It had to pull the paper through using tractor-feed sprockets which could be adjusted for the width of the paper. It was limited in its printing capabilities. It could only print in pica, condensed, expanded, and emphasized modes. These print modes were expanded in later versions of firmware (operating instructions on ROM chips).
The Epson MX-100 was released with a 15-inch platen to accomodate larger sheets of paper for printing spreadsheets and other forms of output which couldn't be printed on 8 1/2" paper. The MX-100 also included an improvement in the firmware (Type II) which allowed it to print in higher resolution graphics, skip-over perforations, program the right margins, and print in a total of eight international character sets.
Later, Epson introduced the MX-80 III F/T (for Friction/Tractor feed) which included a platen along with the tractor-feed sprockets. The platen enabled it to print on single-sheet paper as well as continuous-feed computer paper. This printer also included another update of the firmware called Graftrax Plus. This added the ability to print in italics, superscript, subscript, and to underline.
THE RX PRINTERS
The RX series is an improvement over the MX series. These printers print at 100 characters per second, feature 11 international character sets, 96 italic characters, and 32 graphic characters. In addition, they offer graphic characters which are used by the Epson HX-20 portable computer. The RX series print in pica, elite, compressed, expanded, and emphasized modes.
Like the MX series, the RX-80 and RX-100 can use only tractor-feed continuous paper. The RX series also has F/T models that can handle either perforated rolls of paper or cut sheets. The RX printers can do many more things than the MX printers, but they usually sell for less.
THE FX PRINTERS
The FX series was introduced in 1983. It is an upgrade of the preceding printer lines. These printers can print at a blinding speed of 160 characters per second. They offer a "pin-feed" platen for bidirectional printing which allows the paper to move both forward and backward for improved printing control.
This latest series offers graphics resolution twice that of the RX series (240 dots per inch) along with nine international character sets. They can print in pica, elite, italic, condensed, expanded, underlined, and emphasized modes. The vertical line spacing is set at 1/6 inch but can be programmed to n/72 and n/216 inch.
These FX computers contain a 2000-character storage space (buffer) which will hold one-to-two pages of text. This buffer can hold text in memory while the printer is printing it out instead of requiring the computer to wait for the printing to finish before continuing onto the next task.
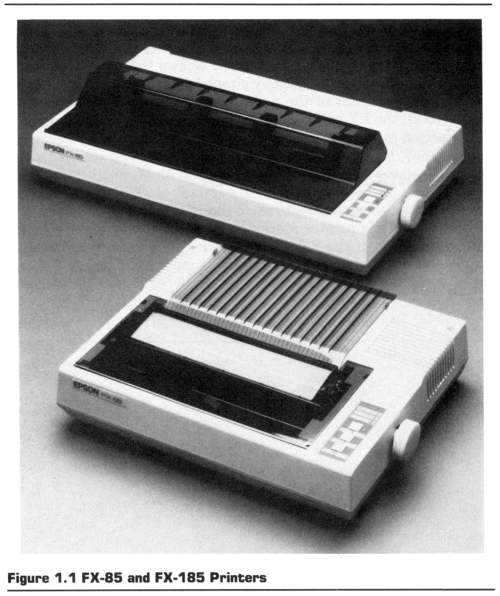
The FX-85 and FX-185 are the latest in the FX series. In addition to including everything found in the earlier FX printers, these printers feature an 8000-character buffer and the SelecType capability. The SelecType component allows the user to program up to ten different typestyles by simply pressing the control panel buttons on the front of the printer. SelecType was originally introduced on the LX printer series and will be further explained in that section.
THE SPECTRUM LX-80 PRINTER
In addition to the many features found in the FX-80, the Spectrum LX-80 dot-matrix printer marks a new era in Epson printers with its introduction of the SelecType feature. This feature allows the user to access various printing modes simply by pressing the control panel buttons in specific sequences. This capability removes many of the headaches previously found by users wishing to vary printstyles in their documents.
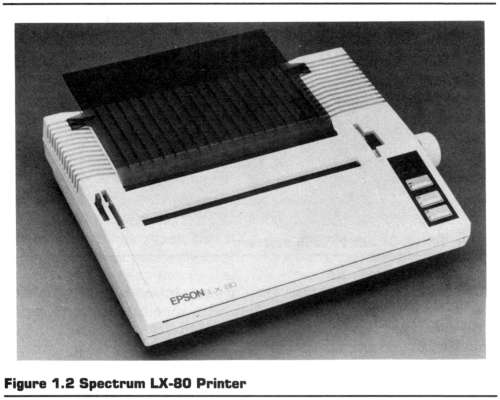
Along with the SelecType feature comes the Near-Letter Quality mode. This produces sharp characters which are almost indistinguishable from those printed on a typewriter. Because the method used to produce these letters requires two passes, the speed for Near-Letter Quality printing drops to 16 characters pe second from the 100 characters per second speed for normal draft quality.
THE JX PRINTER
The Epson JX-80 might be thought of as a Spectrum LX-80 with the capability of printing in seven colors. Like the LX-80, it can print in multiple fonts which can be software programmable or through the SelecType feature. It has a high level of graphic resolution as well as the ability to print in any of eight international character sets.
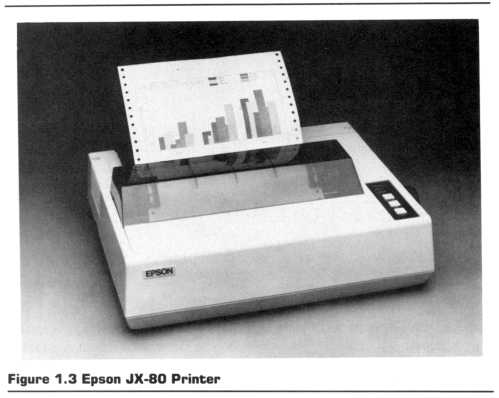
The color printing is controlled by including a special control code (ESCAPE R) followed by the code for the specific color. The ribbon for the JX-80 contains four colors: black, magenta, yellow, and cyan. These colors are mixed with multiple passes to produce the other three colors: green, orange, and violet. Many software programs are already modifying their programs to make use of the colorful capabilities of the JX-80.
THE LQ PRINTER
The LQ-1500 is the top-of-the-line in Epson dot-matrix printers. Its printhead holds 24 pins instead of the standard nine pins which provides it with resolution that is almost three times that of its siblings. This resolution gives it the capability to produce nearflawless letter-quality characters.
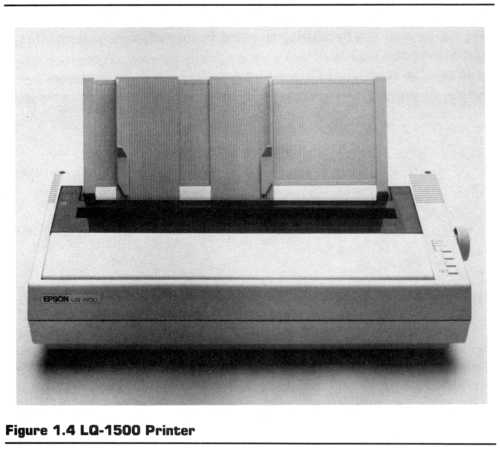
The LQ-1500 is both fast and versatile. It prints at 200 characters per second in the draft mode and 67 characters per second in letter-quality mode. It has a character set of 96 standard characters, 96 italic characters, and 32 international characters which can all be printed in letter quality, letter quality/proportional, and draft modes. This machine offers true superscript and subscript modes as well as `many' different printstyles.
THE SPECTRUM LX-90 AND HOMEWRITER-10 PRINTERS
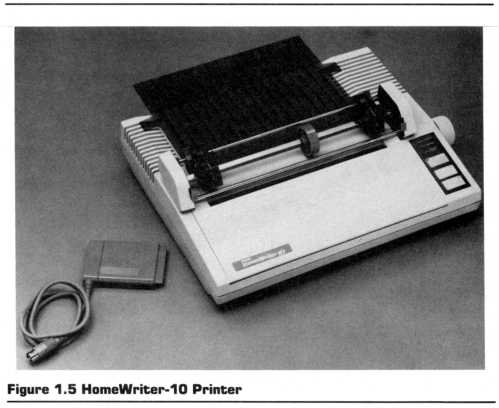
The LX-90 and HomeWriter-10 printers are quite similar to the LX-80 with the slight exception that they "have no brains." They are designed to emulate machine-specific printers for the Commodore 64, Atari XE/XL, IBM PC, IBM PCjr, and Apple IIc. The instructions for these emulations are contained in the unique cartridge interfaces used to connect the LX-90 or HomeWriter-10 with the respective computers.
One advantage to owning the HomeWriter-10 or LX-90 over just using one of the actual printers being emulated is the SelecType feature.
THE SQ-2000 INK JET PRINTER
This printer is different than the rest of the Epson line in that it is a dot-matrix printer that doesn't use pins to make impressions on paper. It uses ink jets. The greatest thing about this style of printer is its quiet operation. While the SQ-2000 prints, you only hear the whoosh of ink being sprayed on paper instead of the rackety clatter of metal pins crashing onto a platen.
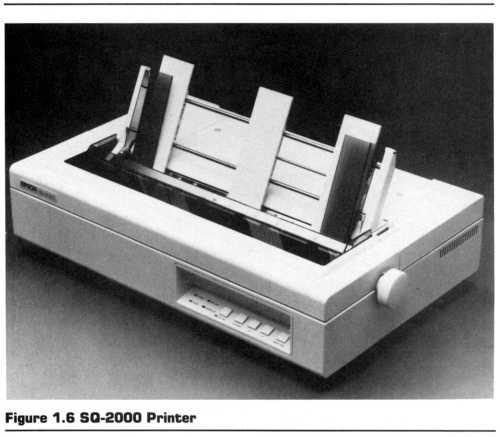
This printer prints at 176 characters per second in draft quality, and 106 characters per second in letter-quality printing mode. It supports 11 international character sets and prints in pica, elite, condensed, condensed-elite, expanded, emphasized, italic, superscript, subscript, and underline modes. It comes with a 2000 byte input print buffer which can be expanded to 32,000 bytes with an interface board. This is a versatile and fast printer which can handle anything from correspondence to business graphics.
HOW DOES A DOT-MATRIX PRINTER WORK?
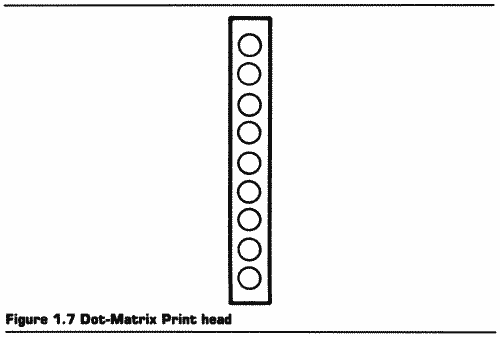
A dot-matrix printer doesn't form letters by striking a piece of paper with a key like on a conventional typewriter. Instead, a dotmatrix printer forms letters by striking the paper with a number of pins in the shape of the desired letter.
Your Epson printer has a set of nine pins arranged in a vertical column. This column of pins travels horizontally across the page firing the necessary pins against the ribbon to form letters. In the draft printing mode, each letter is composed of an imaginary matrix of dots. This matrix is composed of six columns of nine dots-hence the name of dot-matrix printer (see figure 1.7).
When a capital "P" is to be printed, the printer sends instructions to the print head to shoot forth pins as depicted in Figure 1.8. In the first column, all of the pins in the upper seven rows are pressed against the ribbon (the pins in the two bottom rows are used to print the descenders of letters like "p," "y" and "q"). In the second, third, fourth, and fifth columns only the pins in the first and fourth rows are used. In the final column, the pins in the second and third rows are used to close off the "P"
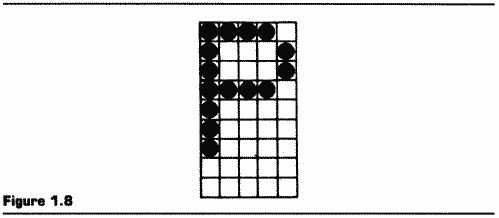
The imaginary 9x6 matrix used in creating letters
The O's show the dots used to print a "P" Dot-Matrix technology has many advantages. The greatest advantage is versatility. Since each pin can be individually controlled, a dot-matrix printer is not limited to printing only letters. By shooting forth the appropriate pins, it can produce detailed pictures as well. These pictures are created in much the same way as pictures in a newspaper through the use of little dots.
The other great advantage to dot-matrix printers is speed. A computer communicates through electricity. Electricity travels at the speed of light. Although there may be some mechanical limitations to transmitting information that fast, the biggest stumbling block to getting words to the printed page is the speed of the printer.
The conventional procedure for typing characters with a typewriter involves the use of single keystrokes, the spinning of a ball typing element, or the turning of a daisy wheel. Each of these necessitates a short period of time waiting for the proper letter typing element to move into position to produce the desired letter.
A fast typist will type 70 words per minute. This is about 350 characters per minute or about six characters per second. When incorporated into a printer, the typewriter technology for printing letters will usually print between 13 and 25 characters per second (cps). On an expensive printer with only one printing head, you might get 55 cps.
The dot-matrix printer doesn't have to worry about spinning heads. The printhead moves back and forth across the page striking the ribbon with pins to form letters. The only limitations for speed are how rapidly the head can move from side-to-side and how quickly the paper can be advanced. The speed on these printers will range from 40 to 200 cps.
The greatest disadvantage to a dot-matrix printer is the quality of the characters. As I stated before, these letters are created by a number of dots placed on the paper in the form of a letter. The early dot-matrix printers (models MX-70 and early MX-80) created many poor quality letters. Since each letter had to be created within a small 7 x 5 box of pins (the matrix), some of the letters were strangely shaped. The lower-case "q" and "p" didn't go below the line, which at times made it difficult to tell the difference between a "q" and a "9." Some people didn't like playing "connect the dots" while they were reading.
Since then, great care has been taken by companies like Epson to improve the quality of dot-matrix characters. The descenders on the "q's and p's" now go below the line. The number of pins used to create the letters has been increased to improve the resolution of each letter. As more dots are used to create each letter, the letter appears more solid and is easier to read.
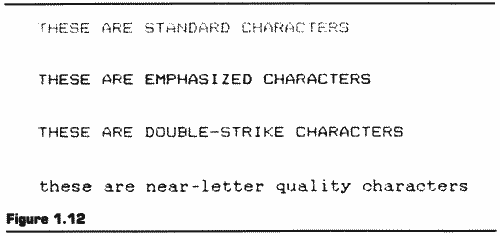
The Epson printers have three print modes that will improve the letter quality and thus, improve the ease of reading. These modes are called Emphasized, Double-Strike, and Near-Letter Quality printing.
In the Emphasized mode, an Epson printer prints each letter twice, with the dots of the second letter slightly to the right of the first. This process fills in the horizontal lines of the characters. The characters produced are darker and more fully formed than the standard letters.
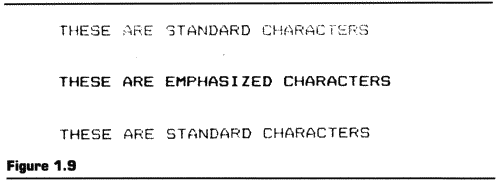
In the Double-Strike mode, each letter is printed twice with the dots of the second letter slightly below the first. This process tends to fill-in the vertical lines of the letters. It also produces characters that are darker and more fully formed than standard printing.

The sharpness of the letters in the Near-Letter Quality (NLQ) mode is created in a fashion that is a bit different than that of the emphasized and double-strike modes. Each of those modes produces its letter quality by printing a letter twice but with a slight offset. In the NLQ mode, the print head makes two passes on each letter but doesn't print exactly the same letter both times.
Figure 1.12 shows six lines of NLQ printing. The first two and the last two lines are perfectly formed. The center two lines, however, look as though the ribbon was running out of ink or something. There is nothing wrong with these two lines. They are demonstrating the difference between the letters printed on the first and second passes in the NLQ mode.
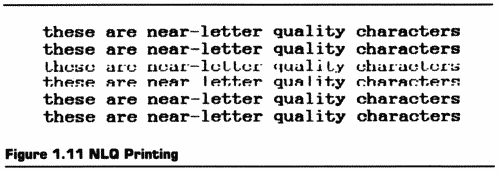
The center two lines were created by manually advancing the paper between the first and second pass of the print head. Notice that during the first pass, the print head lays down the basic structure of each letter. The 'T's" and the "t's" aren't crossed and the "e's" don't have the center bars printed. During the second pass, the letters are filled in. The letters are crossed and the centers are filled in. The result is a high-quality form of letter.
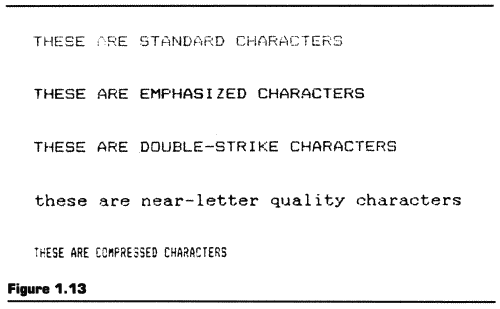
Another style of printing that comes in handy when you want to put a large amount of information in a very small space is Compressed. In this mode, your printer "compresses" the letters horizontally. This allows you to print 132 compressed characters in the space of 80 standard characters.
If your Epson printer has the SelecType feature then it has the unique capability of allowing you, the user, to set these printing modes through the use of a combination of keys on the front of the printer. Unlike other printers in this price-range, the Epson printers with SelecType don't require computer knowledge to produce high-quality printing. This feature is called SelecType. The specifics of this feature will be more fully covered in Chapter 4.
EPSON PRINTER, MEET YOUR NEW OWNER ...
Now that you know about some of the capabilities of your new printer, let's take a closer look at it.
If you've never seen a printer before, it might remind you of a typewriter without a keyboard. For all intents and purposes, that's exactly what it is. It is an output device for your Atari computer.

On the outside, your printer looks like a beige box with a knob and some flat buttons. Open up the front panel (the one with the Epson decal) and things will begin to look a bit more interesting. If your printer has a long, black roller that can be turned by the knob it is called a platen. Like a typewriter, this is the roller around which the paper rolls. It gives your printer the capability to push single sheets through using friction. Hence, the name-Friction Feed. If your printer doesn't have a platen, then it is restricted to printing only on paper with perforated tractor-feed holes running long the side.
The squarish metal object that slides back and forth along a bar in front of the platen is the print head about which you spoke earlier. You will see this device rushing from side to side trying to keep up with the information sent by your Atari.
Around the printhead you might find a black cartridge of ribbon. If you haven't installed it, you won't be getting much printing from your printer until you do. This cartridge contains a 20-foot loop of ribbon that is accordion-folded inside.
Installing the cartridge is not too difficult. Hold the cartridge so that the knob and arrow are on top and the ribbon is pointing towards the platen of the printer. Look towards the rear of the cartridge and you will see plastic pins jutting out on either side. If you have an LX, JX or HomeWriter printer, you will find a black plastic platform directly behind the print head. At the rear of the platform you will find hooks under which you must hook the ribbon cartridge pins to secure it. If you have any of the other printers, you will find slots at either side of the printer for hooking the pins. Now level the cartridge into a horizontal position on the platform slipping the ribbon between the printhead and the silver metal facing between it and the platen. You might want to use a pen or a small screwdriver to guide it into position. Turn the knob on the ribbon cartridge in the direction of the arrow a couple of times to seat the ribbon properly and you're all ready to print.
If you have a platen on your printer, you should have a lever at the left side of your machine marked "RELEASE." This is similar to the paper release lever on a typewriter. It controls the amount of friction used to push the paper through the printer. When it is in the back position, the platen pushes the paper through the carriage using friction. This is useful when you are printing on single sheets of paper like letterhead.
When the lever is towards the front in the "RELEASE" position, turning the platen has little effect on feeding the paper through the carriage. This is used chiefly when you are printing with continuous paper that has sprocket holes on the either side. If you plan to use continuous paper, you should definitely acquire the optional tractor unit that fits into the holes in the lid of your Epson printer on either side of the platen.
The tractor unit has gear-like sprockets with pins that fit into the holes on the edges of the paper. These sprockets pull the paper through the carriage and ensure a smooth feed. Tractor-feed sprockets come standard with platenless printers, but are optional on the other printers. It isn't absolutely necessary to use a tractor unit if you wish to use continuous paper, but I have found in using printers like the LX-80 and HomeWriter-10 that continuous paper is less likely to snag if it is used with a tractor feeding device.
I might also mention that if you are using the optional tractor unit you should have the "RELEASE" lever pushed forward to the released position. Trying to use the tractor unit with a friction feed situation can lead to wrinkled and torn paper. The tractor pins are trying to "pull" the paper through while the platen is trying to "push" the paper through. These two forces don't always coincide and can lead to torn paper.
INSERTING THE PAPER INTO YOUR EPSON PRINTER
Before you can do any printing, however, you must insert some paper. You could try printing without, but all of your work would end up on the platen. Have you ever tried putting three holes in a platen and clipping it into your notebook? It's not easy.
It won't matter whether you use single sheets or continuous paper. Threading paper into your printer is the same either way. Be sure that the power is off and the print head is moved into the center of the platen. Push the release lever forward into the "RELEASE" position. Place the straight edge of the paper (it's more difficult if the paper is torn or jagged) into the slot about halfway back. on the top of the printer. With a hand on each side of the paper, press the paper evenly down and around the platen so that it pokes up between the print head and the platen. If you are having problems accomplishing this, try rocking the paper from side-to-side while pushing downwards.
Once the paper has peeked up on the other side of the platen, pull the paper bail away from the platen and thread the paper underneath. Push the bail back towards the platen and the paper will be held firmly against the roller.
If you are using the tractor unit, continue to pull the paper through the roller until the front edge of the paper is about two inches above the pin feed holders on the unit. Open the clips on each of the pin feed holders and try to fit the sprockets into the holes on the side of the paper. You may have to adjust the horizontal position of the pin feed holders to line them up with the edges of the paper. To do this, pull the locking levers on the pin feed holders forward. Place the left holder about 3/4 of an inch from the extreme left position and lock it there by pushing the locking lever back. Leave the other holder unlocked.
Open the clip on the left holder and fit the sprockets into the holes on the left side of the paper. When you have done so, close the clip to secure the paper into place. Now open the clip on the other holder and slide it into a position that will allow you to easily fit the paper holes onto the sprocket. Close the clip on the holder and flip the locking lever back to secure the holder into position.
If you aren't using a tractor unit, flip the release lever back to the friction feed position and you're ready to roll.
There, you're ready.
BRINGING YOUR EPSON PRINTER TO LIFE
"Master, it lives!" The paper's loaded and your Epson printer is ready to go! Let's see what it can do.
The actual explanation of how to put your printer through its paces will be covered in Chapter 4, but you can see it print without even hooking it up to your Atari computer.
Begin by plugging in your printer. Make sure that the power switch on the side of the printer is turned off. If you have a HomeWriter-10 or LX-90, your PIC (Printer Interface Card) must be plugged into the back of your printer but it doesn't have to be connected to your Atari computer.
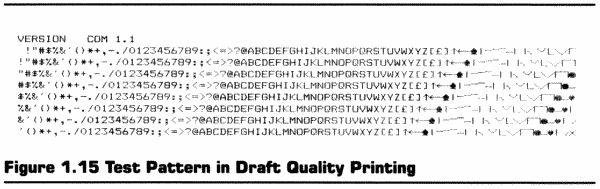
Now find the function button labeled "Line Feed" and press it while you turn your printer on with the power switch. As your printer comes to life, it will click a few times and the printhead will bounce back-and-forth. Suddenly, you will see "VERSION COM 1.1" print across the page and then continuous lines of characters will begin printing. This is the test pattern and it will continue until you turn off your printer.
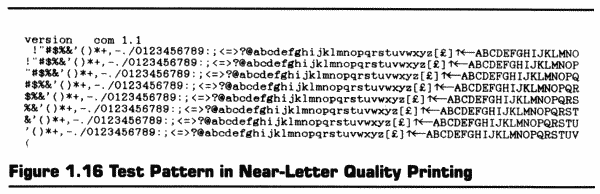
If your printer is equipped with the SelecType feature, you can see this same test pattern in Near-Letter Quality mode. Repeat the process except press the "Form Feed" button while turning on your printer. You'll notice that these characters have a different appearance from the first test pattern.
There you have it! Your Epson printer is more than a pretty box. It's functional too.
Return to Table of Contents | Previous Chapter | Next Chapter