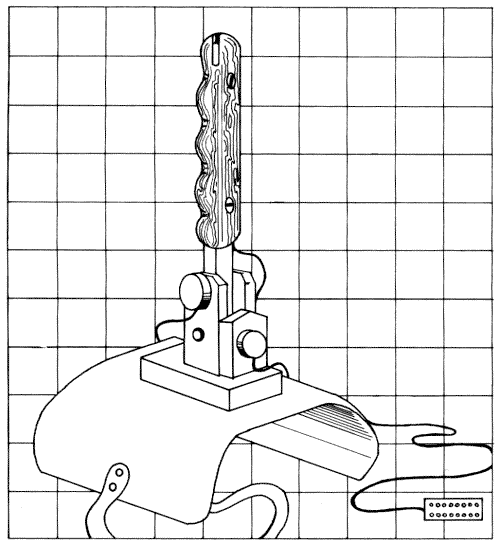
7 Super Stick
Commercial analog joysticks for the Apple and other home computers are powerful
tools for directing a cursor and playing games, but for the most part they
are flimsy units. They don't give the player the sensation of handling actual
machine controls. Super Stick, by contrast, is a much larger device, about
the size of the control stick for a high-performance aircraft. Super Stick
is not quite as fast in response as the lightweight commercial units, but
it has the robust feel of a controller for a real machine.
This chapter gives you construction details for two different
versions of Super Stick. The machined version is the most challenging construction
project in the book, and the finished device is the most elegant. It is the
only design we've included that requires metal machining tools for its construction.
It makes an exciting project for an experienced hobbyist or a student in
an advanced metal shop class. The second version, made from sheet metal and
wood, is not quite as elegant, but it can be built in the home workshop.
The materials for either unit are not difficult to obtain. You should read
through the instructions and decide which would be more appropriate, keeping
in mind your needs and the tools you have available.
CONSTRUCTION OF THE MACHINED SUPER STICK
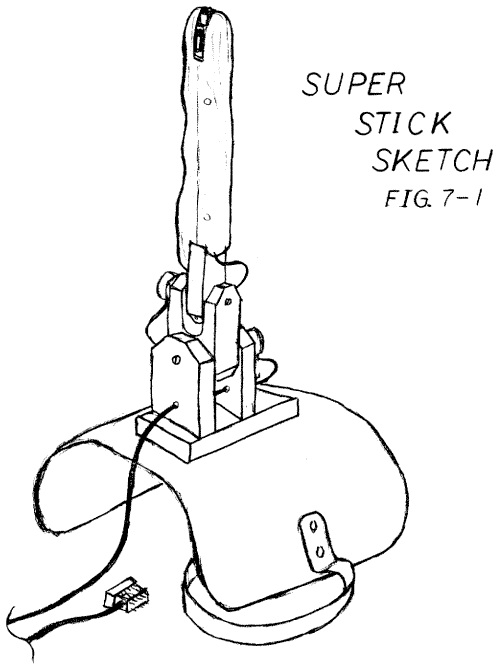
Figure 7-1 is a sketch of the machined version. The hardwood handle contains
two pushbuttons and is supported by a double-articulated wrist that serves
as the mount for the two potentiometers. The upper structure is supported
by a machined base and a sheet metal saddle that straps to the leg.
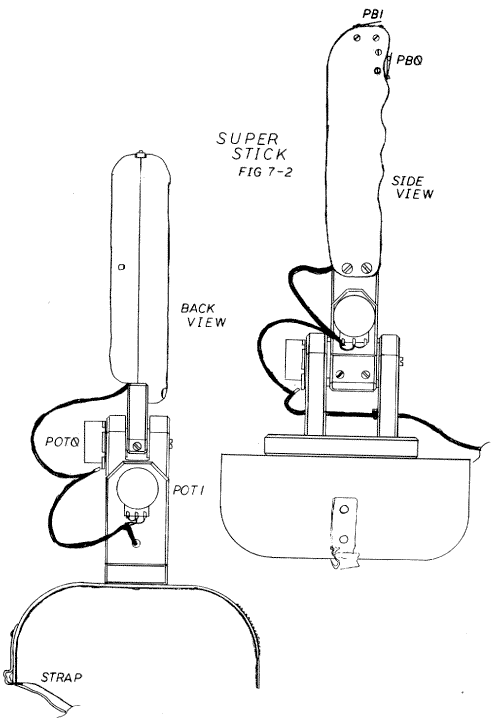
Figure 7-2, in front and side views, gives many more
details of the completed device. It shows the location of the pots and pushbuttons,
as well as details of the pot wiring.
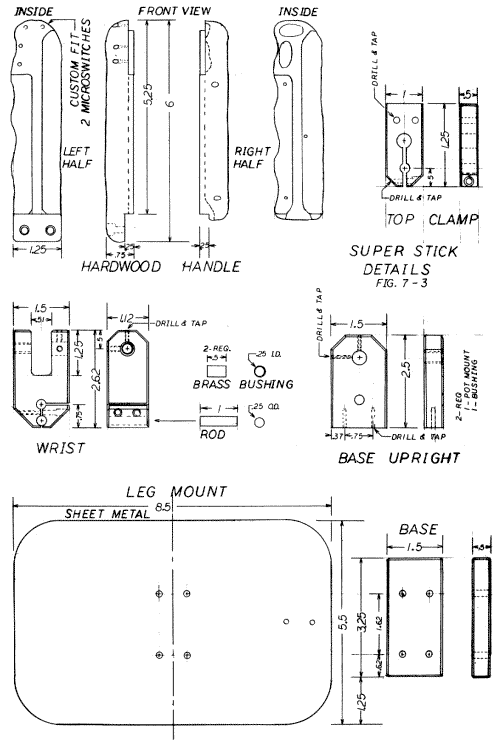
Figure 7-3 provides details of the component parts. The
handle grip is fashioned from two pieces of 6 x 1-1/4-inch hardwood. Walnut
is particularly attractive, but true mahogany also makes a striking handle.
Alternatively, you could use clear pine and paint the handle jet black, to
get a high-tech look.
Cut out the wood blanks with a radial arm or table saw
and then contour them into shape with wood rasps and sandpaper. Counter-sink
three flathead screws (1/2-inch x #4) into the wood to hold the two halves
of the grip together. Then drill the holes for the bolts (1/2-inch x #2)
to mount the pushbuttons and the shaft clamp for the top potentiometer.
The machining attachment for a small metal lathe was
used to work the aluminum for the top clamp, wrist, and two base uprights.
You can use any material that can be machined, including aluminum, brass,
steel, or plastic. By starting with stock a little thicker than 1/2-inch,
we were able to take a slight amount off all the surfaces, thus leaving them
with a decorative pattern of machining marks.
First rough out the pieces with a band saw and machine
them to slightly larger than finished dimensions. Then drill all the holes
and tap the threads that are shown in figure 7-3. Choose the tap size that
is appropriate for available bolts and set screws. Caphead screws set in
counter-sunk holes are best for the top clamp and wrist, while panhead bolts
are best for the leg mount and base.
When you complete the rough work, go back over all surfaces
with a small milling tool on a final shallow pass. This will bring the pieces
down to exact dimensions and leave the characteristic markings. On the prototype,
all edges were beveled off with a power-belt bench sander. You could also
use a fine file for this step.
The brass bushings were cut from 1/4-inch (internal diameter)
hobby shop tubing, but commercial brass bushings with thicker walls would
be easier to machine. You could even machine these bushings from brass stock
on a lathe. The bushings should not spin, so remember to secure them in place
with thread sealant.
Since you may have difficulty obtaining the thicker block
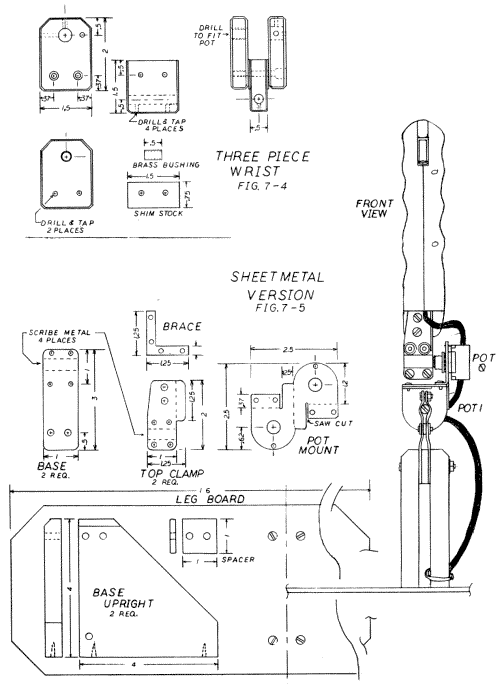
needed for the one-piece wrist, figure 7-4 shows an alternate construction
of the wrist using three pieces of 1/2-inch stock. To insure that the top
clamp piece will move easily between the two uprights, two pieces of shim
stock are required for construction.
The pots will be needed during machining to measure the
exact size of their mounting bushings and shafts. Different manufacturers
vary the sizes slightly. If you do not have the pot when you do the machining,
leave 3/16-inch pilot holes for the time being. Trim the pot shafts to the
correct length and saw screwdriver slots in their ends.
The leg mount for the prototype was cut from 1/16-inch
aluminum sheet and then drilled, using the base as the pattern. Pass panhead
screws up through the leg mount and base and screw them into the two base
uprights. The leg mount was finished with an orbital sander to remove all
tool marks and give a matte finish. You could use a small cup wire brush
in a drill press to obtain the swirled finish found on the cowling of the
Spirit of St. Louis.
When assembling the pot mounts, don't overtighten the
set screws and clamps, since this can crush the pots and make them hard to
turn. Put some sealant like Loctite on the bolt threads to insure that they
don't loosen.
The wood handle requires fine sanding, staining, and
finishing with two coats of polyurethane varnish. After you attach the leg
mount to the base and uprights, bend it to fit your leg. Cover the inside
of the leg mount with cotton felt. Attach a cloth or leather strap to the
leg mount with swat rivets from a leather supply store. Sew a piece of Velcro
to the free end of the strap and glue the Velcro mate to the leg mount with
epoxy.
CONSTRUCTION OF THE SHEET METAL VERSION
Since not everyone has access to a machine shop, we decided to include a
home workshop version of the Super Stick that can be constructed from sheet
metal and wood. No unusual tools are necessary for the project. The result,
shown in figure 7-5, is a solid, attractive device with good, fast action.
The construction of the sheet metal Super Stick is similar
to that of the Sketch Pad (see chapter 4). For the metal work, only a drill,
sheet metal shears, file, and pop rivet gun are necessary. Either hand or
power saws can be used for the wood work.
The metal should be stiff, but thin enough to cut with
hand shears; aluminum or galvanized steel will do nicely. Cut out the six
metal pieces, then round and smooth all edges with a file. Make the two cuts
for the pot mount with a hacksaw.
Hold the metal pieces with vise grips or in a bench vise
while drilling them. To start each hole, strike a point with a center punch,
then drill a pilot hole of about 1/8-inch. Don't drill the pop rivet holes
in the pot mount until you are ready to install the rivets. The two holes
in the pot mount for the spin prevention tabs must be custom fitted to the
pots you choose.
You can make the bends in the sheet metal with a sheetmetal
brake, a vise, or vise grip pliers. Only one of the top clamps needs to have
the large side tabs shown in figure 7-5. The only bends that are difficult
to form are those for the pot shaft clamps in the base and for the top clamp.
Pop rivet the pieces together, then bend open the two pieces and form the
clamp around a 1/4-inch bolt. Using washers on the pop rivets keeps the sheet
metal from bending in the wrong places. The two sheet metal ends of the clamp
should be about 1/8-inch apart with the shaft installed.
Don't worry if you fail in your first attempt to make
the sheet metal parts. Sheet metal is cheap, so discard the piece and start
over. Bend the pot mount in the direction shown in the front view (figure
75). Clamp the predrilled brace in place with vise grips and drill the first
pop rivet hole. Install the rivet, then drill the holes and install the other
three rivets in turn.
Now cut off the pot shafts and saw screwdriver slots
into their ends. Apply Loctite to the pot mounting threads after you complete
the final adjustments.
The handle grips on the prototype were cut from hardwood
scrap with a radial arm saw and then shaped with wood rasps and sandpaper.
The bottom of the handle at the lower end where the top clamp is attached
is a little different than that of the machined version. The notch on the
sheet metal unit cuts both pieces, but the top clamp is screwed to only one
piece of the handle. You can make the inside wire groove and switch cutouts
with a saw or wood chisels.
The leg board and spacer are cut from tempered masonite.
You can make the base upright from any available wood or plywood. The base
should be held together with screws and glue, but the handle is held together
with counter-sunk screws only, since you have to open it up again to wire
the switches. Sand all wood parts and finish them with two coats of polyurethane
varnish.
ELECTRICAL WIRING
The wiring for this project is not difficult since Super Stick is simply
a two-pot joystick with one or two pushbuttons. The pots should be mechanically
superior and long shafted. You will have to cut the shafts to length and
add screwdriver slots, as noted previously. The pots in these units do not
travel through their full 300 degree turn. You can use pots with values larger
than standard for your computer, or you can work with easier-to-obtain pots
with values of 100K and add correction caps as described in chapter 1. (The
standard pot value for the Apple is 150K; for this prototype we used 250K
pots.) You can mount the correction caps on a small piece of PCB in the cable
about a foot from the plug and encase them in foam packing material.
For pushbuttons you can purchase any normally-open,
momentary-contact switches that can be mounted easily on the handle. We used
subminiature lever switches mounted with #2 nuts and bolts. The switches
and bolts came from Radio Shack.
If you choose to install only one switch you will need
only four wires in the cable. The telephone cable noted in the parts list
is adequate. For two switches a 5-wire cable is necessary, and this is harder
to find. You can substitute two runs of the 4-wire telephone cable, which
gives you extra wires to double up the +5 and ground if you use correction
caps.
The best plug for Super Stick is the plug/socket described
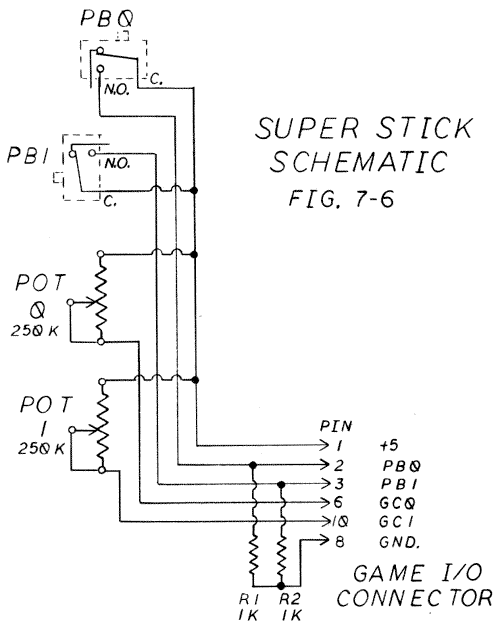
in chapter 3. The pull-down resistors R1 and R2 (figure 7-6) can be mounted
inside the plug. If you look carefully at the pots in figure 7-2 you can
see which outside terminal is connected to the center terminal with a loop
of wire, as indicated in the schematic (figure 7-6).
TESTING AND ALIGNMENT
When you are through with the wiring, check your work against figure 7-6.
Then turn off the computer, plug in your new joystick, and turn on the computer
again. If startup does not proceed exactly as usual, turn the computer off
immediately and recheck your work.
Now run the Controller Checkout program and check the
pushbuttons and pot readings. Adjust the pots by loosening the clamping bolts
and turning the shafts with a screwdriver until you get readings of 128 for
both GC0 and GC1 with the handle straight up. Then retighten the bolts and
move the stick all around. You should be able to get full range readings
(0 to 255) in both axes.
If either axis works backwards to the way you intended,
trade the wires on the outside terminals of that pot and realign the unit.
Now you are ready to run one of your favorite games to test the action of
your new Super Stick. We think you will find game playing a lot more exciting
with a solid controller to grasp.
FINISHING UP
You can lock all the clamp bolts with Loctite or nail polish. The cables
should be securely tied to the pot terminals with dental floss; coat the
terminals with silicone sealant. A dab of sealant on the pushbutton hinges
will help to strengthen them. Secure the cable to the base with a plastic
wire tie.
The leg mount and strap cannot easily be adjusted down
to fit a child's leg. If you prefer, you can mount the machined Super Stick
on a leg board like the one the sheet metal version is mounted on.
| Parts List Super Stick |
||||||||||||||||||||||||||||||||||||||||||||||||||||
|
||||||||||||||||||||||||||||||||||||||||||||||||||||
|
Return to Table of Contents | Previous Chapter | Next Chapter

