8
Missiles
As I mentioned earlier, Atari Player-Missile Graphics was originally designed to simplify the creation of arcade-style games. These games often include little creatures who fire missiles (or bullets) at each other. In this chapter you'll learn to create and animate these missiles. Keep in mind that missiles can also serve other purposes: they can highlight text in graphics mode 0, for example.
DEFINING THE MISSILE IMAGE
There are four missiles available in PMG. All four missiles are stored in a single byte in "missile memory."
- How many bits wide is a single missile? (Keep in mind that a byte is made up of eight bits.)
|
||||||
Let's look at a map of a single byte of the missile memory area:
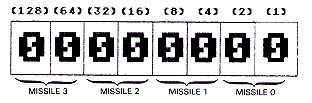
Since this byte has nothing but zeros in it, no missiles would appear on the screen. Now if we wanted to make missile 1 appear on the screen, we might put this binary data into a byte of missile memory:
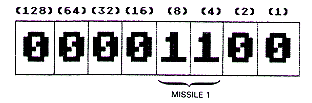
- What would be the decimal number needed to turn on missile 1? (Remember how we calculated those decimal numbers for players? We do the same thing with missiles. The bit on the far right is worth 1; the next bit to the left is worth 2; the next bit to the left, 4; and so on. Each successive bit to the left is worth twice as much as the previous bit.)
|
||||||
- If we wanted a thinner missile 1, what binary data might we use?
|
||||||
So if we wanted a thin missile 1, we might use a decimal 4 or 8 to put the proper binary data into missile memory.
- Ok, try this one. What binary number would you use to turn on missile 0 so that it has full width? What would the corresponding decimal number be?
Binary Number:
Decimal Number:
|
||||||
- Suppose you wanted to turn on both bits of missiles 0 and 1. What binary number would you need? Decimal number?
Binary Number:
Decimal Number:
|
||||||
Ok, so let's say we want to turn on both bits of missile 0. We know that we need to put a 3 into missile memory to do this since a binary 00000011 = 3. But what specifically do we do to code this?
Image String
It's fairly simple. We just create an "image string" similar to the strings we defined earlier. For a missile, a single byte string may be enough. Remember, the more bytes in your image string, the taller the player or missile will be.
Once we have the data in the image string we can easily zap it into the missile memory area at machine language speed. This only works, of course, because we have carefully defined our PMG area with strings.
- Let's call our missile image string MIMAGE$. We need to do two things to set up MIMAGE$: dimension it and then plug in a decimal 3. See if you can write the code to do it. (It will go into your new program as line 11070.)
|
||||||
HORIZONTAL POSITION REGISTER
Let's initialize another variable for the horizontal position register for missile 0. We'll call it HPOSM0. So at line 10060, we add this statement:
HPOMS0=53252
(Note that HPOSM0 ends with a zero, not the letter "0.")
Another minor change to make in SOUNDRUN is the automatic save routine at line 2. Change it to:
2 SAVE"D:MISSILE.SAV":STOP
That way you won't wipe out the previous program when you save this one.
REVISING THE MAIN LOOP
Since we will be using the joystick button to fire missiles, we need to delete line 200 from the SOUNDRUN program. After deleting line 200, renumber line 204 so that it now becomes 200. Line 200 will now read:
200 GOSUB PEEK(JOYSTICK):GOSUB MOVELEGS:GOTO 200
Also, let's delete these pokes from line 30:
POKE S0,X*TONE
POKE DV0,D0
since we won't be including player traveling sounds this time.
- In a moment we are going to add a routine to move our missile. We want line 200 to fall through to this new routine. So what change do we need to make to our new line 200 shown above?
|
||||||
BUILDING A MISSILE MOVE ROUTINE
As you know, we have set up our player move routine so that our player can move in any one of the eight joystick directions (up, down, left, right, plus the four diagonal directions). Wouldn't it be nice if our player could also fire a missile in any one of those directions?
To make this work, let's make a rule that a player must be moving when she fires a missile. Furthermore, the missile will go in the same direction as the player. Now, how do we write the code to accomplish this?
First, we need to identify when the fire button is pressed while the stick is also being deflected from its upright position. If that happens, we will set a variable called MOVE0 to the stick value. For example, if the stick is moved to the left while the fire button is pressed, we will set MOVE0 to 11. (The stick value for left is 11.) Also we will increment an "indicator"--a variable that we will call FIRE0. This variable will help the routine remember that the joystick was pressed. Also, it will serve as a counter. It will count the number of passes that have been made through the missile move routine. We need this because we need to do different things on the first pass through the loop than on successive passes.
- Got all that? See if you can write the code for it.
|
||||||
Of course, Atari won't pay any attention to this fancy indentation. But it does make it easier to read. It's also easier for me to type on my ATARI TEXT WIZARD. This will be line 301. (Yes, there is a line 300. But it will come later. For now just put a REM at line 300.)
Next, we need to be able to jump out of this loop if the fire button was not pressed. We can't just peek at BUTTON0 to decide whether to leave the missile routine because BUTTON0 will return to zero as soon as the button is released.* If we relied on BUTTON0, then on the second pass through the loop our missile would stop.
So we look at FIRE0. If it equals 0 then we know we need to return to line 200. The code would then be:
305 IF FIRE0=0 THEN GOTO 200
*Technical note: there is a way to "latch" the fire button so that location 644 is not reset as soon as the button is released. I find it easier to use this method, however.
Positioning the Missile
The first time through the missile move routine, we need to plop the missile down on the screen "underneath" our player so that when the missile is moved on subsequent passes through the loop, the missile will appear to be coming from him.
- How does the routine detect the first pass?
|
||||||
On first pass through the missile move routine we will also want to:
- Set DIR0 to a number representing the direction we want the missile to move. (Again that will be the familiar joystick value such as 7 for right, 14 for up, and so on.)
- Add 1 to FIRE0 so that on the next pass through the loop FIRE0 will be greater than 1.
- Consider for a moment what the code might look like for doing that:
|
||||||
Note that with this code, DIR0 will be set to the stick deflection value only on the first pass through the loop. Also notice that I set MY0 to Y0+7. That's because I wanted to move the missile down a bit from the player image. Remember that the player image has zeros at the top so she erases herself as she moves down the screen.* I set MX0 to X0+3 because a value of X0 would put the missile at the far left edge of the player image--I want the missile to be hidden "underneath" the player.
*By now you have probably noticed that I sometimes refer to our player as male and sometimes as female. Working with a feminist writer taught me to do this as a way to avoid sexist writing. I hope it doesn't jar you too much. Of course, you might still complain that the player doesn't look at all female--oh well.
Putting the Missile on the Screen
- Now we're ready to put the missile on the screen! We simply erase the data in MISSILES$, POKE HPOSM0 with MX0, and set MISSILES$(MY0) equal to our missile image string. Can you write the code?
|
||||||
Also, we'll need to make these changes:
Add this to line 10060:
HPOSM0=53252
Add line 11070:
11070 DIM MIMAGEO$(1):MIMAGEO$=CHR$(3)
Change lines 13000 and 13010 to:
13000 X0=120
13010 Y0+43
Change line 2 to:
SAVE"D:MISSILE.SAV":STOP
Change line 14000 to:
14000 ? "To fire missile, move joystick and push fire button.":RETURN
Change line 15 so it reads:
15 POP:PLAYER0$(Y0)=LEGS1$:GOTO 300
Delete lines 1000 through 1020.
Now (finally) we're about ready to take a preliminary test run of our missile routine. (Assuming you've typed in all of the preceding lines along the way.) But first, in line 315 change MX0=X0+3 to:
MX0=X0-10
Why? Because I want you to be able to see the missile so you can verify that your routine is working at this point. Otherwise, the missile will be positioned directionally on top of the player and you won't be able to see it. (Remember, the missile is normally the same color as the player it belongs to.)
Also, put a stop at line 340 just to temporarily freeze the action so you can see exactly where the missile appears when you press the fire button.
I've covered a lot, I know. So for your convenience, here is a listing of the new program with the changes circled,
MISSIL1.BAS
Download (Saved BASIC)
Download / View (Listed BASIC)
When your new program is working properly, the missile will appear to the left of the player. That's because we set the horizontal coordinate (MX0) to ten less than the player coordinate. Now that we've got the missile on the screen, let's see about moving it. But first, go back and change line 315 so it says MX0=X0+3.
Moving the Missile
Now let's get on with animating that missile. For now, delete the TRAP statement from line 1. Now, remember lines 5 through 15? Let's review. We used them to adjust the coordinates for the player's position. If the stick reading is 7 (right), then we GOSUB 7. Line 7 is a "minisubroutine" that increments X0 and immediately returns. We can use that same approach to move our missiles. To do that; we will write a similar routine that starts at an offset of 60 from the first one. That is, instead of beginning at line 5, our new missile subroutine will start at line 65 (5+60). Instead of adjusting X0 and Y0, we will adjust MX0 and MY0, the missile coordinates. Here is the complete missile coordinate adjustment routine:
65 MX0=MX0+MS0:MY0=MY0+MS0:RETURN
66 MY0=MY0-MS0:MX0=MX0+MS0:RETURN
67 MX0=MX0+MS0:RETURN
69 MX0=MX0-MS0:MY0=MY0+MS0:RETURN
70 MX0=MX0-MS0:MY0=MY0-MS0:RETURN
71 MX0=MX0-MS0:RETURN
73 MY0=MY0+NS0:RETURN
74 MY0=MY0-MS0:RETURN
Notice that we are now using MS0 to increment or decrement our missile coordinates. (MS0=Speed of Missile 0.)
In addition to the above lines, we will need these lines in our missile move routine:
320 IF FIRE0>1 THEN GOSUB DIR0+60
449 GOTO 200
- According to line 320, where will control pass if the joystick is pushed forward? (Hint: the number 14 is returned when you push the stick forward.)
|
||||||
What happens at line 74?
|
||||||
Let's try it. In summary:
1. Add lines 65 through 75 above.
2. Add line 320.
3. In line 10060 initialize MS0 to 6 (MS0=6).
4. Delete line 340.
5. Add line 499.
6. Delete the TRAP statement from line 1.
Then, save and then run the program. If all went well, your player can now fire the missile in any one of six directions!
ERROR ROUTINE
Having played around a bit firing missiles, you are probably tired of seeing that error message pop up. You know, the one that comes up every time you fire a missile off the screen. That's fairly easy to fix. Let's write an error correction routine for it.
Once again, let's begin our program with a TRAP statement at line 1:
1 TRAP 3000:GOSUB 2000:GOTO 200
Whenever an error occurs, program control will branch to line 3000. I've used a high line number so that the trap routine is out of the way of our main loop. Now when an error occurs, control will pass to an error correction routine at line 3000. The error correction routine will check for various error conditions and then correct them. I know, we did this in a previous chapter, but this time the correction routine will be a bit more detailed.
First, let's handle the situation where the player moves off the screen too far to the right. Horizontal coordinate 210 is just off the screen to the right. So if the X0 coordinate is greater than 210 let's reset X0 to 210. The statement IF X0>210 THEN X0=210 will do that nicely.
In the same way we can reset the other X0 and Y0 values if they move too far off the screen. Like this:
3000 IF X0>210 THEN X0=210
3010 IF X0<39 THEN X0=39
3020 IF Y0<1 THEN Y0=1
3030 IF Y0>128 THEN Y0=128
In addition, we need to reset the leg movement counter Z. We can do that with the statement Z=0. Let's add it at line 3035:
3035 Z=0
That takes care of our player. Now she can hide off the screen--even move around off-screen and then come back.
Let's fix the missile, too. Here's a simple way to do it for now: reset the X0 and Y0 coordinates whenever an error occurs. Reset them to what? Well, let's simply reset them to the player's coordinates, like this:
3040 MX0=X0:MY0=Y0
Also, we need to turn off the missile sound when an error occurs. We can do that simply by setting D1 to zero:
3050 D1=0
Next, we need to turn off the missile routine, so it doesn't continue to adjust the MX0 and MY0 coordinates. We do that by setting FIRE0 to zero:
3060 FIRE0=0
Finally, we need to include another TRAP statement so that if another error occurs control will once again return to line 3000. Then we can jump back to line 300 in the main routine:
3080 TRAP 3000:GOTO 200
Add these lines. Then you'll be able to fire missiles from an ambush position--while the player is hiding off the screen!
Our missile move routine is now pretty much finished. But let's add a few embellishments. First, let's add sound to the firing of the missile.
Add line 300 as follows:
300 POKE SD1,P1:POKE DV1,D1
At line 10070 initialize P1, D1, SD1, and DV1 as follows:
P1=10 (Pitch for sound)
D1=0 (Distortion/Volume)
SD1=53762 (Pitch Register)
DV1=53763 (Distortion/Volume Register)
Also, remove the RETURN from line 10060 and put RETURN at line 10900. Now we can use variable D1 to set the volume of our missile sound. A good place to do this is on the first pass through the missile loop. If we set the volume to maximum on the first pass and then decrement it on each successive pass, we can create an explosive type sound that gradually fades away. We can set the volume to maximum by writing D1=15.
- Where would be a good place to insert that statement?
|
||||||
Now we still need to decrement D1. Let's do that at line 330. We can decrement D1 easily enough with D1=D1-1. But that's not enough, because that way D1 will eventually become a minus value and we will get an error message.
- How can we avoid that? Write the code.
|
||||||
Add line 330. Save the program and run it. You will now hear an explosive sound whenever you fire a missile.
MISSILE SIZE REGISTER
Now let's play with the missile size register. That's a register that lets us instantly increase or decrease the width of a missile. We can set a missile's size to normal, double, or quadruple width. The missile size register, at location 53260, controls the size of all missiles.
Here's a chart showing the proper numbers to poke in for various missile sizes.
|
Missile Number 0 1 2 3 |
Normal 0 0 0 0 |
Double 1 4 16 64 |
Quadruple 3 12 48 192 |
Important: if you want to set the size of two or more missiles at once, then add the proper values for each missile depending on the desired size. Then poke the total into location 53260.
For example, to set missile 3 to quadruple size and missile 1 to double size, you would poke 196 into 53260. (192 gives quad size for missile 3, and 4 gives double size for missile 1. We get 196 by adding 192 and 4.)
- Suppose you wanted to set missile 0 to quad size and missile 1 to double size? What number would you poke into 53260?
|
||||||
- How would you set missiles 0 and 1 to double size?
|
||||||
To make our program easier to read, let's set up a variable called SIZEM (size of missiles) at line 10070, like so: SIZEM=53260.
We can create a nice effect by poking a random number into SIZEM. First (also at line 10070) let's set up a variable called RANDOM: RANDOM=53770. Location 53770 is constantly being updated by Atari's operating system with a random number. So a quick way to get a random number is to "peek" into location 53770.
- Write a statement to poke a random number into the size register for missiles.
|
||||||
Try it. Be sure to initialize SIZEM and RANDOM at line 10070. Then add POKE SIZEM,PEEK(RANDOM) to line 300.
You'll now see the missile randomly expand to various widths as it sails across the screen. Notice the different effect produced by firing the missile vertically versus firing it horizontally.
COMPLETE LISTING
Here is a complete listing of the missile program that we have developed in this chapter. Again. I have circled the lines that are to be changed or added. Be sure to save it to disk or tape. You'll need it. Remember, each chapter will build on the previous program in some way.
In the next chapter, you learn how to create single-line resolution PMG!
MISSIL2.BAS
Download (Saved BASIC)
Download / View (Listed BASIC)
Return to Table of Contents | Previous Chapter | Next Chapter