Chapter
5
Word
Processing
Applications for the Household
Perhaps the most versatile application of your Atari computer and Epson printer computer system is word processing. This is the application which can most greatly change your lifestyle because you'll find that almost everywhere you have been using a pen or pencil to accomplish a task, you can use a word processor with results that look neater and more organized.
In this chapter, I'll discuss how you can use your computer system creatively to write letters or help your children write their own stories. You can use it productively to create a shopping list or a list of things to do. You can even use it to publish your own newsletter. The list of uses for word processing is as endless as the list of things you can do with a pencil and paper.
WHAT IS WORD PROCESSING?
Perhaps I should start with a brief explanation of word processing. In simplistic terms, word processing is a form of an electronic typewriter. You can sit down to your Atari computer, press some of the keys on the keyboard and the corresponding characters will appear on the screen. Through this process you can create letters, lists, reports and even books.
Notice, however, I said that the characters appear on the screen and not on a piece of paper. The most important difference between using a typewriter and a word processor is that when you type a word it is not written on a piece of paper but rather placed within the memory of the computer. The advantage is that words on a word processor can be changed, added, deleted and even moved without having to worry about erasing, scratching-out or painting your paper with correction fluid. Where a typewriter is an instrument for producing a finished product, a word processor is a tool for developing that product and molding it into its finished form. You might say that writing with a word processor means "never having to say your sorry."
Is your Atari computer a word processor? No, it is not. It is a microcomputer. But it can be instructed in how to work like a word processor through a word processing program like Atariwriter, PaperClip, Bank Street Writer or any of a number of word processors developed for the Atari computer. When these programs feed their instructions into your Atari computer, it can act as a word processor.
It isn't the intention of this book to teach you how to use a word processor. It is, however, the intention to teach you to use a word processor in such a way as to utilize your printer to its utmost capability.
Your Atari computer and Epson printer computer system is much more versatile than the conventional typewriter. It joins the ease of word processing with a large variety of print styles. For fast print, you may use the Draft Dot-Matrix style. Formal correspondence can be given a professional look with Near-Letter Quality. Expanded letters make titles. Compressed letters can provide the fine print of contracts. You can even use Reversed print when you want to make a line stand out. It's like having five typewriters in one.
Invoking these type features is almost as easy as pressing a button. Some of these typestyles are available through the SelecType feature of your Epson printer while others can be controlled directly through your word processing program.
The SelecType fonts have already been discussed in the last chapter, so I won't spend time re-explaining how to use them. They are controlled directly from your Epson printer and run independently from the software running on your Atari computer.
Some of the printing typestyles can be controlled directly from your word processing program through special coding. There are many word processors on the market for the Atari computer, but for purposes of demonstration, I will be referring to the two most popular word processors for the Atari computer, Atariwriter by Atari and PaperClip by Batteries Included.
CONTROLLING YOUR EPSON PRINTER THROUGH A WORD PROCESSOR
Controlling your Epson printer through a word processing program is accomplished by proceeding a line of text, such as a title, with specific codes which tell the printer that the following letters are to be typed in that specific form. It is also necessary to end this line of text with a specific code to tell the printer to return to the standard mode of print.
For example, refer to the printer control characters discussed in Chapter 4. Imagine that you are creating a paper entitled "Controlling Your Epson Printer" and want to begin it with a title printed in expanded print. This may be created with a line that looks like this:
CHR$(14)
Controlling Your Epson Printer CHR$(15)
The CHR$(14) at the beginning of the line sets your printer into the expanded mode. The printer then prints the title in expanded letters. Finally, the CHR$(15) returns your printer to the standard mode for printing the rest of the paper.
This is how your title will appear:
![]()
The actual way in which you signify these printer codes will vary from word processor to word processor. Atariwriter's system for sending control codes to your Epson printer varies from that used by PaperClip.
These are some examples of how these word processors would create the same effect:
Atariwriter:
SELECT
E Controlling Your Epson Printer SELECT E
The SELECT E represents pressing the SELECT key and the E key simultaneously. This switches your Epson printer into the expanded mode (called elongated mode in Atariwriter). The printer is then switched back into the standard mode of ten characters per inch by pressing SELECT E at the end of the line.
Using this method of sending control codes, Atariwriter will allow you to set four styles of printing.
(CTRL)G 1 Standard print (10 cpi)
(CTRL)G 2 Compressed print (17 cpi)
(CTRL)G 3 Proportional spacing
SELECT E Expanded mode
(CTRL)G 2 Compressed print (17 cpi)
(CTRL)G 3 Proportional spacing
SELECT E Expanded mode
If you are using an Epson printer, you may find the SELECT E to be inoperational. If this is the case, use (CTRL)G 3 instead of SELECT E to induce the Expanded mode.
You may have difficulty making Atariwriter communicate with your Epson printer. This is because it needs some additional instructions to know what to send to produce the various styles of type. There are programs like the Print Driver Construction Set-for Atariwriter from the Atari Program Exchange which allow you to configure Atariwriter to your Epson printer.
PaperClip:
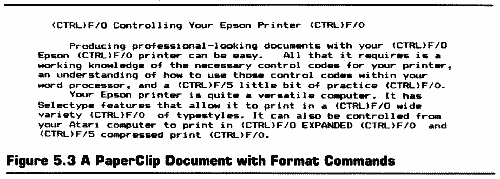
(CTRL)F/O
Controlling Your Epson Printer (CTRL)F/0
The (CTRL)F indicates that you want to set the Print Pitch. To set the pitch at five characters per inch (Expanded mode), you must select the (O)ptional pitch which is defined as 5 cpi. At the end of the line, you press (CTRL)F to enter the Print Pitch selection mode again. Now you want to return to the standard 10 cpi printing mode. Press 0 (zero) to indicate you want 10 cpi.
PaperClip allows much more variety in printer output than Atariwriter. Using the already identified control codes for the MX80 and FX-80, you can print in Bold Face, Italic, Underline, Superscript, Subscript, as well as the already explained print pitches.
(CTRL) B Bold Face
(CTRL) I Italic
(CTRL) U Underline
(CTRL) S Super/Subscripts
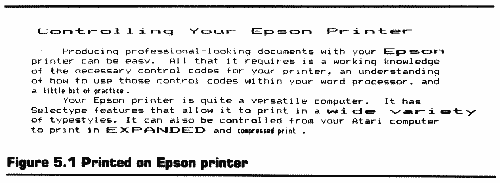
Printed on the Epson Printer
Controlling Your Epson Printer (Expanded)
Producing professional-looking documents with your Epson printer can be easy. All that it requires is a working knowledge of the necessary control codes for your printer, an understanding of how to use those control codes within your word processor, and a little bit of practice.
Your Epson printer is quite a versatile computer. It has SelecType features that allow it to print in a wide variety of type styles. It can also be controlled from your Atari computer to print in EXPANDED and compressed print.
This is how this document would appear when typed into the Atariwriter word processor:

This is how it would appear when typed into the PaperClip word processor:
INTEGRATING SELECTYPE FEATURES WITH A WORD PROCESSOR
Integrating the SelecType feature with your word processor can be a bit more complicated. It is best explained on two levels.
The first level of using SelecType with your word processor entails simply setting your desired print style and then printing a document. It is the same process as explained in Chapter 4. Prepare your document, set SelecType for the desired type face, and start printing.
The second level of using SelecType with your word processor is a bit trickier. It involves mixing fonts on the same page. This can produce pages that are interesting to see as well as easier to read. It takes a bit more work, but the results are worth it.
MIXING TYPE STYLES WITH SELECTYPE
Mixing type styles on a page using SelecType involves a three-step process. You must first stop the printer at the point where you wish to change the print mode, then you must reset the SelecType controller to the desired type style, and finally you must restart the printer until the next change is needed at which point the process is repeated. This may sound cumbersome at first, but once you master a few tricks it should be as easy as falling off of a platen.
Let's suppose you have a document which you want to print in NLQ type style, but in the center of the page there is a paragraph you would like in compressed mode. Begin by setting your printer to NLQ style printer and then start your printing.
Your document will begin printing in the NLQ mode. But you want to change the type style halfway down the page. This means you must stop the printer before it reaches that point so that you may change the setting. Watch carefully, and when the print head reaches the correct spot, press the On-Line button. This will cause your printer to stop. Once stopped, your printer is ready for more instructions. This way is effective but not always accurate.
A more efficient manner for stopping your printer at precisely the correct spot is to include a command within your document. This command will tell your computer to stop sending information to your Epson printer when it reaches that point and wait for further instructions. Some word processors even allow you to insert a message which will appear on the screen reminding you of what must be done when the printing pauses.
Thank goodness for little favors...
As with all printer control commands, telling your printer to pause is accomplished differently with different word processors. Atariwriter doesn't provide this capability, but PaperClip uses the command:
(CTRL)Z W
Place (CTRL)Z W in your document where you want to change print settings. Your printer will stop and wait for you to make the necessary changes before you start it off again by pressing the START key.
Once you've stopped the printer, you must reset the settings. This process would be quite impractical and in some cases impossible if resetting the printer could only be accomplished by turning your printer off and then on again. Most word processors discontinue sending information to a printer after it realizes that the printer has been turned off.
Have no fear!! There is another way.
The SelecType feature is equipped with a reset capability. While the other SelecType options are set by pressing the On-Line button a specified number of times, the reset function is activated by not pressing the On-Line button at all. This means that you turn SelecType on in the usual manner but instead of selecting a print function by pressing the On-Line button, press the Form Feed, and then the Line Feed buttons to erase any SelecType setting that is presently in the printer. Pressing the On-Line button then brings your printer back On-Line.
To reset the SelecType feature on your Epson printer:
1) Press the On-Line and Form Feed buttons simultaneously. This will cause your printer to beep.
2) DON'T select a print function by pressing the On-Line button.
3) Set the function by pressing the Form Feed button once.
4) Press the Line Feed button once.
5) Press the On-Line button one last time to put your Epson printer back on line so it may communicate with your computer.
Once you have reset your Epson printer, you can then set it to the SelecType printstyle you desire for your document. In our imaginary case, you would then set the SelecType function to the compressed mode. Your document would then print in compressed mode until it reached the next Pause command where you could return it to NLQ printing.
WORD PROCESSING APPLICATIONS AROUND THE HOUSE
Letters
The most obvious use for a word processor around the house is writing those formal letters that you have to type to insurance companies, creditors, colleges and even to Jeffrey's teacher excusing him from missing school. You need a professional-looking letter, flawlessly typed, without typing and re-typing and re-re-typing.
The nature of word processing makes letter writing a breeze. Composition and correction is easier and your Epson printer will give it a truly finished look. Yet, there is even another facet where you can use your Atari computer word processor to make correspondence easier.
The format of a formal letter includes a heading (return address), inside address (mailing address), salutation, body of the letter, and closing. The heading, salutation, and closing are basically the same on every letter. Imagine the time you could save if you could use a form for writing these letters where you just have to enter the mailing address, addressee's name and the body of the letter.
It's possible to create such a form for letter writing using your word processor. Figure 5.4 shows such a form.
This is a form that you can use to create your formal letters. Notice that in the upper-right corner is the heading which will be the same in every letter you write. Directly below the heading is the date. When you write the actual letter, you can type right over the word DATE. There are three Xs on the left margin. Since the inside address is different with every letter, these Xs indicate its location. The salutation follows with space for the first name of the addressee. The closing and signature name are included at the close of the letter since they remain the same.
Use your word processor to create this form (modifying it to reflect your name and address). Then save it on a data disk or tape under the name FORMAL LETTER. You now have a form for writing formal letters.
To use your form, load FORMAL LETTER into your word processor. Enter the date, inside address, and first name of the addressee. Then write your letter. When you have completed your letter, save it on your data disk or tape under another name like INSURANCE LETTER. This will save your new letter as well as retain your form in the file entitled FORMAL LETTER.
1m10:rm70
256 Sunset Avenue
Formal City, California 91100
*DATE
*RECIPIENT
*ADDRESS1
*ADDRESS2
Dear *RECIPIENT
Sincerely,
John P. Borkus
Figure 5.4 Letter Form
You may wish to use this same procedure to create different letter forms for different purposes or for people you contact often. Either way, you will find that using letter forms with your Atari/ Epson computer system will make your correspondence easier and more productive.
Personal Letters
Although business letters are expected to be typed, I've found many people actually take offense to receiving a personal letter in typewritten form. I guess there is something a little more personal when you know that the sender has spent the time to take pen-in-hand to write a letter. Then there are those of us who are simply more comfortable writing with a keyboard. With some help from your Epson printer and Atari computer, there may still be hope.
The main complaint about typewritten letters is the lack of personal care. Using what you've learned about the many type fonts available with your computer system, you can give quite a personal touch to your letters. Here is an example of a letter with "That Extra Something."
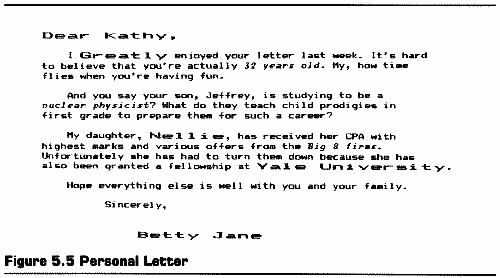
By the way, word processing is also a great tool for catching up on those dozens of letters you owe your friends. Write a basic letter talking about what's been going on in your life lately, and then save it to diskette. Then change the heading and rewrite the first paragraph to give it the personalized touch. When it's complete, save it to disk or print it out and start on your next letter. It's an efficient way to make a repetitious task manageable.
Creative Word Processing
Word processing is also a good tool for creative writing. It frees you from worrying about making a mistake and allows you to express yourself. You can do a little poetry, write a story, even keep a diary. What better way to illustrate life's up and downs? Shout about your good times with Expanded print and diminish your failures with compressed type.
Word processing is an ideal system for helping your son or daughter express themselves as well. More will be covered about using your Epson printer system to create school reports later in this book, but sitting your child in front of an Atari computer keyboard may yield pleasant surprises.
Have you ever noticed that your children seem to have a continual stream of talk. They have thoughts on everything and express them freely-with or without prompting. But when you place a piece of paper in front of them and ask them to write about something, they immediately complain "I don't know what to write!!"
The reluctance to write is often founded more directly upon a fear of writing words on paper than a lack of ideas. Ask a child to tell you a story and you'll find an imagination full of ideas. Children find the spoken word an easy tool for self-expression. They have spent a lifetime building their skills in speaking and if they make a mistake, they can easily correct themselves and continue.
The written word, on the other hand, is not as easy to manipulate. When a word is written down, it's no longer an abstract unit of meaning. It is a physical "thing" that must be dealt with in the physical world. It cannot be easily changed or modified. It must be erased or crossed out. Erasures and cross-outs make a messy paper. Kids don't like messy papers so they feel impelled to rewrite them. Rewriting is a long, laborious task. No one likes laborious tasks so it's just easier not to write in the first place.
Using a word processor to write stories can eliminate much of the fear. Words of light on the computer screen are easier to manipulate. They can be changed, moved or deleted without leaving a mess. Rewriting is no longer a problem. Instead of a laborious task, it is now a continuous process of molding the text until it is composed to the liking of the author.
The word processor can even be used with youngsters aged four through seven. These kids have lots to say but they don't have the writing skills and, in some cases, the fine motor coordination to write stories with a pencil and paper. This is where you, the parent, can help nurture their creativity.
An excellent way to build excitement and enthusiasm in storytelling/writing for youngsters is to have them tell you stories. Make it into a game. They tell you a story and you listen intently. It will be slow at first, but after a few sessions you will be surprised at the active imaginations your kids possess.
When your child is comfortable with telling you stories, start entering them into the word processor as he speaks. This will allow him to concentrate on the story while you worry about transcribing it into written form. You won't find your child lacking in storylines.
Once you've immortalized your child's story in your word processor, you can print it out and share it with the young author.
Use the expanded mode when you print out the story. This will make it easier to read for your child. Because expanded type is twice as wide as standard type, you will only be able to print a maximum of 40 characters on a typical 8 1/2 x 11 inch sheet of paper.
Now use this printout to help your child make a book. Cut out the sentences and glue one on each page of a picture book. Have your child draw a picture to go on each of the pages.
Here are a few hints for making this process successful:
1) Set your margins for 40 characters.
2) Press RETURN at the end of each line. This will ensure that your lines aren't restructured by word wrap.
3) Print out the story double-spaced.
4) Limit the text to about one sentence per page.
5) Read through the book with your child several times before he starts illustrating the sentences.
After your child has completed his pictures, read it through with him again. This will become HIS (or HER) book. It may replace the bedtime story books. You may find him reading it to himself when he is alone.
You will probably find that your child is memorizing the story instead of reading it word-for-word. This is OK. A large part of reading is memorization.
If your child is interested in learning the words in his story as individual words, it would be helpful to make a list of the words used in the story. Use this list to make "flashcards" of these words. An easy way of doing this would be to use the Label Maker program listed in Chapter 6. Print labels in expanded print and affix one to each of a pack of 3" x 5" index cards.
Take these words and place them into a shoe box for your child. This will be HIS (or HER) collection of words from HIS (or HER) story. You won't need to force him to learn the words. This sense of possession will make reading a matter of pride rather than drudgery.
Making Lists on Your Epson Printer
Your word processor and Epson printer make a dynamic duo when it comes to organizing your life. The best way to ensure that you accomplish all the tasks that you set out to do is to work from lists. You need a list of "things to do," "things to buy," "places to go," and "people to see/pick up." The task of making these lists is a simple one, but organizing your day from these lists can mean copying and recopying your lists until they're legible and in a form that you can use.
Creating those lists on your computer system can alleviate both of the problems you confront when you create a list the "Gettysburg way" by scribbling them on the back of envelopes. First of all, they are legible. Every list is typewritten so you won't find yourself buying nine loaves of bread instead of four because you couldn't read your writing. Secondly, they're easy to reorganize. Instead of crossing out and recopying, you may create each list only once by making all of your changes before you print it. If further changes are required, it's a matter of making the changes and then producing another typewritten copy instead of having to handcopy the complete list again.
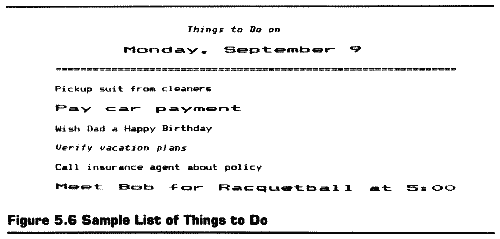
Things to Do
Creating a list of things to do can be done in ten minutes, but it can save you a couple of hours a day in misdirected activity. Use your computer system to create your list and you'll save even more time.
The best way to start a list of things to do is by sitting down to the keyboard and typing anything that comes to mind. Many people waste time trying to think of tasks in specific order and forget other tasks in the process. By using the method of free association, you allow your mind to flow and have a greater chance of remembering things on the first pass through.
List each of the tasks as they come to mind. Nevermind the order. Place each on a separate line. When you have completed your list, begin to prioritize the list in your mind. This list of priorities should help you decide the order in which things must be completed.
Now use your word processor to move the tasks into order. This is the order in which you will be completing them during the day. When you have finished, review it again and adjust anything that is still out of order.
Some of your tasks are more important than others. Include before each of these the printer control code to print them in expanded print. This will make them stand out and will help assure that they will be completed.
Now print out the list on your Epson printer, stick it in your pocket and prepare yourself for a productive day.
The possibilities with word processing are almost limitless. I have only touched upon a few possible uses in this chapter but you will develop your own as you become more familiar with it.
The next chapter will discuss using your computer system around the kitchen. It's quite a time saver for making labels, shopping lists, recipe cards and the like.
Return to Table of Contents | Previous Chapter | Next Chapter