5 Homebuilt Atari Joysticks
In this chapter we are going to look at some homebuilt joysticks for the
Atari and Atari-compatible systems. We will describe two different designs
for Atari joysticks: one is similar to the commercial unit, but the other
is a new type of joystick that can be customized for individual hand fit
and high-speed action. We will also include the electronic circuit needed
to wire these Atari joysticks for use on an Apple computer.
THE ELECTRONICS OF THE ATARI JOYSTICK
The Atari joystick is simply a collection of five normally-open, momentary-contact
switches. These five switches allow the computer to detect a movement in
eight directions and to read the input from a FIRE button. The four switches
which control direction are paired so that only one switch of each pair can
be pressed at a time. One pair controls up or down on the screen, the other
pair controls left or right. These switches are paired by mechanical linkages
rather than by electrical circuits. The fifth switch, the FIRE pushbutton,
is mechanically independent of the others, but all share one common electrical
conductor.
This construction is completely different from that of
Apple-type joysticks, which feature two lever-controlled variable resistors.
The Apple joysticks are analog input devices, having many values over their
range, while the Atari type are digital, with only a few discrete input commands.
In an Atari-type joystick you need precise control so
that you can give an exact command every time, good feel so that your hands
don't tire, and, above all, speed. Another helpful feature, but one that
most commercial joysticks for the Atari lack, is tactile feedback, which
means that there is a definite sound and feel when electrical contact is
made. The joystick should also have good mechanical strength to insure long
life, since it will see heavy use.
Most commercial units for the Atari do not meet the above
requirements. They are often awkward to hold, particularly for lefthanders;
it is difficult to tell when contact is made, and handle movement is limited
and rubbery. We think you can obtain a far superior joystick if you build
your own. Constructing an Atari-type joystick may seem to be a somewhat mundane
exercise, but working out the details of precise, rapid hand movement makes
this task an excellent lesson in man/machine interface.
FEATURES OF TWO HOMEBUILT UNITS
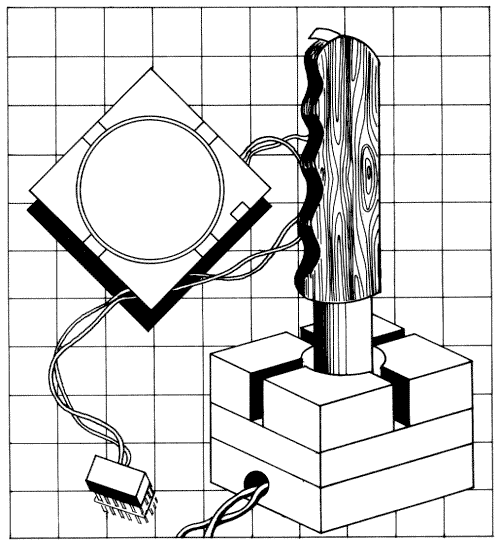
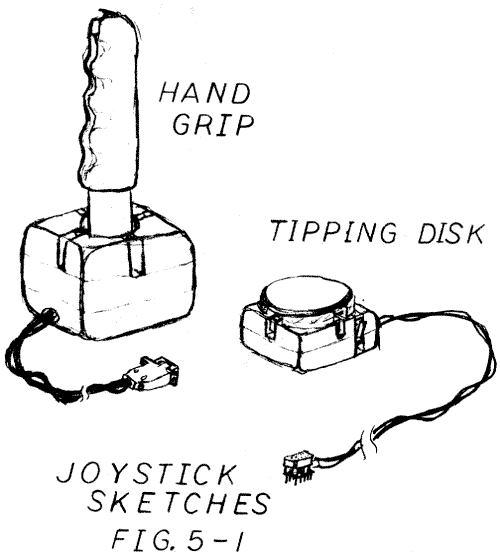
Figure 5-1 shows sketches of two joysticks for the Atari. Each unit is constructed
from a block of hardwood in which the switches and wiring are. embedded.
The hand grip joystick, like the standard unit, is used by holding the block
in one hand and the grip in the other. The FIRE button on top of the handle
will feel natural to most players. The weight of the homebuilt unit improves
the feel, and the switches click to give you tactile feedback.
To operate the tipping disk unit, you hold the block
in one hand and work the FIRE button with the index finger of that hand.
(Your index finger can press a button more quickly than your thumb.) With
the finger tips or palm of your other hand you press the disk to direct the
movement. With the tipping disk joystick, the player controls the computer
with hand movements that are quite different from those of the conventional
units.
CONSTRUCTION OF THE HAND GRIP JOYSTICK
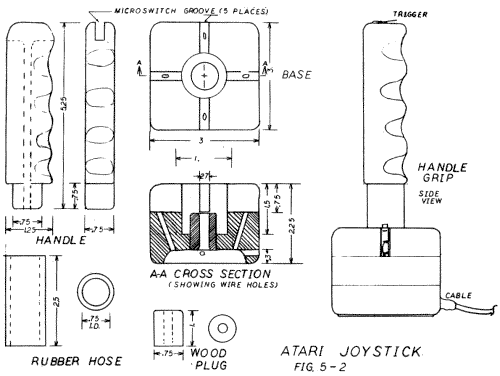
Figure 5-2 presents a side view of the component parts of the hand grip unit.
The base is a hardwood block that you make by gluing three ¾-inch
thick boards together. We used oak for all the wooden parts of the prototypes,
but any attractive wood free from cracks and large knots will do as well.
You could use clear pine, but the finished unit will not be as strong or
good looking.
Cut the microswitch grooves with a dado blade in a table
or radial arm saw (or use a router or handsaw). Since it is somewhat difficult
to cut grooves in this small a block with a power saw, you might want to
start with three 14 by 3-inch boards. Apply carpenter's glue and clamp them
together. Drill the large holes and cut the microswitch grooves for four
blocks into the one large piece. This accomplished, you can then saw the
large piece into four blocks. This is easier than trying to work with a small
block and scarcely increases your cost. If you want to make only one joystick,
choose the best of the blocks and discard the others.
Cut out the large central hole with a hole saw in an
electric drill or with a large adjustable auger bit in a brace. It is easiest
to do this before the grooves are cut.
The rubber hose shown in figure 5-2 serves as a flexible
joint. It is the type used for automobile heaters and was purchased at an
auto supply store. Other types of hose might be used if they are springy
and not too stiff. Size the wood plug and the base for the hand grip for
a snug fit in the hose.
The hand grip was cut from a single piece of 3/4-inch
thick lumber. With a wood rasp, contour the front of the grip to fit the
fingers of your hand. The microswitch groove was cut with a small handsaw
and a 1/4-inch wood chisel. If you prefer, you can move this switch to the
front of the grip so that you can operate it with your index finger rather
than your thumb. The hole down the middle for the fire button wires was drilled
with a 1/4-inch paddle drill.
Drill the hole for the wood plug and then carve out part
of the bottom of the block to make a cavity in which to place the wire connectors.
Glue the plug in place. For the wire of each microswitch drill a 3/16-inch
hole; drill a slightly larger hole for the main cable. All of these holes
lead to the bottom cavity.
Rasp off the outside corners of the block. (The amount
of rounding off you choose to do is one aspect of customizing your unit.)
Sand all surfaces smooth, taking special care with the hand grip. The best
finish for the wood parts is two coats of polyurethane varnish.
CONSTRUCTION OF THE TIPPING DISK JOYSTICK
The construction of the tipping disk is much the same as that of the hand
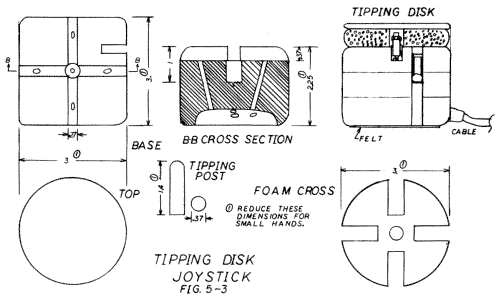
grip unit. If anything, the tipping disk is easier to build. Figure 5-3 shows
details of the parts. Cut out the three pieces of hardwood and glue them
together. As noted before, it is easier to make several blocks at once and
cut them apart later. Drill the 3/8-inch central hole and cut the microswitch
grooves, following the instructions for the hand grip unit.
The groove for the FIRE button is on the side of the
block; in figure 5-3 it is shown for right-handed players. The right or left
hand orientation of the unit is set when you cut this groove and the hole
for the main cable. To properly locate the groove, hold the partially finished
block in your hand and find the most comfortable place for your index finger.
Drill the holes for the wires and the main cable and
chisel out the bottom compartment as before. Round off all outside corners
until the unit rests comfortably in your hand and sand all surfaces smooth.
The tipping disk itself is made of masonite or other
thin material. It can be any diameter that suits you, either larger or smaller
than the base block. Cut it out with a coping saw, and round off and smooth
the edges. The disk and the block should be finished with polyurethane varnish
before you begin wiring the unit.
The tipping post is a short piece of 3/8-inch dowel,
one end of which is rounded. The exact height of the post and shape of the
rounded top affect the feel of the finished joystick, so it is one of the
key elements for personalizing the unit. Do not glue this piece into the
block until you have tried the action and then shaped the end to get the
response you want.
The springy foam cross that fits beneath the disk was
cut with household scissors from 1/2-inch thick polyurethane shipping material.
The thickness and shape of this foam piece is another important element in
personalizing the unit.
ADJUSTING THE SIZE OF THE JOYSTICKS
The dimensions given for both these joysticks will produce a unit that fits
an adult's hands. Smaller hands will need a smaller block. You can reduce
the 3-inch square dimensions of the block to as small as 2-1/4-inches for
the tipping disk and to 2-1/2-inches for the hand grip unit. The smaller
blocks are somewhat harder to wire. If you cut a wood block large enough
to make three or four units, you can cut them down to the exact size you
need. (Remember the woodworker's lament, "I've cut it off twice already,
and it's still too short.")
ELECTRICAL COMPONENTS
The key electrical parts of these units are the switches. They are, in fact,
almost the only electrical parts. Radio Shack submini lever switches were
used for the prototypes. Discount mail order houses like PolyPaks (see chapter
14 for their address) have similar switches for about half the price. Look
for those described as "Leaf" microswitches. The size of these switches and
their terminals varies, so it is best to have them in hand before cutting
the microswitch grooves in the wood block. Since the hinges on the Radio
Shack switches (and probably most others) are a bit weak, they were strengthened
with a matchhead-size dab of silicone sealant.
The cable for each unit requires six conductors. We used
two runs of 4-conductor telephone cable with stranded wires, but you could
use any small, flexible 6-conductor cable.
The plug for the homebuilt Atari joystick is a DE9S socket
from Jameco Electronics; it is a first cousin to the RS232 socket used on
many peripherals. The hand-wired version of this socket requires a separate
plastic hood. The two plastic tabs on the hood stick out too far and must
be filed down. The two clamping screws included with the hood aren't needed
for this project.
Distinguishing plugs from sockets on computer equipment
can be confusing. A connector is a plug if the small metal parts that conduct
the electricity are metal prongs. It is a socket if these small parts are
receivers for the prongs (note the letter "S" for socket in DE9S). Either
type of connector may be mounted on a cable or in the electrical device itself.
Be careful not to order the wrong type.
ELECTRICAL WIRING
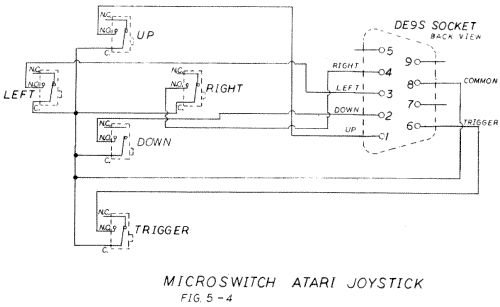
Figure 5-4 is the electrical schematic for any Atari-type joystick. Each
of the five microswitches is wired as a normally-open, momentary-contact
switch. All of their common terminals (a small "c" will identify them) are
connected together and wired to pin 8. Each switch has its own wire on the
normally open (n.o.) terminal.
To install the switches, solder two 3-inch pigtails of
insulated wire to each switch. Telephone cable wire is excellent for this
purpose. Use one color of wire for all the common terminals and five different
colors for the normally open terminals. Poke the wire through the holes.
Position the switches with their hinges toward the center on the disk unit
and down on the hand grip unit. The switches on the hand grip unit should
just touch the rubber hose in its central position.
The switches were wedged into place in the grooves with
flat slivers of wood from a popsicle stick and fixed in place with silicone
sealant. Apply only a small amount of sealant and let it set for a few hours.
(If necessary, you can add more when you have completely checked out the
joystick.)
Now turn the block over. Trim the wires short, but leave
enough length to make the solder joints. Bring the main cable into the cavity
and strip and tin all wires. Group all the common wires together, twist them,
and solder the joint. Solder each of the five other 2-wire joints, wrap each
joint with a small piece of electrical tape, and press them all into the
cavity.
Strip and tin all the wires on the socket end of the
cable. Pass the cable through the hood and solder each terminal. It is easier
to solder the socket if you clamp it upright in front of you in a small vise.
CHECKING THE CIRCUITS
You can use a multimeter set on a low ohms scale to check the wiring. Place
one lead on socket terminal 8 and with the other lead move in turn to terminals
1, 2, 3, 4, and 6. On each terminal, press all the switches to be certain
that the correct switch, and only the correct switch, shows continuity when
pressed. Examine the socket solder joints for solder bridges and cold joints
covered with dark resin. Make any necessary repairs. Don't assemble the connector
until you are entirely satisfied with your work.
TEST RUN
Turn off your Atari. Plug in your new joystick and turn the system on again.
If it doesn't start up in the normal way, turn it off immediately and recheck
your work. Then run your favorite game to try out the unit. If you get crazy
responses, you have probably wired some of the switches to the wrong connector
pins.
FINISHING UP
When the switches work correctly you can put the finishing touches on the
new joystick. The hand grip unit could probably use more silicone sealant
on the switches and on the main cable where it comes out of the block. In
addition, you can fill the bottom cavity with sealant, cover it with a piece
of plastic, and clamp or weight it to a flat surface. After the sealant has
set overnight, peel off the plastic, trim any excess sealant, and glue cotton
felt to the bottom with contact cement.
The tipping disk unit deserves some personalizing touches.
First secure the switches, main cable, and cavity as above. Then try out
different combinations of thickness of the foam cross and height of the tipping
post and shape of its top until you get a response you like. You can even
do without the post altogether, or you can eliminate the foam by gluing the
disk to the post with silicone sealant. Use whatever combination feels good
and improves your speed. When you get the combination you like, glue the
foam to the block and the tipping disk with contact cement.
ATARI JOYSTICK CIRCUIT FOR THE APPLE
If you own an Apple computer you may want to make an Atari-type joystick
for playing games that require only limited directions. Snoogle and many
other arcade games are more enjoyable when played with Atari-type paddles
than with Apple paddles because the former have faster response. The resistance
values of the two potentiometers in such a paddle, however, are limited to
"full on," "average," and "full off."
The construction of this joystick for an Apple is almost
the same as it is for the Atari systems, except that you will have to make
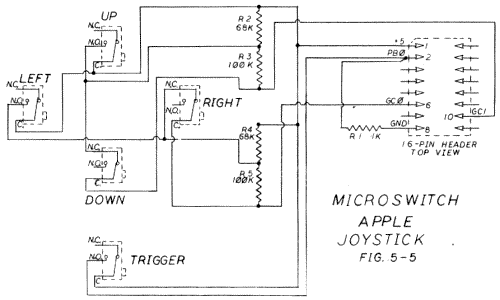
the bottom cavity slightly larger. Figure 5-5 gives you the schematic for
wiring the unit. Note that two of the switches (down and right) use the normally
closed terminal. The resistors R2, R3, R4, and R5 can be placed on a postage
stamp size piece of printed circuit board and hidden in the cavity in the
block. Resistor R1 can be placed in the header plug so that only a 4-wire
cable will be needed.
This circuit works by mimicking a pot, using two resistors
and two switches. If you don't press a switch, the game control inputs see
the 68K resistors and read approximately 128. If you press the left (UP)
switch,. the game controls see zero resistance and read 0. If you press the
right (DOWN) switch, the controls see 168K (68K plus 100K) and read full
scale, 255.
Resistors R3 and R4 are not absolutely necessary, since
the game controls read full scale when open, but it is easier to understand
the circuit if they are shown. The stacked plug and socket described in chapter
3 works very well with the Apple-adapted joystick.
SUMMING UP
You can build joysticks for the Atari in a home or school workshop. The materials
will cost you less than the purchase of a commercial joystick, and the great
advantage is that you can personalize your joystick for the exact feel and
action you want.
| Parts List Homebuilt Atari Joysticks |
||||||||||||||||||||||||||||||||||||
|
||||||||||||||||||||||||||||||||||||
|
Return to Table of Contents | Previous Chapter | Next Chapter
