10 Sound Pushbutton
A lot of arcade game players will instinctively shout commands at the screen
when the action gets exciting. There are so many times when it would be more
fun to control game movements by vocal commands than by pushing buttons.
This device, the sound pushbutton, lets you do just that, since making a
sound will have the same effect as pressing a paddle button. A potentiometer
provides sensitivity control with a wide range of adjustment, so low-level
background noise will not set the device off. The construction is simple
and the materials are inexpensive and easy to obtain.
CONSTRUCTION
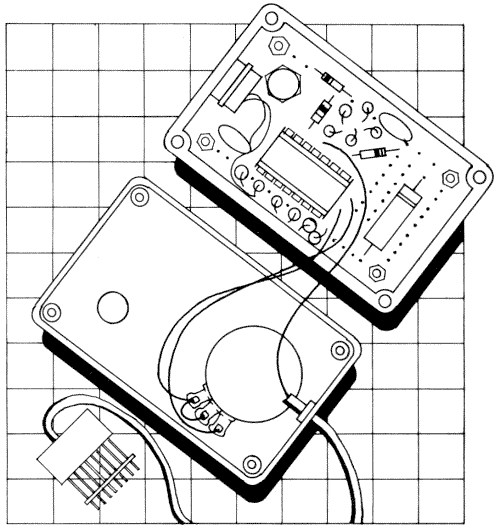
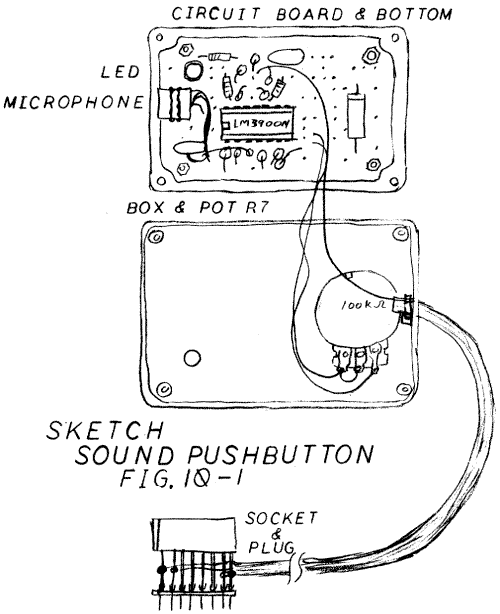
The sound pushbutton is encased in a small plastic box. The device consists
of a microphone element, a pot, and a circuit board with one chip, three
capacitors, one LED, and 14 resistors. It is connected to the computer with
a 3-wire cable and a simple plug/socket.
To begin, cut a piece of circuit board to fit inside
the box. Cut the board by scoring both sides deeply with an X-acto knife
and breaking it over the edge of a table. File off the corners of the board
so that it doesn't hit the screw posts in the box. Mount the board on the
bottom of the box with four small bolts. You will need spacers or extra nuts
to raise the board off the metal bottom of the box.
Next position the microphone on the center of one end
of the circuit board. Mount the element by looping wire over it and soldering
the wire to the board. Carefully determine where the microphone will be located
near the end of the plastic box and drill a 1/4-inch hole to let sound inside
to reach the element.
The sensitivity pot is mounted through the top of the
box on the end away from the microphone. You may have to add a 3/8-inch flat
washer to mount the pot on the thin plastic. Now drill a hole for the cable
in the end of the box just beneath the pot. Mount the LED on long leads so
that its base is about 1/4-inch above the circuit board. Find the spot on
the box just above the LED and drill a 3/16-inch hole so that it can be seen.
As a finishing touch, you might want to add rubber feet to the bottom of
the box so it will not scratch your desktop.

ELECTRONIC OPERATION
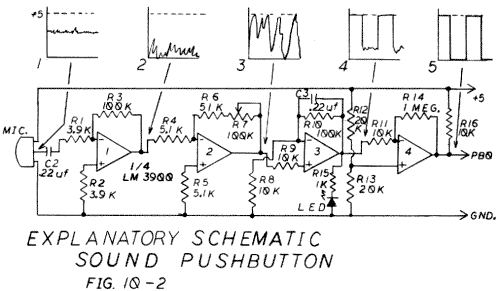
Figure 10-2 is an explanatory schematic which shows the appearance of the
sound signal at five points along the circuit path to the computer. The key
to this circuit is the LM3900 chip, a quad operational amplifier that operates
on +5 volts.
Operational amplifiers (op-amps) are basic and popular
building blocks for analog circuits. The standard op-amp has two analog inputs
(one plus, one minus) and a single analog output. It takes the difference
between the incoming signals and multiplies the difference by an enormous
amount (the gain) to produce the output. The gain may be as much as 100,000
to 1. To achieve control over such large gains, a set of input and feedback
resistors is used with the op-amp.
In the first section of the circuit (figure 10-2), resistor
R3 is the feedback resistor and R1 and R2 are the input resistors. The gain
of this stage is R3 divided by R1 (100K divided by 3.9K = 26). The small
signal coming from the microphone, shown in the first waveform drawing, is
multiplied by 26 to become the second waveform. Resistor R2 adds a zero voltage
to the input from the microphone, helping to prevent oscillations and improve
temperature stability.
Most op-amps use plus and minus power supplies to provide
a full range of possible outputs. The LM3900 uses only the +5 supply, so
its output is limited to the range of 0 to 5 volts. When you are designing
a circuit with the LM3900 you have to make certain that your intended output
will fall in this range.
In the first stage of the circuit the input from the
microphone is amplified. The second stage provides additional gain, and this
gain is controlled by the sensitivity pot. This stage uses the LM3900's limited
output range to amplify half the waveform so that weak signals will be close
to 0 volts and strong signals will be amplified to +5 volts.
The third stage of the circuit provides additional gain
and filters out the high frequency portion of the signal with capacitor C3.
This filtering makes the signal more like the steady pushing of a button
and eliminates bounce and electrical noise. The LED is also driven by this
stage.
The last stage compares the signal with half of the +5
volts provided by the voltage divider (resistors R12 and R13). The output
of this stage is then either 0 or +5 and is therefore a proper digital signal.

WIRING THE CIRCUIT
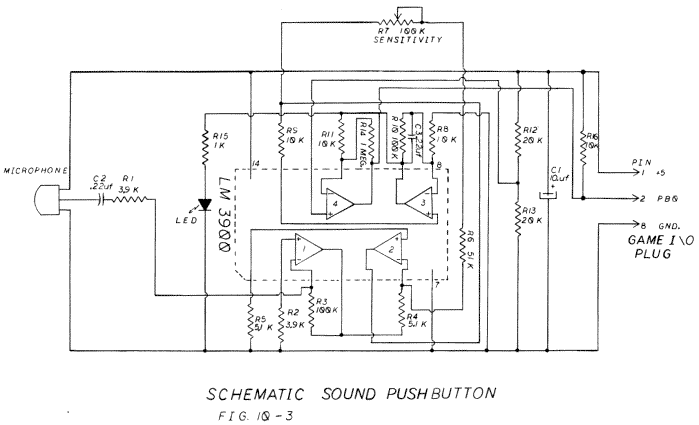
Remove the circuit board from the box and add a 14-pin DIP socket to the
components (the microphone and LED) already on it. Now add the wires, resistors,
and capacitors, marking off each on a copy of figure 10-3 as they are installed.
Since there is no mechanical strain on this device, the
pot you buy does not have to be an expensive one. If you purchase the pot
given in the parts list, you will have to shorten the shaft and add a knob.
The cable requires only three wires. Telephone cable with four wires works
well for this unit and gives you an extra wire to double up the ground.
The best plug for this unit is a simple plug/socket similar
to the more complex one described in chapter 3. For this one, do not bend
or cut short any of the socket pins. You will almost always be using the
sound pushbutton with another controller, and you want all the controller
functions to pass through the plug/socket.

TESTING
When you have finished the wiring, examine your work closely for solder bridges
and shorted wires. Plug the LM3900 into the socket in the board and check
to make certain there is at least 50 ohms between pin 1 and pin 8 of the
plug. We got a reading of 1.3K when we tested the prototype. Mount the circuit
board on the bottom and close the box.
Turn off your computer. Plug the new sound pushbutton
into the game I/O connector and turn it on again. If the computer doesn't
start up exactly as usual, shut it down immediately and recheck all your
work on the new unit.
Now run the Controller Checkout program from the software
chapter and watch the screen to determine if the 0 pushbutton responds to
sounds. Try various settings of the sensitivity control while making sounds
of differing volume.
Turn the computer off, plug a controller you know is
in good working order into the back of the sound pushbutton plug, and rerun
the Controller Checkout program. Test all the functions of the sound pushbutton
and the controller. Now you can try it out with your favorite games. Instead
of wearing out your fingers, you can yell at the screen and get a response.
OTHER COMPUTERS
The output of the sound pushbutton is very close to a standard digital signal
and should be acceptable to any computer system that has at least one pushbutton
input and that can provide a small amount of +5 voltage. You will, of course,
need a different plug, and the plug pins may have different numbers than
the ones shown for the Apple. See the section on other computers in the Electronics
Tutorial for more information on how to adapt this controller to other computers.
| Parts List Sound Pushbutton |
||||||||||||||||||||||||||||||||||||||||||||||||||||||||||||||||||||||||||||||||||||||||||||||||
|
||||||||||||||||||||||||||||||||||||||||||||||||||||||||||||||||||||||||||||||||||||||||||||||||
|
Return to Table of Contents | Previous Chapter | Next Chapter

