Al Baker
Exploring joysticks...
Programming is the most complex and least organized of human endeavors. Well, maybe after the U.S. Government and raising children. Many people have tried to bring order out of this chaos. In this column, I will join that noble company. With your help, we just might pull it off.
Two of my favorite computers are the Apple and Atari. They are superbly designed machines. (It's not that I don't like the PET. I do. I guess I'm just hopelessly addicted to sound and color, joysticks and paddles.) In this column, I am going to help you use the sound, color, and attachments of these two computers.
In each issue, I will show you one or two short routines fully utilizing some feature of an Atari or Apple. I'll put the routines to work and leave you with a chance to work on a programming exercise, answered in the next issue.
I said I needed your help. Send me any routines you have and would like to share. If I use them, you'll be given credit as the source.
The Atari Joystick
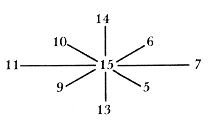
This month, we are going to explore the Atari joystick. The position of a joystick is read with the function STICK. The joysticks are numbered from 0 to 3. Thus, the position of the second joystick is STICK(1). This function returns the number 15 when the joystick is centered. Here are the results of STICK for the other joystick positions.
The button on the joystick is read with the function STRIG. STRIG(0) reads the button of the first joystick. The function is zero if the button is pushed and one if the button is not pushed.
Most programs use the joystick to move objects around on the screen. As soon as the program needs a yes or no response, however, the players must use the keyboard. This is inconvenient, especially when there are several players, none sitting close to the keyboard. Why not use the joystick to make the selection?
Two Entry Menu Selection
Look at the first listing. This is a routine which uses the joystick to get a yes or no response from a player. Line 45 turns off the cursor on the screen. Lines 60 through 140 set the default answer and display the options, YES NO, on the screen. The default answer, in this case YES, is highlighted in reverse video.
The routine assumes that the word YES is to the left of the word NO. If the joystick is moved to the left, then lines 180 through 240 set the answer to Y and highlight the word YES on the screen. If the joystick is moved to the right, then lines 280 to 340 set the answer to N and highlight the word NO. Pushing the button ends the routine. This is handled in line 380. The IF statement is true if STRIG (PLAYER-1) is 1. Remember that this means the button is not pushed. The program loops back to line 180 as long as the button is not pushed.
Lots of lines and REM statements take up memory and slow the program down. Look at the second listing. Here is a short program which uses the menu selection routine. The routine has been compressed into lines 1000 through 1050. The program needs no explanation. Play it and get some feel for the convenience of using the joystick instead of the keyboard.
At the tone the number is...
Listing 3 is another joystick input routine. This time we are using the joystick to input a number, it is similar to the first routine. Lines 60 through 140 set the default input number and print it on the screen. Notice that line 120 prints a blank after the number. This prevents garbage from appearing on the screen if 'A' goes from 2 digits to 1 digit.
Look at lines 130 through 140. This generates a muted bell sound, very similar to striking a xylophone. The SOUND statement has four parameters. The first is the sound register. This can be any number from 0 to 3. Up to four sounds can be created at one time. The second parameter is the pitch of the sound. The higher the number, the lower the pitch. Using 100-A gives a pitch that goes up as A gets bigger and goes down as A gets smaller.
The third parameter is the sound quality. A 10 gives a clear tone. The fourth parameter is the loudness of the note. The NOTE goes from 15-0 = 15 or loud to 15-15 = 0 or quiet. This creates the bell effect.
Lines 180 through 240 decrease the input number as long as the joystick is pushed to the left. Lines 280 through 340 increase the input number as long as the joystick is pushed to the right. Line 380 ends the routine if the button is pushed.
Conclusion
Next time we will compress the number input routine and use it in a program. Try it yourself and let's see who does a better job at compressing it! We'll also try our hand at using the Apple paddles to do a menu select. Al Baker is Programming Director of The Image Producers, Inc., 615 Academy Dr., Northbrook, IL 60062.
Program 1. Two Entry Menu Select
Download (Saved BASIC)
Download / View (Listed BASIC)
Program 2. Do You Love Me?
Download (Saved BASIC)
Download / View (Listed BASIC)
Program 3. Number Select
Download (Saved BASIC)
Download (Saved BASIC, Fixed version)
Download / View (Listed BASIC)
Return to Table of Contents | Previous Section | Next Section