Chapter Five
Running an Assembly
Language Program
There are several ways to execute a machine language program on an Atari computer system. For example, you can run a machine language program by:
- Using a special debugging command (the "G" command) provided by both the MAC/65 assembler and the Atari Assembler Editor cartridge.
- Running the program using the Atari disk operating system (DOS) or (if you have a MAC/65 assembler) the OS/A+ operating system.
- Using the AUTORUN.SYS utility of Atari DOS (or a STARTUP.EXC file is you're using the OS/A+ operating system).
- Calling your machine language program from a BASIC program.
In this chapter, we'll cover the first three of these methods of running machine language programs. The fourth technique, calling assembly language programs from BASIC, will be covered in Chapter 8. First we'll discuss the technique for running a program with the "G" command offered by the MAC/65 assembler and the Atari Assembler Editor cartridge.
Your Assembler's Built-in Monitor
To use the "G" command, you'll need the help of a handy tool that's provided free with both the MAC/65 assembler and the Atari Assembler Editor cartridge. That tool is called a debugging utility. If you've just finished Chapter 4 and still have your computer turned on, you can start using your assembler's debugging facility in just a few moments, as soon as readers who've turned their computers off between chapters have had a chance to get their machines back into action again.
If you've turned off your computer since the end of Chapter 4, please get it up and running again. You'll need your data disk in place and your assembler turned on. When the EDIT prompt appears on your video screen, you can load the source code listing of the program that you wrote in Chapter 4 into your computer's memory. Just type the word "NEW", a good habit to get into when you want to load a program, just in case there may already be a program in memory. Then type
ENTER #D:ADDNRS.SRC
- just as you did when you loaded the ADDNRS.SRC program at the end of Chapter 4. When your disk drive stops spinning, you can check to see whether the program has been loaded correctly by simply typing the command:
LIST
You should then see the program listed on your screen. Now let's assemble the program. Actually, if you did the exercises in Chapter 4, our ADDNRS program is already assembled, and stored on your data disk in its assembled form. But the program is so short that is would take more time to load its object code into memory from a disk than it would take to assemble it again. So we're going to assemble it again right now. If you're using a MAC/65 assembler, take a look at the source code listing of your program and make sure it contains the line
05 .OPT OBJ
- so that it will be loaded into your computer's memory as it is assembled. If you're using an Atari Assembler Editor cartridge, line 5 should not be in your program! The .OPT directive means nothing to the Atari Assembler Editor cartridge, and will be flagged as an error!
Once line 5 is either in your program or out of it, depending on what kind of assembler you have, you can assemble the ADDNRS program. To do this, simply type:
ASM
Your assembler will present you with an object code listing of the ADDNRS program.
Then you can use the debugging facility built into your MAC/65 or Atari assembler to debug your program and save it on a disk in its final form. The debugging facilities of the MAC/65 assembler and the Atari Assembler Editor are quite similar. But there are a few differences.
Using the MAC/65 Debugger
The debugger built into the MAC/65 assembler is called BUG/65. To use it you must first make sure that your ADDNRS source code has been properly assembled using the ".OPT OBJ" directive. Then, while your assembler is in its EDIT mode, type the command "CP". That will return you to your assembler's OS/A+ operating system. Now, in response to the OS/A+ prompt "D1:", type "BUG65". Your disk drive should start spinning, and when it stops, the yellow-bordered BUG/65 screen should be displayed on your computer monitor.
Using the Atari Assembler's Debugger
If you're using an Atari Assembler Editor cartridge, putting your assembler into its DEBUG more is even easier. Just type
BUG

Entering Debug Mode
- (not DEBUG), followed by a carriage return. This will present you with a screen display that says
DEBUG

Atari Assembler Editor Debug Mode
- and when that command appears on your screen, you can then debug assembly language programs using a whole host of commands.
In this chapter, we'll be discussing only a few of the many capabilities of your assembler's debugging package. Your assembler's debugger is a very special kind of software package. With it, you can PEEK into your computer's memory registers, and display the contents of those registers in many different ways. You can even run programs using your assembler's debugger, which can alert you to many kinds of programming errors, both while the program is running and after it has run.
Using Your Debugging Package
We're now going to show you how the monitor built into your assembler can help you examine the contents of your Atari's RAM. Then you'll get a chance to run a machine language program using your assembler's built-in monitor.
Listing the Contents of Memory Locations
As we've pointed out, all of the capabilities of your assembler's built-in monitor are accessible from the assembler's DEBUG mode. When you're in DEBUG mode, for example, you can take a look at the contents of any memory locations you like by using the instruction "D", which stands for "display memory." The "D" command is similar to the PEEK command in BASIC. By using the "D" command, you can peek into your Atari's memory registers and see what their contents are. To use the "D" command, all you have to tell your assembler is what memory locations you want it to peer into. If you type a "D" followed by a memory address (expressed as a hex number, of course), you'll get an onscreen listing of the requested location and the next seven locations that follow it. If you have assembled your ADDNRS source code listing, you can take a look at how your monitor's "D" command works right now. Simply type
D600
--- and you should see a screen display that looks something like this:
0600 D8 18 A9 02 69 02 85 CB
(If you have a MAC/65 assembler, there'll be a few extra characters after the letters "CB". Don't pay attention to them, they're the printed forms of characters that could be represented by the numbers in this line under certain circumstances, but mean nothing in the context of what we're doing right now.) The rest of that line, as you can see by glancing at one of the object code listings we've created in other exercises, is nothing but a stripped-down machine code listing of the first eight bytes of your ADDNRS.OBJ program. You can also use your monitor's "D" command to look at more than eight consecutive locations in your computer's memory. Just type two addresses after the "D", using the format
D5000 500F
--- if you have a MAC/65 assembler, and the format
D5000, 500F
--- if you have an Atari Assembler Editor cartridge.
Your assembler's debugger will then provide you with a list of the contents of all registers form the first address listed to the second address. To see how the "D" command works when you use it optional second parameter, just type:
D06000 0608
(or D0600,0608 if you have an Atari Assembler)
You should get a listing something like this (with some extra symbols tacked on if your assembler is a MAC/65):
0600 D8 19 A9 69 02 85 CB
0608 60 00
That, of course, is a disassembled listing of your complete addition program, all the way down to its last mnemonic, the RTS instruction.
The Atari Assembler Editor's 'L' Command
The Atari Assembler Editor is also equipped with an "L" (List Memory With Disassembly) command. (The MAC/65 assembler also has an "L" command, but it's entirely different. The MAC's "L" command is used for locating hexadecimal strings.) But the Atari assembler's "L" command can be used to display disassembled listings of machine language programs. The Atari Assembler Editor's "L" command is similar to the "D" command, but there are some differences. The Atari "L" command, like the "D" command, can be used with either one or two addresses. When you use one address, "L" will list the contents of 20 consecutive memory locations in your computer (not just the contents of eight locations, as the "D" command does).
Whether you use that optional second address or not, "L" will disassemble the machine code at the address it lists; alongside each hex number listed, it will also list the assembly language instruction that the number equates to, if any. To get a look at how the Atari "L" command works, type the following on an Atari Assembler.
L0600,0608
If you try to enter that line on a MAC/65 assembler, you'll get nothing but an angry beep and a "COMMAND ERROR!" message. But if you have an Atari assembler, this is what you should see:
0600        D8           CLD
0601        18           CLC
0602        A9 02        LDA       #$02
0604        69 02        ADC       #$02
0606        85 CB        STA       $CB
0608        60           RTS
This is a listing of the actual contents of memory addresses $0600 through $0608 of your computer, after your ADDNRS.SRC source code listing has been assembled and stored in RAM. By merely looking at this listing, you can see that your program has been assembled and loaded into RAM correctly, and is now just sitting in RAM and waiting to be run. Now we've come to a debugging command that can actually be used to run a program, the "G" (for "Go," or "Execute") command.
Golly, G
Fortunately, the "G" command can be used on both the MAC/65 assembler and the Atari Assembler Editor cartridge. By using the "G" command, you can instruct your computer to execute machine language code that begins at any specified memory location. If you have an Atari Assembler Editor cartridge, it's very easy to use the "G" command. While your assembler is in its DEBUG mode, just type the letter G, immediately followed by the memory address at which a program or routine that starts at the specified address. If you're using an Atari Assembler Editor, you can use the "G" command to run your ADDNRS program right now. Just type
G0600
The program should then run.
If you have a MAC/65 assembler, the "G" command is a little more powerful and, in this case, requires an additional parameter. When you use the MAC's "G" command, you can (and in this instance should) use both an initial address and a termination (or "breakpoint") address for the routine you want to run. And when you type your programs breakpoint parameter, you must flag it with the prefix "@". For example, here's how to use the "G" command to execute the ADDNRS program using the MAC/65 debugger:
G 0600 @0608
A number of other ways in which the "G" command can be used are listed in the MAC/65 and BUG/65 user's manual.
No Bells and Whistles
If your ADDNRS program runs without any hitches using the MAC/65 or Atari "G" command, you won't see much action on your computer screen. The program will just quietly do its job, which is adding 2 and 2, and then, quick as a wink, it will return control of your computer to you. At that point, what you'll see on the screen is a display of your Atari's internal registers. If you have an Atari Assembler Editor, your screen display will look like this:
A=1C X=00 Y=00 P=30 S=04
If you have a MAC/65 assembler, the display will be a little more complicated. It will look more like this:
A    X    Y    SP    NV_BDIZC    PC    INSTR
04   00   00   00    00100000    0608  RTS
Both of the above displays have the same general function. Both tell us that your program has finished running and has left some values in five of the 6502 chip's status registers: the accumulator, the X register, the Y register, and processor status register, and the stack pointer. The line displayed by the MAC/65 debugger also lists the address that was in your computer's program counter (PC) when the program reached its breakpoint. The last item in the line tells what the instruction (INSTR) at that address was.
All of this information can be useful in some debugging applications, since it's sometimes helpful to know what condition the 6502 chip has been left in after a program has been run. But it doesn't mean a great deal to us right now, since our addition program has finished running and we don't really care what the 6502's registers now contain. What's' more important to us at the moment is whether or not our program did the job it was supposed to do. The only way we can find that out is to look and see whether the program did what we instructed it to do, namely, whether it added 2 and 2, and stored the result of that calculation in memory address $CB.
While your assembler is in its "debug" mode, you can easily PEEK inside memory address $CB and see if the sum of 2 and 2 is stored there. Simply type:
DCB
You should see one or two lines something like these on your video screen (again, with a few minor and not especially significant differences if our assembler is a MAC/65):
00CB 04 00 00 00 00
00D0 00 79 00
Success! The number 4, the sum of 2 and 2, is indeed stored in memory address $CB!
Saving a Machine Language Program
Back in Chapter 4, you learned how to save both source code listings and object code listings of assembly language programs. In Atari assembly language, source code listings are loaded into memory using the ENTER command, and are saved to disk using the LIST command. If you have a MAC/65 assembler, you can also load source code into memory using command LOAD, and you can save source code listings to disk using the command SAVE. When you use a MAC/65 assembler, ENTER and LIST are used to save and load source code programs in their "untokenized," or unabbreviated form, LOAD and SAVE are used to load and save source code listings in their "tokenized," or abbreviated, form. This is the same system used for loading and saving programs written in Atari BASIC.
If you have an Atari Assembler Editor cartridge, the commands LOAD and SAVE are used for a completely different purpose. In programs written with the Atari Assembler editor, the LOAD and SAVE commands are reserved for loading and saving object code, so they can't be used at all for loading and saving source code listings. Object code listings are loaded into memory using the commands LOAD (with the Atari Assembler) or BLOAD (with MAC/65), and are saved to disk using the commands SAVE (with the Atari cartridge) or BSAVE (with MAC/65). Source code programs must be loaded into memory and saved to disk while your assembler is active and in its edit mode. But object code programs can be loaded and saved in two different ways.
You can load and save object code programs while your assembler is active and in its edit mode. You can also load and store object code programs using either the Atari or OS/A+ disk operating systems. To save an object code program using the Atari DOS menu, all you have to do is select Menu Option K, the "Binary Load" command. To save an object code program using the OS/A+ operating system, the correct format is:
[D1:]SAVE ADDNRS.OBJ 0600 0608
I know this is all quite confusing, but at least you had this chapter to guide you, which is more than I had when I was trying to learn Atari assembly language!
Writing Programs That Will Run When Loaded
You can use both the Atari DOS menu and the OS/A+ operating system to save machine language programs in such a way that they will automatically run as soon as they have been loaded into your computer's memory. When you select option "K" on the Atari DOS menu, your computer responds with this prompt:
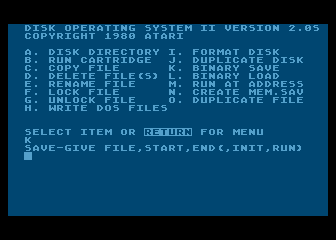
Atari DOS 2.0 Menu
SAVE - GIVE FILE, START, END, INIT, RUN
If you wish, you can respond to this prompt by typing only two addresses: START and END. But the prompt also allows you to use two more addresses: INIT and RUN. These two addresses are optional parameters. When you save a program without using these parameters, the program you save will load, but not run when you retrieve it from a disk. To run a program that has been saved without using the INIT or RUN parameters, a special "execute" command must be used: either Option M (RUN AT ADDRESS) on the Atari DOS menu or certain special commands (such as the "G" command) that are available on various assemblers, debuggers, and operating systems.
If you like, you can use Atari DOS to save an object code program in such a way that it will automatically run when it is loaded into memory. In fact, if you wish, you can even save an object code program in such a way that is will run as soon as a disk on which it is stored is booted. To flag an object code program so that it will automatically run when it's loaded into memory, you can save it from DOS using the INIT parameter, the RUN parameter, or both. The INIT and RUN parameters do slightly different things so, not surprisingly, they are used for slightly different purposes.
When you use INIT, your program will start running at its INIT address as soon as that address is loaded into memory. When you use the RUN parameter, your program will start running at that address, but not until the entire program has been loaded into memory. The INIT parameter is usually used for running short routines within a program while the program is being loaded. For example, converting text strings from one kind of character code to another, so that the conversions will all be completed by the time the program runs. The RUN parameter is used to run the entire program after it has been loaded into memory.
Using the Run Parameter
This is how you would store the ADDNRS.OBJ program with an Atari Assembler Editor cartridge using the RUN parameter but not the INIT parameter:
ADDNRS.OBJ,0600,0608,,0600
Notice the two commas between the number 0608 and 0600 in this example. They mean that the INIT instruction has been left blank, and thus has not been used. If it had been used, it would be the third number typed, right between the commas. Instead, the line has been typed using this format:
ADDNRS.OBJ,START,END,,RUN
The program will therefore run automatically, beginning at $0600 (the address entered under the RUN parameter), as soon as the entire program is loaded into memory. If you saved your program using this format, and then loaded the program into your computer's memory, it would start loading at address $0600 and would stop loading at address $0608. It would then start running at address $0600.
Using the 'INIT' Parameter
The "INIT" parameter of the Atari Assembler Editor's Binary Load command can be used either by itself or in conjunction with the "RUN" parameter. You can use the "INIT" command as many times as you like in a program, for each portion of the program that you want to run as it is being assembled. The "RUN" command may be used only once, to run the entire program. Detailed instructions for using the RUN and INIT commands can be found in your Atari Disk Operating System II Reference Manual. For our purposes, all you really need to know right now is that you can save object code programs in such a way that they'll run after they are loaded by using the optional "RUN" parameter of the binary load command.
Running Machine Language Programs Using OS/A+
OS/A+ doesn't provide any INIT or LOAD parameters for running machine language programs because it doesn't require any. To run a machine language program using OS/A+, all you have to do is use the "RUN" command, just respond to the "D1:" prompt by typing the word RUN, followed by the starting address of the program you want to run. For example:
[D1:] RUN 0600
The binary file stored at that address will then run.
Writing Self-booting Programs
Have you ever wanted to write a program that will boot itself and then run itself automatically, as soon as you turn your computer on? Well, you can do that very easily, if you know how to use assembly language! All you have to do is save the program using the AUTORUN.SYS utility built into Atari DOS (or the STARTUP.EXC utility provided by OS/A+, which we will discuss in a moment). Use either of these utilities, and your program will run automatically each time the disk it is saved on is booted, just like a piece of professionally written software!
Two Ways to do It
There are a number of ways to use Atari's AUTORUN.SYS. One way simply is to save your program as a self-booting program, using the INIT parameter, the RUN parameter or both, under the file name AUTORUN.SYS. Another way is to take a program that you've saved as an automatically running program, and simply change its name to AUTORUN.SYS. Here's how to change the name of a file to AUTORUN.SYS using the Atari Assembler Editor cartridge. First, make sure that the program you want to convert is already a self-running program. In other words, make sure that it was saved using either the RUN or INIT parameter, or both. Then call up your DOS menu and type "E" for RENAME FILE. You should then see this prompt:
RENAME - GIVE OLD NAME, NEW
In response to this prompt, type:
ADDNRS.OBJ,AUTORUN.SYS
That's all there is to it! From now on, each time you boot the disk that Program 1 is on, the program will run automatically (you can use your Assembler Editor cartridge's monitor, if you like, to assure yourself that it's true).
Using the OS/A+ STARTUP.EXC Utility
The STARTUP.EXC utility provided by OS/A+ is very similar to the AUTORUN.SYS offered by Atari DOS. To use the OS/A+ STARTUP.EXC utility, just boot OS/A+ and then replace your OS/A+ master disk with a data disk on which the object code of your ADDNRS program is stored. When your data disk is in place, respond to the OS/A+ "D1:" prompt by typing:
TYPE E: D1:STARTUP.EXC
This is the line you should then see on your screen:
D1: TYPE E: D1:STARTUP.EXC
When you type this line, be sure to use the exact spacing that we used in these examples. In particular, make sure that there's a space between "E:" and "D1:STARTUP.EXC". OS/A+, like the MAC assembler and the Atari Assembler Editor, is rather fussy about spacing. When you're sure you've typed the line correctly, hit your RETURN key and your computer screen will go blank for a moment. When the lights come back on, you'll see a blank screen with a cursor in the upper left-hand corner. When the blank screen and cursor appear, simply type the word "LOAD", followed by the name of the file that you want to convert into a self-booting file. For example:
LOAD ADDNRS.OBJ
Next, type the word "RUN", followed by the address (in hexadecimal notation) at which the first instruction in your program is located. For example:
RUN 0600
At this point, these two lines should be all you see on your screen:
LOAD ADDNRS.OBJ
RUN 0600
Now type RETURN, followed by [CONTROL] 3 (which is typed of course, by pressing the CONTROL key and the "3" key simultaneously). When you've done that, your data disk should start to spin. When it stops, the ADDNRS.OBJ program should be stored on your disk as a self-booting file. When you've finished creating your STARTUP.EXC file, you can check to see if it's really on your disk by typing the command "DIR" to get a disk directory. Then, if the STARTUP.EXC file is there, you can check to see if it works by turning your computer off and then turning it on again. When your computer is up and running again, load your debugger into memory by typing the command BUG65. Then you can use your debugger's "D" command to check memory registers $600 to $608 to see if your program loaded, and memory register $CB to see if it executed properly.
Calling Machine Language Programs From BASIC
You can also run machine language programs by calling them from BASIC programs. But it's a complex process, requiring an understanding of some fairly sophisticated programming techniques. So we're going to save our explanation of calling machine language programs from BASIC for Chapter 8, which will be completely dedicated to mixing assembly language and BASIC programs.
Return to Table of Contents | Previous Chapter | Next Chapter
