APPENDIX C
THE ATARI CASSETTE
This discussion of the ATARI 410™ Program Recorder includes the following topics:
- How the cassette works. Information on the hardware and software used to operate the cassette.
- Cassette applications. How to mix audio and digital information to produce a user-oriented program.
HOW THE CASSETTE WORKS
RECORD STRUCTURE
Byte Definition
The OS writes files in fixed-length blocks at 600 baud (physical bits/second). Asynchronous serial transmission is used to read and write data between the ATARI 400/800 Computers and the ATARI Program Recorder. POKEY recognizes each data byte in this order: 1 start bit (space), 8 data bits (0=space, 1=mark), then one stop bit (mark). A byte is sent/received least significant bit first.
The frequency used to represent a mark is 5327 Hz. For a space, the frequency is 3995 Hz. The data byte format is as follows:

A |
= Start Bit (Space) |
0-7 |
= Data Bits |
B |
= Stop Bit (Mark) |
Record Definition
Records are 132 bytes long. A record is broken down in the following way: 2 marker characters for speed measurement, a control byte, 128 data bytes, and the checksum byte. The record format is shown below:
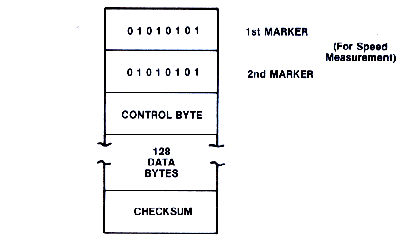
1st and 2nd MARKER
Each marker character is a 55 (hex). Including start and stop bits, each marker is 10 bits long. Ideally, there should be no blank tape between the markers and the subsequent data.
Speed Measurement:
The purpose of the marker characters is to adjust the baud rate.
The input baud rate is assumed to be a nominal 600 baud. This is adjusted, however, by the SIO routine to account for drive motor variations, stretched tape, etc. Once the true receive baud rate is calculated, the hardware is adjusted accordingly. Input baud rates ranging from 318 to 1407 baud can theoretically be handled using this technique.
The OS checks the tape speed in the following manner: The software looks at the POKEY Serial-In bit continuously. Looking for a start (0 bit) which signifies the beginning of a record. When it finds one, the OS stores the current frame counter by saving the ANTIC VCOUNT (vertical screen counter). Continuing to look directly at the Serial-In bit, the OS counts the 20 bits (end of the 2 markers), then uses VCOUNT and the frame counter to determine the elapsed time. The baud rate to use is derived from the result. This is done for each record.
Control Byte
The control byte contains one of three values:
- $FC indicates the record is a full data record (128 bytes).
- $FA indicates the record is a partially full data record; fewer than 128 bytes were supplied by the user. This case may occur only in the record prior to the end-of-file. The actual number of data bytes, 1 to 127, is stored in the last data byte prior to the checksum; i.e., the 128th data byte.
- $FE indicates the record is an end-of-file record and is followed by 128 zero bytes.
Checksum
The checksum is generated and checked by the SIO routine, but is not contained in the cassette handler's I/O buffer CASBUF [03FD].
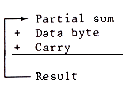
The checksum is a single byte sum of all the other bytes in the record, including the two markers. The checksum is computed with endaround carry. As each byte is added into the sum, the carry bit is also added in.
TIMING
Inter-Record Gap
As mentioned earlier, each record consists of 132 data bytes including the checksum byte. In order to distinguish one record from another, the cassette handler adds a Pre-Record Write Tone (PRWT) and Post-Record Gap (PRG). PRWT and PRG are both pure mark tone. The InterRecord Gap (IRG) between any two records thus consists of the PRG of the first record followed by the PRWT of the second record. The layout of the records and gaps is as follows:
| PRWT | MARKER | DATA | PRG | PRWT | MARKER | DATA | PRG |
| Record 1 | Record 2 | ||||||
Normal IRG Mode and Short IRG Mode
The length of PRWT and PRG are dependent upon the Write Open mode. There are two types of IRG modes: Normal IRG mode and Short IRG mode.
When a file is opened, the most significant bit of AUX2 specifies the mode. On subsequent output or input, the cassette handler executes the READ/WRITE in either mode based on the MSB of the AUX2 byte:
| AUX2 | 7 | 6 | 5 | 4 | 3 | 2 | 1 | 0 |
| C |
c = 1 indicates that the cassette is to be read/written in Short IRG mode (continuous mode).
c = 0 indicates Normal IRG mode.
Normal IRG Mode
This mode is used for a READ interleaved with processing; i.e., the tape always comes to a stop after each record is read. If the computer "STOPS" the tape and gets its processing done fast enough, the next READ may occur so quickly that the cassette deck may see only a slight dip in the control line.
Short IRG Mode
In this mode the tape is not stopped between records, either when being written or during readback.
On readback, the program must issue a READ for each record before it passes the read head. The only common use of this mode so far is storage of BASIC programs in internal (tokenized) form where, on readback, BASIC has nothing more to do with the data than put it in RAM. The special BASIC commands "CSAVE" and "CLOAD" specify this mode.
There can be a potential problem with this. The software that writes the tape must allow long enough gaps, so the beginning of records are not missed on readback.
Timing Structure
The timings for each of the inter-record gaps are as follows:
| NORMAL IRG PRWT | 3 seconds of mark tone. |
| SHORT IRG PRWT | 0.25 second of mark tone. |
| NORMAL IRG PRG | Up to 1 second of unknown tones. |
| SHORT IRG PRG | From 0 to N seconds of unknown tones, where N is dependent upon user program timing. |
Each record is written with the following timing: once the motor starts and the PRWT is written, the duration of the tone depends on the above format. The record follows, then the PRG is written. The motor is then stopped for Normal mode, but continues writing mark for Short IRG mode.
Note that for the Normal IRG mode, the tape will contain a section of unknown data because of stopping and restarting the motor. (Up to 1 second of travel is possible, depending on the cassette machine.) This unknown data may be garbage data left previously on the tape.
Noisy I/O Feature
The Noisy I/O feature is useful for determining the success of reading the tape, particularly with CLOAD. Marks and spaces use different sound frequencies and you quickly learn the good and bad sounds the OS makes.
FILE STRUCTURE
A file consists of the following three elements:
- A 20-second leader of the mark tone
- Any number of data records
- End-of-File
When the file is opened (output), the OS starts by writing a mark leader of 20 seconds, the OS then returns to the caller, but leaves the tape running and writing marks.
The WRITE/READ timeout counter is set for about 35 seconds as the OS returns. If the timeout occurs before the first record is written, the tape will stop, leaving a gap between the open leader and the first record leader.
TAPE STRUCTURE
There are two sides to each tape. Each side has two tracks, one for audio and the other one for digital recording. This way the tape can be recorded in both directions. Following is a flat view of the tape:
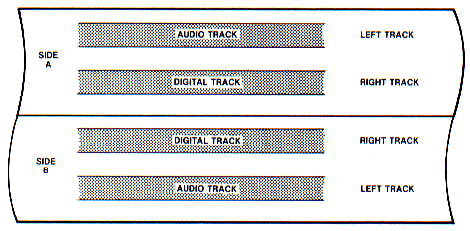
Tapes are recorded in 1/4 track stereo format at 1 7/8 inches per second (IPS). Note that the ATARI 800 computer utilizes a tape deck that has a stereo head configuration (not a single or mono type).
CASSETTE BOOT
The Cassette Boot program can be booted from the cassette at power-up time as part of the system initialization. System initialization performs functions such as zeroing all of the hardware registers, clearing RAM, setting flags and so on.
After all the resident handlers are brought in, if the [START] key is pressed, the Cassette Boot request flag CKEY [004A] is set. If the Cassette Boot request flag is set, then a Cassette Boot operation is attempted.
The following requirements must be met in order to boot from the cassette:
- The operator must press the [START] key as power is applied to the system.
- A cassette tape with a proper boot format file must be installed in the cassette drive, and the PLAY button on the recorder must be pressed.
- The cassette file must have been created in Short IRG mode.
- When the audio prompt occurs, the operator must press a key on the keyboard.
If all of these conditions are met, the OS will READ the boot file from the cassette and then transfer control to the software that was read in. The Cassette Boot process is given in more detail below.
- READ the first cassette record to the cassette buffer.
Extract information from the first 6 bytes. The first 6 bytes of a Cassette Boot file are formatted as shown below:
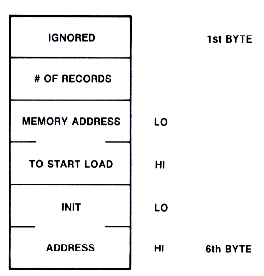
1ST BYTE is not used by the Cassette Boot process.
2ND BYTE contains the number of 128 byte cassette records to be read as part of the boot process (including the record containing this information). This number may range from 1 to 255, with 0 meaning 256.
3RD and 4TH BYTES contain the address (LO,HI) at which to start loading the first byte of the file.
5TH and 6TH BYTES contain the address (LO,HI) to which control is transferred after the boot process is complete. Pressing the [S/RESET] key will also transfer control to this address assuming that the boot process is complete.
When step 2 is complete, the Cassette Boot program will have:
- Saved number of records to boot
- Saved the load address
- Saved the initialization address in CASINI [02,03]
- Move the record just read to the load address specified.
- READ the remaining records directly to the load area.
- JSR to the load address +6 where a multistage boot process may continue. The carry bit will indicate the success of the operation (carry set = error, carry reset = success) on return.
- JSR indirectly through CASINI for initialization of the application. The application should put its starting address into DOSVEC [0A,0B] during initialization, and then return.
- JMP indirectly through DOSVEC to transfer control to the application.
Pressing the [S/RESET] key after the application is fully booted will cause steps 6 and 7 to repeat.
CASSETTE APPLICATIONS
HOW TO CONFIGURE THE CASSETTE SYSTEM
Most serial bus devices have two identical connectors: one is a serial bus input and the other a serial bus extender. Using these connectors, peripherals may be "daisychained" simply be cabling them together in a sequential fashion like the following diagram:
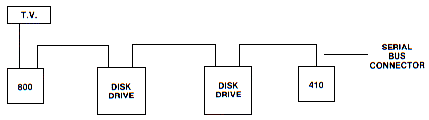
Figure C-1 Daisychained Peripheral Equipment
However, the cassette does not conform to the protocol of the other peripherals that use the serial bus. The cassette must be the last device on the serial bus because it does not have a serial bus extender connector as the other peripherals do. The lack of a bus extender assures that there is never more than one cassette drive connected to the system. The system cannot sense the absence or presence of the cassette drive, so it may be connected and disconnected at will.
Whenever there is a need to open a cassette file for reading or writing, use the following instructions:
Input (Data From 410 to 800) When the cassette is opened for input, a single audible tone is generated using the keyboard speaker. If the cassette is ready (power on, serial bus cable connected, tape cued to start of file), the user must depress the [PLAY] button on the cassette and any ATARI 800 keyboard key (except [BREAK]) to initiate tape reading.
OUTPUT (DATA FROM 800 to 410) When the cassette is opened for output, two separate audible tones are generated using the keyboard speaker. If the cassette is ready (as previously described), the user must simultaneously press the [PLAY] and [RECORD] buttons on the cassette, and then press any keyboard key (except [BREAK]) to initiate writing the tape.
SAVING AND LOADING DIGITAL PROGRAMS
Concept
The following technique saves the digital data directly from the computer through its I/O port of either the ATARI 410 Program Recorder or the Atari Lab Machine which uses 1/4 inch tape recorded at 7 1/2 inches per second.
FOR BASIC:
| Format: | CSAVE |
This command is usually used in direct mode to save a RAM-resident program onto cassette tape. CSAVE writes the tokenized version of the program to the 410.
| Format: | CLOAD |
This command can be used in either direct or deferred mode to read programs from cassette tape into RAM for execution.
FOR ASSEMBLY LANGUAGE:
| Source Program |
Format: LIST#C:[,XX,YY] |
This command is used to write assembly source code. The items in the optional brackets [,XX,YY] mean to transfer only lines XX to YY to cassette. If line numbers are not provided, the whole program is listed to cassette.
Format: ENTER#C: |
This command reads source code from the cassette.
| Object Program |
Format: SAVE#C:<XXXX,YYYY |
The contents of a block of memory, locations XXXX to YYYY, is saved onto cassette.
Format: LOAD#C: |
This command will load memory with the material that was previously saved. The range of memory locations that are filled will be the same as those given in the original SAVE command.
SAVING DIGITAL PROGRAMS WITH AUDIO AS BACKGROUND
Concept
This recording technique does not allow any program control over the audio. The audio plays purely as background to help time pass during the monotonous loading process.
| Step 1: | Follow the digital writing instructions indicated in 2.2 for BASIC and assembly programs; except, this time ATARI standard cassette tape (1 7/8 inches per second) is not used. Because it is hard later for an individual to record audio onto the program recorder, we have to use the ATARI recording lab machine, which uses 7 1/2 inches per second master tape. The lab machine is a much more sophisticated recording machine able to record data onto a specified track. On the lab machine, the recording mode is switched to ON for the right track, so digital is saved onto the right track of the 7 1/2 inch tape. |
| Step 2: | Use Step 1 for audio recording, but first rewind the tape to the beginning of the program then switch the recording mode to ON for left track. This way the audio is recorded onto the left track of the 7 1/2 inch tape. |
DIGITAL PROGRAMS, AUDIO, SYNC MARK, AND SCREEN MANAGEMENT
Sync Mark Concept
There is no efficient way for the program to detect an audio segment when the cassette is playing. To solve the synchronization problem, Sync Mark is used to carry the signal to inform the program that an audio segment has been played (an audio segment can be either a piece of music or an instruction, depending on the application).
More precisely, since audio data has no record structure, Sync Mark recorded on the digital track is more or less like End-of-Record Mark for audio. For example, once the program senses the Sync Mark, the program can decide what to do next, like stop the cassette motor for lengthy processing or continue to play the next audio segment.
| Step 1: | The programmer figures out an audio script for FROG. The script is like this: (MUSIC) TODAY I AM GOING TO TELL YOU A FAIRY-TALE NAMED "THE PRINCESS AND THE FROG." IT IS A SWEET STORY SO DON'T GO AWAY. / (MUSIC) BEFORE I START MY STORY, I WOULD LIKE TO KNOW WHO I AM TALKING TO. WHAT IS YOUR NAME? TYPE YOUR NAME AND PRESS CARRIAGE RETURN. (PAUSE) (MUSIC) NOW, LET'S START THE STORY. ONCE UPON A TIME, THERE WAS THIS BEAUTIFUL PRINCESS LIVING IN A CASTLE AND HER NAME WAS YYYY. / (MUSIC) ON A CLEAR AND BEAUTIFUL DAY, THE PRINCESS WAS WALKING ALONG THE .... / REMARK: | ||||||||||||||||||||||||||||||||||||||||||||||||||||||||||||||||||||||
| Step 2: | It is suggested that before coding begins, the programmer draft a general plan for the program indicating the relationship between screen (CPU) and audio. Example: Figure C-2 illustrates how a programmer should create a cassette containing a program that control over an audio track. The example is called FROG: | ||||||||||||||||||||||||||||||||||||||||||||||||||||||||||||||||||||||
| Step 3: | The programmer can start coding the program called FROG, and it will look something like this: Download CHCPRG1.BAS (Saved BASIC)
ROUTINE TO CHECK SYNC MARK: On the tape, non-sync is represented by "MARK" and Sync Mark is represented by "SPACE." (Space is a "0" frequency; it is a lower pitch sound than a Mark which is a "1" frequency. As mentioned before, Mark frequency is 5327 Hz, Space is 3995 Hz). The Check Sync Mark routine continuously watches for a "SPACE" from the serial port. The routine looks like this: ROUTINE TO CONTROL THE MOTOR: The program can turn the cassette motor on and off by poking location 54018 with the data given below: ON: POKE 54018,52
| ||||||||||||||||||||||||||||||||||||||||||||||||||||||||||||||||||||||
| Step 4: | After the audio script has been roughly written, the programmer should estimate the time and the tape length required for the designed audio script (including pauses) and program. If the tape length required is too long for one cassette, then either the script or the program will have to be modified to fit into one cassette. | ||||||||||||||||||||||||||||||||||||||||||||||||||||||||||||||||||||||
| Step 5: | Save the program to a master tape, for example "MASTER 1." | ||||||||||||||||||||||||||||||||||||||||||||||||||||||||||||||||||||||
| Step 6: | With the audio script the voice is taped with pauses on another master tape, "MASTER 2." | ||||||||||||||||||||||||||||||||||||||||||||||||||||||||||||||||||||||
| Step 7: | After "MASTER 1" and "MASTER 2" are produced, these two master tapes are merged to produce another master tape called "MASTER 3." "MASTER 3" has the program recorded first, and the audio spliced on the end. Three recording lab machines are needed for this procedure. Make two copies of "MASTER 3." | ||||||||||||||||||||||||||||||||||||||||||||||||||||||||||||||||||||||
| Step 8: | Load the Sync Mark program into the Atari 800 Computer. The purpose of
this program is to write continuous Sync Mark ("0" frequency) onto the
digital track. The Sync Mark informs the program that an audio segment has
been played. Whenever there is a pause indicated on the audio script, a
Sync Mark is needed at that place. The finished tape with audio and sync
would be as shown in Figure C-3.
Figure C-3 The Sync Mark program looks like this: Download CHCPRG2.BAS (Saved BASIC) | ||||||||||||||||||||||||||||||||||||||||||||||||||||||||||||||||||||||
| Step 9: | Mount both MASTER 3 tapes in two independent recording machines and rewind both tapes to the splice of program and audio. Configure one recording machine to one ATARI 800 Computer with Sync Mark program loaded. This recording machine is prepared for recording Sync Mark on the digital track. The other recording machine will play back the audio recorded earlier. | ||||||||||||||||||||||||||||||||||||||||||||||||||||||||||||||||||||||
| Step 10: | Type RUN to start the Sync Mark program. At the same time start the recording machines, one for recording, another one for playback. Listen to the audio and press the [START] key whenever it is indicated by a pause in the audio script. | ||||||||||||||||||||||||||||||||||||||||||||||||||||||||||||||||||||||
| Step 11: | Now the tape is done, with the program recorded followed by the audio and Sync Mark recording. The finished tape is ready for mass production. |

DISABLING THE BREAK KEY
We suggest that the programmer disable the BREAK key. This prevents the cassette program from failing when the user accidently hits [BREAK] The OS will not recover a partial record, unless the user can rewind to the lost record. The disable BREAK key routine looks like this:
4000 X= PEEK(16): IF X 128 THEN 4020

4010 POKE 16,X-128: POKE 53774,X-128

4020 RETURN
The disable routine should be called whenever there is a change of graphics mode or any screen open call.
MASS PRODUCTION
The programmer produces one or more MASTER TAPES according to the recording techniques discussed in the forgoing paragraph. All Atari Masters are recorded on open-reel 1/4 track, 1/4-inch tape recorded at 7 1/2 inches per second. The MASTER TAPE is supplied to the duplicator as a SOURCE MASTER.
The duplicator will take the SOURCE MASTER to make a WORK MASTER for the final cassette mass production. The released product will be third generation from the original. The following is a flow of the process:

INTERIM MASTER is recommended for the duplicator, because the WORK MASTER may be destroyed or worn from excessive use. The SOURCE MASTER should be reserved only for emergency need. The INTERIM MASTER is the backup copy for the WORK MASTER.
Mass Production Of Cassettes
At present, ATARI prefers the BIN LOOP method for mass production: The WORK MASTER is copied to produce a LOOP MASTER. The LOOP MASTER may be on 1/4 inch, 1/2 inch, or any tape width. The BIN LOOP is spliced into a CONTINUOUS LOOP with a short clear leader at the splice. It is placed in a high-speed loop master machine which has one or more SLAVE machines. The configuration is shown in Figure C-4
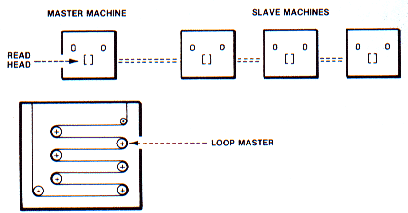
Figure C-4
The LOOP MASTER is repeatedly read. If the duplicator wants to produce 100 cassettes, for example, the length of the tape on the SLAVE MACHINE is measured to the length of the program multiplied by 100. There is a counter on the MASTER machine and it is set to 100.
As the LOOP MASTER is continuously read, the data (all four tracks) is copied onto the SLAVE MACHINE tape.
As the clear section in the LOOP MASTER is sensed, the MASTER machine produces a CUTTING TONE which is recorded on one or more tracks on the SLAVE MACHINE tapes. The counter will then increase by one.
Each finished tape from the SLAVE MACHINE has 100 recorded programs with 100 CUTTING TONES recorded. It is fed into an automatic loading machine which winds the tape into C-Zero cassette shells. The configuration is like this:
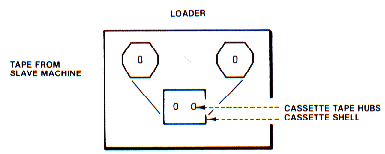
Figure C-5
The cassette shells come with a small loop of leader which is bound to the cassette tape hubs. The loader pulls the leader from the shell, cuts it, and splices the end of the slave machine tape to the leader. The tape hub is used to wind the tape into the shell until the cutting tone is sensed. The slave machine tape is then cut and spliced to the leader on the other hub.
The cassette shell is removed either manually or mechanically from the loader and the tape in the cassette shell is fully wound. The next cassette shell is loaded by the same process.
Quality Control Testing
Any time that a production run is created, samples must be taken from it and verified before it is approved and released.
The QC testing is done normally by taking the first and the last cassette produced. Atari must receive at least 10 samples from each mass production for each master released.
Return to Table of Contents | Previous Chapter | Next Chapter