A Letter Quality Alternative For Atari Users
Nancy Blumenstalk Mingus
You want letter quality capabilities on your Atari system, but Atari makes only dot matrix printers. So you decide to wait until they produce a letter quality printer instead of fighting with interfacing to non-Atari printers, right? Well, you don't really have to wait. By using the Atari 850 interface module you can use any parallel printer or RS232 serial printer on the market.
But, be forewarned. Interfacing other products to the Atari is not as easy as Atari would lead you to believe. I found this out the hard way. Although Atari does give you all the information necessary to utilize the interface module properly, you must glean the facts out of three different manuals, and that takes a considerable amount of time. This article will explain some of the problems encountered in interfacing an Anderson Jacobson 832 (RS232) to the Atari, and give some solutions that should apply to many other RS232 printers as well.
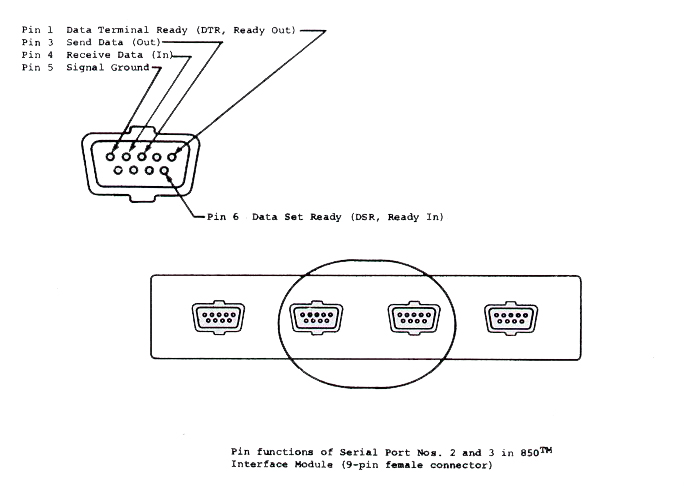
One of the hardest problems in using an RS232 printer on the Atari is getting a connector cable between the printer and the interface module. Although the literature on the 850 says it is standard RS232, it only has 9-pin connectors. Most printers use a 25-pin connector. So you need a cable to convert the proper signals coming from the 25-pin connector into signals recognized by the 9-pin connector. Now I'm no electronics expert so I wouldn't even attempt to create my own cable. Since I use port one on the 850 to connect a modem, I wanted port two to be my printer port. With the wiring diagram for port two and the wiring diagram for the Anderson Jacobson printer in hand, I located a good electrician and he kindly wired everything correctly for me. If you don't know anyone in your area who does this kind of work, your local Atari dealer should be able to help you.
Once everything is connected properly, there are a few other things you need to remember when using the printer. The most important of these concerns the disk drive. If you plan on using a disk drive with your interface module and printer you must have DOS II as your disk operating system. There is a special file in DOS II called AUTORUN.SYS which automatically runs when you turn on the computer. This affects the power up sequence you use. You must turn on the printer, then the disk drive, then the interface module and finally the computer. Also, be sure you have the BASIC ROM PAC in place.
Most of the above procedure is explained in the 850 manual, but they make no mention of the AUTORUN.SYS file. The problem we kept encountering was error number 130 when we tried to open the printer port. This message indicates that the interface module can find no such device. What had happened was that the System diskette we had created from the Master diskette had not copied the AUTORUN.SYS file. Once we copied the file on to the System diskette, we could then open the printer port.
|
Trying to print or list on the printer is now a fairly simple matter. If you want to print to it you do the following:
OPEN #2,8,0,"R2:"
where:
OPEN signifies initialization of a device or file.
#2 indicates the channel number being used. It can be any number one through eight.
8 means opening the channel for output only, which is all that is required for a printer.
0 this argument is not used, so will always be zero.
"R2:" refers to the port being used. The two signifies port two.
Then any subsequent printing statement would take the following form:
PRINT #2;"Anything",variable
where:
PRINT is the standard BASIC PRINT command.
#2 is the channel previously defined in an OPEN.
Last, to close the device or file, you would enter:
CLOSE #2
where:
CLOSE means you are terminating the use of a channel.
#2 is the channel being closed.
Again, this is explained fairly well in the interface module manual. The LIST command however, is somewhat confusing. To LIST to the printer, instead of LIST #2 as you might expect, you must type:
LIST "R2"
where:
LIST functions the same as usual.
"R2" is the port number you are listing through.
|
||||||||||||||||
Now that you know how to connect your printer, list a program and print lines to the printer you're almost ready to start. There's one last problem left to deal with. The default configurations of the RS232 ports as shown in the 850 manual need one modification, because the ports do not send a line feed when they send a carriage return. That is, when the print head returns to the left margin of the paper, the paper does not roll up one line. So all those lines you know how to print, print right on top of each other. This produces an interesting effect, yet it is impossible to read. To change this, you must reconfigure this one aspect of the printer port you are working with. Again, I use port number 2 and the command I use is:
XIO 38,#2,64,0,"R2:"
where:
XIO is a special command used to configure various aspects of a port.38 is the particular XIO command type.
#2 is the channel number being used.
64 is a decimal code meaning turn on line feed.
0 as in the OPEN command, this argument will stay zero.
"R2" is the printer port.
Before you can do a list you must enter this command, and to be safe, you should include it in any program you write where you plan to print more than one line on the printer.
And now you should be in fairly good shape to start using that nice letter quality printer.
Good luck.
Nancy Blumenstalk Mingus, 15 E. Cenesse St., Wellsville, NY 14895.
Table of Contents
Previous Section: Atari 1200
Next Section: Atari Word Processors
