3
Custom Characters
Charles Delp
Custom character graphics is an easy way to program game animation, but sometimes it results in uneven motion. Smoother animation can be achieved by using custom characters to create the fixed playfield, and then using player/missile graphics to animate the players. The three programs here show you how.
One of the easiest ways to put colorful, high-resolution playfields or special symbols on the screen is with character graphics, employing custom characters.
One of the major drawbacks of using character graphics to animate a game is that players can move only in large, character-sized jumps. When smoother action is desired, a better solution is to draw the fixed playfields using custom characters and then animate the players using player/missile graphics.
The advantages of using character graphics rather than bitmapped graphics to draw fixed playfields are:
1. Much less memory is required to achieve the same resolution.
2. More colors are available.
3. Less time is required to draw to screen memory.
4. Color fill is faster and easier.
The major disadvantage of using character graphics to draw fixed playfields is that only two colors (character color and background color) are available within any one character. The table shows the resolution, memory requirements, and colors available for various Atari BASIC character and bitmapped graphics modes.
How Characters Are Defined
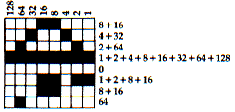
Atari characters are defined by 64 pixels arranged in eight columns by eight rows. From right to left, the values of the columns are 1, 2, 4, 8, 16, 32, 64, and 128. If a particular pixel is turned on, the value of that column is added to the row total; if the pixel is turned off, zero is added to the row total. The total value of all the "on" pixels in a row forms a byte of data which defines that row. Each of the eight rows is defined by a byte of data, for a total of eight bytes per character. (See Figure 1 for a specific example.) Note how the row bytes are arranged in memory from the character start address (CHADD).
|
||||||||||
|
||||||||||
Character Editor
Program 1 is a character editor utility which will be a help in developing the DATA statements required to define each character. Draw the character using the joystick. Erase errors by holding the trigger button while drawing over the error. Press C (Clear character) at any time to clear the screen for another character. Press D (Demonstrate character) to see the character in all three of the character graphics modes, as well as the DATA statement required to produce the character. Press P (Print data) to print a hard copy of the character DATA statement. Press E (Enter data) to enter the character data as a program line beginning at line 9000. When all characters have been entered, typing LIST "D:CHAR",9000,9999 will save the data to disk or LIST "C",9000,9999, to cassette. The data may be merged into your graphics program using the ENTER command (see Chapter 5, Atari BASIC Reference Manual).
Figure 1. Typical Custom Character
|
Row Byte Memory Location CHADD CHADD +1 CHADD +2 CHADD +3 CHADD +4 CHADD +5 CHADD +6 CHADD +7 |
Rows Byte 1 = 24 Byte 2 = 36 Byte 3 = 66 Byte 4 = 255 Byte 5 = 0 Byte 6 = 27 Byte 7 = 24 Byte 8 = 64 |
Column Values
Locating the Custom Character Set in Memory
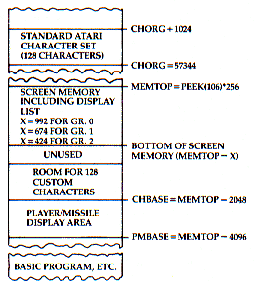
First, look at the memory map in Figure 2. The standard Atari character set is located in ROM beginning at address 57344 (CHORG). The location and size of screen memory including the display list will depend on how much RAM is installed in your computer and which graphics mode is called by your program. The new character set must be defined and stored in RAM in a location which does not interfere with screen memory, the display list, the player/missile display memory, or the BASIC program. The procedure described below and illustrated in Figure 2 will keep everything nicely separated.
- 1. Find MEMTOP on your computer by entering the following line: PRINT PEEK (106)*256.
2. Decide whether your program using the custom characters will be written in graphics mode 0, 1, or 2. For your information, the bottom of screen memory, including display list, will be located at MEMTOP - X
| where |
X = 992 for graphics mode 0 |
|
X = 674 for graphics mode 1 |
|
| X = 424 for graphics mode 2 |
3. The starting address of the custom character set, CHBASE, must be located on a 1K memory boundary, so CHBASE should start 2K below MEMTOP (1K for screen memory, 1K for the character set); therefore, CHBASE = MEMTOP - 2048.
4. If player/missile graphics are to be used, PMBASE must be located on a 2K boundary (for single line resolution), so P/M Base should start 4K below MEMTOP (1K for screen memory, 1K for the character set, 2K for P/M Display Area); therefore, PM BASE = MEMTOP - 4096.
Figure 2. Memory Map
Developing a Custom Character Set
Normally a character set consists of 128 different characters in graphics mode 0, and 64 different characters in graphics modes 1 and 2. However, a character set need not be full and may contain only as many characters as needed to meet the requirements of your program. The first character in the set must always be a space (DATA statement filled with zeros).
Program 2 demonstrates how to set up and use a custom character set containing only custom characters. To keep things simple, the set contains only eight characters.
Lines 10-30 Initialize and find CHBASE
Lines 50-70 Clear space in memory for the custom character set
Lines 90-130 POKE the new characters into memory beginning at CHBASE
Lines 200-280 Contain the character data
Lines 300-360 Print the characters on the screen
The simplest way to print the custom characters to the screen is with the PRINT #6; statement; however, the custom characters are not shown on the keyboard, so the following correlation must be performed:
1. Assign a character number to each of your custom characters, beginning with zero for your first character, number 1 for your second character, number 2 for your third character, etc.
2. Correlate your character numbers, one for one, with the Atari internal character set numbers in Table 9.6 (page 55 of the Atari BASIC Reference Manual).
3. To print your custom character, enter the corresponding Atari character in your PRINT statement. For example, the Atari character number 4 is the dollar sign ($). PRINT #6; "$" will print your custom character number 4 on the screen.
It is necessary to skip the third character of your set. (See line 220 of Program 2.) The third character corresponds to the Atari internal character quotation mark ("). It is not possible to print a quotation mark to screen using the statement PRINT #6; and placing the quotation mark between quotation marks (" " ").
The color of a character is selected by its form in the PRINT statement. If the custom character corresponds to an Atari alphabetical letter, the color is determined by entering the corresponding Atari letter in the PRINT statement in upper- or lowercase, or inverse upper- or lowercase. Four colors are available for characters corresponding to Atari alphabetical letters.
If the custom character corresponds to an Atari number, punctuation mark, etc., the color is determined by entering the corresponding Atari number in the PRINT statement in standard or inverse video. The third and fourth colors for numbers and punctuation can be obtained by using control characters (see "Discovering 'Hidden' Graphics" in Chapter 1).
The PRINT #6; method of putting custom characters on the screen has some serious drawbacks. The method used in Program 3 may not be as easy to understand, but has fewer limitations, particularly for drawing entire playfields.
Mixing Standard and Custom Characters
In addition to colorful playfields, most games print numbers and specific letters on the screen to display such things as score, time, fuel, hits, etc. The standard Atari character set already contains these characters, so it would be pointless to develop custom characters for this purpose. The solution is to develop a custom character set containing all the necessary standard numbers and letters, but to replace all unneeded standard characters with custom characters.
The procedure for developing a mixed character set is described below:
Note:Refer to Table 9.6 in the Atari BASIC Reference Manual,page 55.
1. Determine which standard characters will be needed in your program.
2. Form a string variable which contains the unneeded standard characters. The string may include any unneeded characters with 0 and 127 for GRAPHICS 0, or between 0 and 63 for GRAPHICS 1 and 2. The only exception in either case is the quotation mark, for reasons explained before.
3. Copy the standard character set from CHORG (57344) to CHBASE by PEEK and POKE statements.
4. Modify the unneeded standard characters into custom characters by POKEing custom characters data into the character address (CHADD) of each character in the string. (See Program 3 for specific details of the procedure.)
Printing Complete Playfields
Program 2 places the custom characters onscreen with PRINT #6; statements. A better, though more difficult, method is plotting the character on the screen using color data to designate which character is to be plotted and in what color the character will appear. The color data to define a character contains two elements: the character number (the Atari internal character set number from Table 9.6), and a plus or minus offset which determines the color of the character. The offsets may be obtained from Figure 9.7 on page 56 of the Atari BASIC Reference Manual.The easiest way to explain this concept is with examples.
Example 1: Suppose you want to display the standard character K in graphics mode 1 with color 0:
1. From Table 9.6, the internal character number for K is 43.
Note that the K is from column 2.
2. From Table 9.7, the offset to produce a column 2 character in color 0 is + 32.
3. The color data to plot K in color 0 would be 43 + 32 = 75.
4.
- 210
220 Color 75
230 Plot 5,7
240. . .
The program lines above will print a K in color 0 at X = 5, Y = 7.
Example 2: Suppose you want to display your custom character number 19 in graphics mode 2 with color 3. Your character number 19 corresponds to the standard character ";":
1. From Table 9.6, the internal character number for the semicolon (;) is 27 from column 1.
2. From Table 9.7, the offset to produce a column 1 character in color 3 is + 128.
3. The color data to plot your custom character in color 3 would be 27 + 128 = 155.
4.
- 150. . .
160 Color 155
170 Plot 7,1
180. . .
The program lines above will print your custom character in color 3 at X=7, Y=1.
A complete playfield may be drawn using the color/plot method by implementing a nested row, column loop which reads the color numbers from DATA statements and plots the characters to the screen (see lines 550 through 610 of Program 3 for a method).
Using the color data method has one other advantage: it allows easy printing of the quotation mark (") as well as all the numbers and punctuation in four colors.
Program 3 is a full screen, GRAPHICS 2, fixed playfield demonstration using 31 custom characters:
|
Lines 30-80 |
Initialize, define string, and find CHBASE. Move standard character set down to CHBASE. Modify the characters in the string into custom characters. locates the correct addresses to modify. The -32 is an offset to change ATASCII to Atari internal character numbers. Custom character data. Select split screen mode; kill cursor. Change character set pointer; select colors. Read color data and plot characters on screen. Print standard characters in text window. Flicker engine exhaust. Color data for 10 rows of 20 characters. |
Program 1. Character Editor
Download P061L1.BAS (Saved BASIC)Download / View P061L1.LST (Listed BASIC)
Program 2. Custom Characters
Download P061L2.BAS (Saved BASIC)Download / View P061L2.LST (Listed BASIC)
Program 3. Fixed Playfield Demonstration
Download P061L3.BAS (Saved BASIC)Download / View P061L3.LST (Listed BASIC)
Return to Table of Contents | Previous Section | Next Section