Animation And P/M Graphics
Tom Sak and Sid Meier
This article builds upon the vertical blank routine in the preceding piece, showing how to animate players with pre-drawn shapes.
You're already familiar with the Atari's ability to rapidly move a player from one location to another. But there are many times when you would like to do more than simply move a player; you'd like to give it life-like motion, or animation. Spend a few minutes and learn how you can achieve these effects with far less effort than you might have imagined.
The art of bringing life to still pictures is much older than many of us realize. The production of books which contained moving pictures was well established before the invention of the motion picture camera and projector. The effect of moving pictures was typically accomplished by rapidly flipping the pages of a booklet containing simple character drawings, making them seem to spring to life.
Walt Disney and numerous other animators have produced this illusion of motion by drawing series of pictures in which each picture differs from the previous one only in a very small detail, a subtle displacement of each moving element. The pictures are then photographed for subsequent projection.
For example, an animator, using a sequence of drawings, draws a man who appears to raise his arm away from his side. The first drawing would show the man facing you with both arms at his sides. The second picture differs only in that one arm is now slightly away from the man's side. The next picture shows the arm slightly further away, and so on through the sequence of drawings.
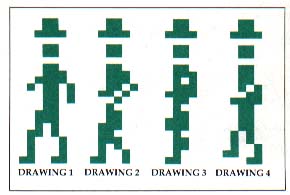
Animate With Only Four Drawings
As each picture in the series is viewed in rapid succession, by flipping through the stack of drawings, the figure appears to be raising his arm away from his side. A motion picture film consists of an analogous sequence of pictures which also provide the illusion of motion when they are projected and viewed in rapid succession.
As you can well imagine, a very large number of drawings is required to produce even a relatively short motion picture sequence. Since you're not about to adapt Fantasia for the small screen attached to your Atari, we will show you a way to use only four drawings, repeated in a cyclical pattern, to produce the illusion of motion. This is a very effective shortcut which makes it practical to adapt the animator's techniques to your BASIC program.
Now for some Atari animation. There is no question that our artistic creativity and graphic talents may never rival those of Walt Disney, but we will endeavor to adapt the basic animation technique which he popularized in order to move four "cowboys" from right to left across your television screen, totally out of step with each other.
For illustrative purposes we'll begin by moving only one cowboy. Program 1 accomplishes this objective by using the automatic player/missile graphics manipulation of the vertical blank interrupt routine which we discussed in the preceding article. Those who have entered the example program in that article will be pleased to know it already contains the animation features described here.
Program 2 adds complexity to the one cowboy program, illustrating the asynchronous movement of four players. Developing an understanding of the more complex program won't be too difficult once you've grasped the concepts in Program 1.
Reviewing Vertical Blank Interrupts
An elementary understanding of our vertical blank interrupt routine, VBLANK PM, is a prerequisite. Here we will review highlights of our previous article.
VBLANK PM is a machine language subroutine which occupies a portion of memory page six. It is initialized by a single BASIC USR function call which causes VBLANK PM to notify the operating system of both its presence and its desire to be automatically invoked during each vertical blank interrupt.
Prior to initialization, a 2K (2048) byte memory allocation must be made for the storage of players, and the players must be drawn. Following initialization, a POKE of the x-axis (horizontal) and y-axis (vertical) screen coordinates is all that is required to cause a player to be automatically moved during the next vertical blank period, or approximately every 60th of a second.
We hinted in the previous article that VBLANK PM has an animation feature just waiting to bring life to your players. All you need do is supply a few more drawings. The drawings and the current display image are contained in the 2K byte storage block.
Players Are Stored As Separate Images
Figure 1 depicts the memory allocated for the storage of players (see line 1030 in Program 1; memory allocation is explained in our earlier article). The current displayed image of player zero resides at locations PMBASE + 1024 through PMBASE + 1279; player one's homestead is PMBASE + 1280 through PMBASE + 1535, and so on for the other two players.
To achieve the animation, you need more than one image of each player, so the lower 1K (1024) locations (PMBASE through PMBASE + 1023) of the 2K byte storage block are used to hold the necessary set of drawings. Each player's drawings are stored in an area of memory beginning at a location which is 1K bytes below (lower memory address) the player's position in the upper 1K portion of the 2K byte storage block. A drawing is copied to the upper 1K portion by VBLANK PM when it is to be displayed. As a matter of fact, you won't draw anything at all in the upper 1K locations, but will let VBLANK PM look after this chore for you.
For example, all of the player zero drawings reside at the 256 locations beginning at PMBASE. The currently displayed image of player zero resides at locations PMBASE + 1024 through PMBASE + 1279. The drawings for player zero are stored 1024 locations below this point, which is equal to PMBASE + 1024 minus 1024, or simply PMBASE. The player one drawings begin at PMBASE + 256, or (PMBASE + 1280)1024, and so on for players two and three at locations PMBASE + 512 and PMBASE + 768, respectively.
A note of caution: we mentioned in the previous article that you could use the lower 1K bytes for your own purposes without disturbing anything. This is true only when the VBLANK PM animation feature is not going to be used. We hope that you've not been led too far astray!
At the risk of stating the obvious, we'd like to mention that as soon as you've decided to use more than one drawing per player--which you must do in order to achieve the animation--you can no longer have a player which is 255 lines tall. This is true because there are only 256 locations in which to store all of the drawings necessary to animate a single player. The first position, location zero, of each storage bin is reserved for a reason discussed later.
Initialize The Vertical Blank Routine
Now let's turn our attention to Program 1. Line numbers ending in zero are the same as in the preceding article and, for those who previously keyed the lengthy DATA statements containing VBLANK PM, we've made no changes to the machine language subroutine.
Lines 105 through 205 are the main program which causes our ragtag cowboy to meander across the screen. The BASIC code required to load and initialize VBLANK PM is found on lines 1000 through 1110. The VBLANK PM machine language subroutine is represented as DATA in lines 2000 through 2100. Finally, lines 3005 through 3045 contain the four drawings, used to describe a single player.
Before reviewing the main program, we'll go over the initialization subroutine which performs three functions: load VBLANK PM, load the player's drawings, and initialize VBLANK PM.
Lines 1010 and 1020 cause VBLANK PM to be read from DATA statements and POKEd into memory page six. A more memory-efficient method of representing VBLANK PM is the use of a string variable instead of DATA statements. Using this alternative, you continue to POKE the VBLANK PM code into page six, but from the string variable instead of from DATA statements.
You would save memory because only a single byte of memory is required in the string variable assignment statement to represent a byte of machine language code. In the DATA statement, as many as three bytes may be required for the same thing. For certain other machine language code applications, you can directly execute from the string, eliminating the need to POKE the code into another memory location.
How The Animation Works
Line 1030 acquires the 2K byte memory storage block, and line 1040 assures that the upper 1K byte display portion is cleared. Lines 1045 through 1065 are responsible for reading and storing the player's drawings in the lower 1K byte portion of the storage block. The four drawings of a cowboy are illustrated in Figure 2; you see now why Disney Productions can rest easy!
Notice that in line 1045 the first location in which the first drawing is stored is established as one byte above PMBASE; you will learn why this is necessary in a minute. The FOR statement on line 1055 assures that four drawings (zero through three) are read and stored. Each drawing is 24 lines tall, so we begin the FOR loop on line 1065 with the base of the first drawing offset by 24 bytes for each previous drawing stored. Since each drawing consists of 24 bytes, the loop is completed by adding 23 to the starting point.
Line 1075 designates the player's color. Line 1080 establishes the locations to be POKEd to change the player's x-axis and y-axis screen coordinates (PLX and PLY) and to set the length (height) of the player (PLL).
The x-axis screen display positions for players zero, one, two, and three are indicated by POKEs to PLX, PLX + 1, PLX + 2 and PLX + 3, respectively. The analogous situation is true for setting the player's y-axis coordinate (PLY, PLY + 1, . . . ) and the player's height (PLL, PLL + 1, . . . ), and for selecting the next drawing to be displayed (PDR, PDR + 1, . . .).
PDR is defined on line 1095 and is used to select the next drawing to be used as the player's current display image. VBLANK PM is responsible for copying the drawing to the appropriate location in the upper 1K byte portion of the 2K byte storage block. A value in the range of one to 255 is POKEd into PDR to indicate the bottom-most line of the selected drawing. The most recent value POKEd into PLL indicates the number of bytes (the height of the player) to be copied.
VBLANK PM Must Announce Itself
A value of zero POKEd into PDR signals VBLANK PM to continue to display the current image. This is why we were careful to avoid location zero when loading the first drawing. VBLANK PM sets PDR to zero automatically after it copies a drawing to the upper 1K byte display area.
Location 1771, POKEd in line 1095, is a location in VBLANK PM which must contain the memory page number of the first page in which drawings are stored. Location 1788, referenced on line 1090, is also in VBLANK PM, and must contain the page number of the beginning of the upper 1K byte current display portion. (These parameters afford even greater flexibility to VBLANK PM, features which are beyond the scope of this discussion. )
The other POKEs on line 1090 are associated with the Atari's player/missile graphics mechanism which is described in numerous other articles.
VBLANK PM is initialized on line 1100. This is the only explicit BASIC function call to VBLANK PM which is required. As a result of this call, VBLANK PM will register its intention to become a part of the vertical blank interrupt process with the operating system.
Inside The Main Routine
Turning our attention to the main program, we start with line 105, which establishes the television screen background, or playfield. It is important that you always define a graphics mode (execute a graphics statement) before you initialize VBLANK PM; if you fail to follow this sage advice, you are likely to be plagued by a strange flashing vertical bar on your screen.
It doesn't matter which graphics mode is specified since Atari players are independent of the mode. Graphics mode one is chosen to provide a text window to serve as a walkway for our strolling cowboy. Line 125 sets the y-axis position of the cowboy so he appears to walk on top of the text window. The player's height is also established on line 125.
The animation is performed by lines 135 through 205. These lines should be relatively easy to comprehend once you have a mental picture of the way in which the drawings were stored during the initialization procedure. The variable DRAW, initialized as one on line 135, selects the next drawing to be used as the current display image.
Lines 145 and 165 control the right to left motion of the cowboy by using the index variable I as the x-axis coordinate of the player. The POKE to PDR on line 185 selects the next drawing to be displayed, and the calculation on line 195 results in the selection of the drawing to be used in the next cycle when the cowboy takes his next step.
The IF statement on line 195 assures that after the fourth drawing is used, the program will cycle and begin anew with the first drawing. The FOR loop on line 205 controls the speed with which the cowboy strolls across the screen. A maximum value of 30 results in a movement which you might describe as a brisk walk. The larger the maximum value of this delay loop, the slower the pace of the player.
The cowboy will continue to walk across the screen until you stop the program. Incidentally, the program does not gracefully turn off the Atari's player/missile graphics mechanism, so you are well advised to press SYSTEM RESET to remove the undesirable residue from the screen. (POKE 53277,0 turns off the player/missile gracefully.) Be patient when the program is started, since it takes more than ten seconds for the initialization procedure.
Four Heads Are Better Than One
And that's almost all there is to animation! Are you ready to tackle a little bit more challenging project? Program 2 represents enhancements to the program we've been reviewing. It uses all four players and, while it causes them to walk out of step with each other, it employs only the same four drawings.
Program 2 modifies seven lines and adds two more. The changed lines are: 125, 165, 185, 205, 1045, 1055 and 1075; lines 155 and 175 are new.
Line 1045 now includes a FOR statement to cause the drawings to be READ and POKEd in the storage area associated with the additional three players. Note also that the calculation of DRWBAS is revised to reflect the additional players. DRWBAS contains the address of the first byte of the drawing storage area containing the first drawing for the current player. As the value of the variable, I, in the FOR loop is indexed from 0 to 3, DRWBAS will take the values 1, 257, 513 and 769. The first byte, location 0, of each storage area is skipped for the reason mentioned earlier.
A RESTORE statement is added to line 1055 which resets the DATA pointer to reread the same drawings for each player. The modification to line 1075 is simply the addition of player colors for the new players.
Looking at the main program, line 125 now establishes the y-axis and height for four players rather than one. Line 155 is added to cycle through the x-axis movement and picture selection for all players.
In line 165 we've added a calculation to the x-axis positioning POKE to maintain a separation between the cowboys which is equal to slightly more than the width of a single player as measured from the left-most edge of one player to the left-most edge of the following player.
Still Only Four Drawings
Line 175 is added to assure that a different drawing is used as the current display image for each player. The variable DRAW continues to determine the drawing to be selected for player zero. Study the statement, and you will discover that each player will be depicted by the drawing following that used for the previous player. That is, if player zero is pictured by the first drawing, then player one is illustrated by the second, player two by the third, and, finally, player three is displayed as the fourth drawing. A circular assignment is used so that the fourth drawing is followed by the first.
The delay loop is omitted from line 205 because the additional calculations needed for the added players consume sufficient time to maintain a reasonable pace for all four cowboys. You might want to experiment with a delay loop to further slow the action; better yet, consider using GET to accept a keystroke instead of employing a delaying FOR loop. The GET will allow you to step the players across the screen in order to study the animation technique.
Don't you agree that animation makes a world of difference in the use of player/missile graphics? I was fascinated when my more talented partner, Sid, gave me a half-dozen lines of cryptic BASIC statements to turn into an animation tutorial. The first time I saw them execute, I was mesmerized. Go ahead, type either program into your Atari; you'll be addicted too.
Figure 1.
|
8 bits wide |
||||||||||||||||||||
|
|
|||||||||||||||||||
|
( ) - VBLANK PM unique usage |
||||||||||||||||||||
Figure 2.
Program 1.
Download P181L1.BAS (Saved BASIC)
Download / View P181L1.LST (Listed BASIC)
Program 2.
This program uses the Vertical Blank Player/Missile routine, so add lines 2000-3045 of Program 1 when you type it in.
Download P183L2.BAS (Saved BASIC)
Download / View P183L2.LST (Listed BASIC)
Return to Table of Contents | Previous Section | Next Section