We will now learn a little about the workhorse of our ATARI, the 6502 family of microprocessors. All real computing in our ATARI is done inside the chip known as the CPU (Central Processing Unit), sometimes called the MPU (Micro Processing Unit). Different computers use different CPUs, the Z-80, the 8080, and the 6502 among them. The ATARI computers and many other popular machines use the 6502, or a modification such as the 6502A or 6502B, as their CPU. When we speak of programming in machine language or assembly language, we are really talking about programming the 6502 directly or indirectly.
In addition to the 6502 microprocessor, there are three additional specialized chips in our ATARI, and these are found in no other microcomputer. They are called ANTIC, POKEY, and GTIA (or in some of the first ATARIs, CTIA). They work in concert with the 6502 to produce the spectacular graphics and sounds that we have all come to associate with the ATARI computers. Their presence in only ATARI computers explains why frequently the same program run on an ATARI and some other microcomputer looks and sounds so much better on the ATARI. The uses for each of these chips and the ways to access them in our programs will be discussed later in this book.
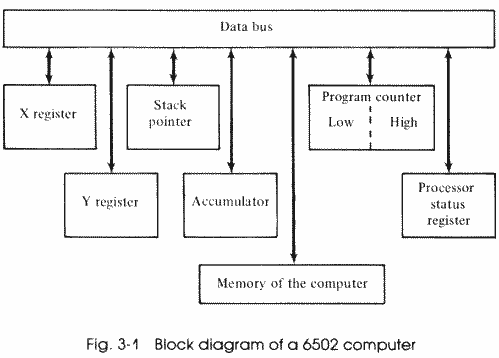
Let's take a brief exploratory tour of the 6502, and learn a little about the way it works. The first thing that we may be surprised to learn is that this powerful computer of ours really only knows how to compare two numbers, or to add or subtract them! What happened to square roots? Division and multiplication? All the complex math we can do so easily in BASIC? Since these functions are really only combinations of comparisons, addition, and subtraction, we can easily teach our ATARI how to perform complex math, as we'll see later. Meanwhile, let's see how our computer works. There are six parts to each member of the 6502 family (Fig. 3-1), and we'll discuss each individually and then talk about how they work together.
THE ACCUMULATOR
The first part of this complex chip is the accumulator, usually called A in assembly language shorthand. This is the part that actually does the computing – the comparisons, the addition or subtraction. One way to think about the accumulator is to picture it as looking like the capital letter Y. You can stuff numbers into each of the top arms and operate on the numbers (add or subtract) to produce a result that can be pulled out of the bottom. The accumulator is unique in this respect, since it is the only place in the computer that can operate on two pieces of information at the same time. Let's think about a simple analogy in BASIC for a moment. If we
POKE 752,1
and then immediately follow that instruction with
POKE 752,0
we know that location 752 will now have the value of zero. That is, it cannot have both values simultaneously. We also know that we cannot add 12 to the value stored in memory location 752 directly. In order to do this in BASIC, the following program would be required:
10 I=PEEK(752)
20 I=I+12
30 POKE 752,I
What we did was pull out the value stored in memory location 752, increase it by 12, and put the new value back into memory location 752. How did we increase the value by 12?
We used the accumulator to increase the value of I by 12 in line 20. How we did this, and the exact instructions required for this manipulation, will be covered later. For now, it's enough to realize that the only part of our ATARI that can actually perform mathematical operations is the accumulator. Whenever we need to perform any math, we must follow the pattern shown above in the BASIC example; that is, we must load the value to be changed into the accumulator, change it, and store it back where we need it. This is an operation fundamental in assembly language programming, as we'll see shortly.
THE X AND Y REGISTERS
Our tour of the 6502 continues with the next two parts of the chip, the X and Y registers. These two storage locations are housed directly in the 6502 CPU, unlike the many other memory locations in our ATARI. They cannot be accessed directly from BASIC, but they are addressed frequently from assembly language. The registers can be used in either of two ways. The first is fairly simple and is exactly analogous to the BASIC POKE command. That is, we can use these two registers as simple storage locations to house information that we know we will need shortly. This is a fairly simple use of these two powerful registers. Their second use is as offset counters, or index registers. For instance, suppose we want first to access location 752, then 753, and then 754. In BASIC, we could do this in two ways:
10 A(1)=PEEK(752)
20 A(2)=PEEK(753)
30 A(3)=PEEK(754)
or
10 FOR X=0 TO 2
20 A(X)=PEEK(752+X)
30 NEXT X
The first way is usually referred to as the "brute-force" approach. It works all right as long as the number of items to be accessed is low, but if we just change the problem to require the accessing of 30 locations instead of 3, our program grows to be 30 lines long instead of 3. In the second example, the only thing that changes is the 2 in line 10. This is a more general and much more versatile solution to the problem posed. As you can see, we are using X as an offset from location 752. That is, the first time through the loop, we access location 752 + 0, or 752. The second time through the loop, we access location 752+ 1, or location 753. We are using the value of X as an offset from the base address of 752.
The X and Y registers of the 6502 can be used in exactly the same way, giving us a quick and easy way to access information stored in consecutive memory locations. Since so much information can be stored this way – arrays, strings, tables, screens, and the like – we have a very easy way of building information and of finding out what we've built.
THE PROGRAM COUNTER
Continuing our tour, we next encounter the program counter, or PC. The first thing that we notice about the program counter is that it's twice as big as the other registers in the 6502, 2 bytes wide instead of just 1; this is the only place in the whole computer which can act as a single 16-bit (2-byte) register. The program counter is responsible for remembering what comes next in your program. For instance, we have all learned that in a BASIC program, line 10 is executed before line 20, which in turn comes before line 30, and so on, and that each line of BASIC is converted to machine language before execution. How does the computer remember where it is and what machine language instruction comes next? The program counter tells it. The program counter is a 16-bit register because it must be able to point to every memory location in the computer. As we learned in Chapter 2, 16 bits are required in order to address 65,536 memory locations, so the program counter must be 16 bits wide. Remember, the program counter always points to the next instruction to be executed.
THE STACK POINTER
Before we continue our tour of the 6502, how about stopping for lunch? Here's a cafeteria – let's stop in here for a quick bite (byte?). First let's get a tray and silverware. Let's see… anything else we need before going through the line? Oh yes, a plate. We'll just grab one from this stack here. Notice how when we grab a plate from the top of the stack, the whole stack moves up one plate, so the next plate is now in the position ours was in before we grabbed it. It's a spring-loaded stack. We could keep taking plates off the top, and there would still be a plate in the same top position. The stack would be one plate shorter, and all of the plates in the stack would be one position higher, but the top plate would always be in the same position, until, of course, we ran out of plates.
Now that we've eaten, let's get back to our tour. The next register on the horizon is called the stack pointer. Sound familiar? Yes, it works just like the stack of plates we just saw in the cafeteria. Let's use a BASIC example again. Look at the following BASIC program:
10 GOSUB 40
20 PRINT "GOODBYE"
30 END
40 PRINT "HELLO"
50 RETURN
If we trace the flow of this program, we see that first we will print the word HELLO to the screen, and then we will print the word GOODBYE below it. The program will then end. How does this happen?
First, we go to the subroutine at line 40, where we print out the first word. Then we get to the RETURN in line 50, which causes line 20 to be executed. How does the computer know that line 20 should have been the next line executed after coming back from the subroutine? Aha! That's where the concept of a stack comes in. BASIC uses a run-time stack, just like the stacks we have been discussing. When the GOSUB statement in line 10 was executed, the first thing BASIC did was to push the line number and offset within that line onto its run-time stack. This stack is distinct from the 6502 stack, since in all 6502-based computers, page 1, memory locations 256 to 511 inclusive, is used as a stack. Both of these stacks work just like the cafeteria; if we then push additional addresses onto the stack, the first address will simply move down the stack as additional numbers are added (Fig. 3-2).
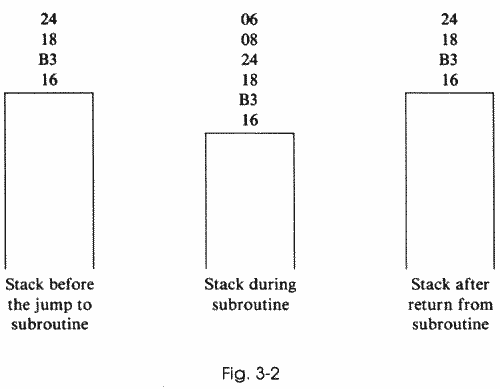
The stack pointer, then, is the part of the 6502 which keeps track of what is currently on the bottom of the page 1 stack. We don't have to worry about how many values are on the stack, or how to add a value to the stack. The 6502 handles all of that overhead for us, just like BASIC takes care of its own stack without our worrying about it. The only thing we do have to worry about is that we don't try to stuff more than 256 numbers onto the stack. Since the maximum size of the stack is 256 numbers, if we put more numbers onto it, the first numbers that we pushed on will fall off the bottom and we'll lose them. Then, when we try to pull them back off to use them in some way, they won't be accessible, and we'll probably have a crash.
Now that we know how to get numbers onto the stack, how about getting them off again? In our BASIC example, we finished the subroutine with the RETURN statement in line 50. This statement tells BASIC to pull the top line number and offset off the stack, and RETURN to that location. That's how we get back to line 20, which is where we are supposed to be after the subroutine. Notice that we don't have to know anything about stacks in order to use a subroutine in BASIC. It works pretty much the same way in assembly language, although as we will see, knowing how the stack works is important to its several other uses in assembly language.
THE PROCESSOR STATUS REGISTER
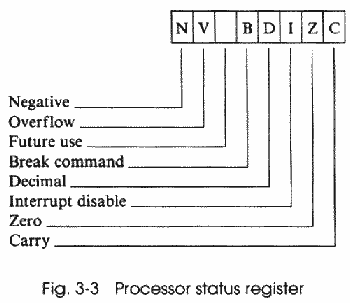
We will complete our tour of the 6502 by visiting the processor status register, which is really just a 1-byte collection of various flags that the 6502 uses for certain conditions. For those of you who have not encountered the term flag before, it is a variable whose value indicates a certain condition. Let's use a BASIC example:
10 I=0
20 IF FILE=33 THEN I=1
30 ...
In this example, we could check in line 30 to see if FILE= 33 by checking the value of I. If I = 0, then we know that FILE doesn't equal 33, but if I = 1, then we know that FILE = 33. In this example, I is a flag which gives us information about the value of FILE. In much the same way the seven flags in the processor status register of the 6502 give us considerable information about what's happening during our program. Each flag is a single bit in the single byte of this register (Fig. 3-3). Flags are usually known by their single-letter abbreviations, as follows:
| Letter | Flag |
Meaning |
|
|
||
| C |
Carry |
1 = true |
| Z |
Zero |
1 = result of zero |
| I |
IRQ disable | 1 = disable |
| D |
Decimal mode | 1 = true |
| B |
Break command | |
| V |
Overflow |
1 = true |
| N |
Negative |
1 = negative |
THE CARRY FLAG
The carry flag, C, tells us whether or not the previous operation set the carry bit; that is, whether or not an addition summed to greater than 255. As a simple example, let's add 250 + 250. We can all easily calculate (perhaps with a little help from our ATARIs) that the answer is 500. However, this presents a bit of a problem in assembly language programming. Since we know that 255 is the largest 1-byte number we can have, how do we possibly represent the answer to this simple problem? Well, we can view the answer as 500 – 255 with a carry. That is, since the answer is larger than 255, we carry 1, and the answer is 245 with a carry of 1. But how can we tell the difference between an answer of 245 and an answer of 245 with a carry? Since we first set the carry bit in the processor status register to zero, and we add 250 plus 250 in the accumulator, we end up with 245 remaining in the accumulator. The carry bit is now 1, instead of zero, allowing us to calculate the true sum. If we add 240 + 5, we would again find 245 as the answer in the accumulator, but the carry bit remains zero, enabling us to distinguish between the two situations. Note that since each of the two numbers we add together must be less than 256, we will never run into the situation where the carry will have to be 2, so a 1-bit carry flag is sufficient for our needs. As we shall see, the carry bit is used in virtually all mathematical operations in assembly language.
THE ZERO FLAG
The zero flag tells us whether or not the previous operation yielded a result equal to zero. If it did, the Z flag equals 1. Therefore, if the Z flag starts out equal to zero, and we subtract 2 from 2, the accumulator will contain the value 0, and the Z flag will be 1. To determine whether or not something is equal to zero, we just have to operate on it in any of several possible ways and then look at the Z flag. We will see how useful this is in later chapters.
THE IRQ FLAG
IRQ stands for interrupt request. If you have read articles on any of the more advanced techniques possible on the ATARI computers, you are probably familiar with the term interrupt as in display list interrupt or vertical blank interrupt. Before you finish this book, these techniques will be easy for you to add to your own programs. The 6502 can be interrupted from its normal operations only if the I flag is equal to 0. If I is equal to 1, then normal interrupts are not possible. This fact will be important in later discussions of various interrupts used in the ATARI. For now, just remember that in order for interrupts to occur normally, the I flag in the processor status register must be equal to 0. If we set the I flag to 1, interrupts will not be allowed. We call this masking the interrupts.
THE DECIMAL FLAG
The 6502 has two modes in which it can operate, binary and decimal. The value of the decimal flag, D, in the processor status register determines which mode the processor is in. If this value is 1, all operations will be in the decimal mode, and if it is 0, they will be binary. In general, most operations in assembly language use binary math, but you have the ability to switch by toggling this flag.
THE BREAK FLAG
The break flag, or B flag, can be set and cleared only by the 6502 itself. The B flag cannot be altered by the programmer. It is used to determine whether an interrupt was caused by the 6502 instruction BRK, which stands for BReaK. Since it cannot be set or reset by the programmer, the B flag has little function in a normal program, and in general is used only to determine program flow.
THE OVERFLOW FLAG
Although each byte consists of 8 bits, as we discussed in Chapter 2, in signed binary math the most significant bit is used to indicate the sign of the number; therefore, the largest signed number we can represent in 1 byte is 128. Here's a situation analogous to that requiring the carry flag discussed above. What happens if we try to add +120 and +120 together? The answer should be +240, but expressing this number requires the use of the most significant bit, which, in signed math, represents the sign, not part of the number. Therefore, if we are doing signed math, we somehow need a way of determining whether the math has overflowed into the sign bit. The overflow flag, V, is used to determine this. If the V flag is 1, overflow into the sign bit has occurred, and if it is 0, no overflow has occurred. We can therefore test this flag to be sure the number we have produced can safely be interpreted as a signed binary number. It is important to note this bit when doing signed math, and to allow a way for the program to deal correctly with such overflow, so it can still correctly interpret signed numbers, regardless of overflow.
THE NEGATIVE FLAG
The final flag in the processor status register is the negative flag, N. If this flag is 1, the previous operation yielded a negative result, and if the N flag is 0, the result was either positive or equal to zero. Note that we can then determine whether a number is zero or positive by testing the Z flag. Tests of the N, C, and Z flags represent the major methods for allowing for branching in an assembly language program, similar to IF… THEN logic in BASIC programs.
This concludes our brief tour of the 6502 chip, the heart of our ATARI computer. Now that we know the layout of the hardware, we can begin to learn the instructions necessary to program it.
MEMORY ALLOCATION SYSTEM
We have already discussed one aspect of memory allocation in computers using the 6502; that is, that the stack occupies a specific place in memory. Memory in a 6502 computer is divided into pages, each of which is 256 bytes long. You have probably already encountered the term page, especially in connection with the area of memory reserved for you, the programmer, by ATARI: page 6. Page 6 is the area of memory from $600 to $6FF, or in decimal nomenclature, from 1536 to 1791, and ATARI states that none of their software will ever require that space, so it is free for your use. Actually, this is not quite true, so be very careful when using this space. Page 6 is located, cleverly enough, directly above page 5; and the high half of page 5 is used by the ATARI computers for several purposes. There are certain conditions when you may overflow this area, and the overflow will be stored at the beginning of page 6, right on top of your carefully protected information. The moral: use page 6 with care, and be aware of the potential pitfalls.
Other pages of memory also have specific uses in 6502-based computers. The most important of these is page 0, the first 256 bytes of memory in the computer. Page 0 has particular significance to the assembly language programmer, since all access to this page is faster than access to anywhere else in the computer, and since certain operations can only be performed using page 0 locations. However, here we run into a major snag. Since this area is so important, you might expect to have it all for your use. Wrong! Since it's so important, ATARI used almost all of page 0 for their own use. In fact, if you have either the BASIC or the Assembler/ Editor cartridge in place, only 6 bytes of page 0 are available for your use! That's right, six. So we're going to learn a few tricks to make more of page 0 available, and we're going to make judicious use of the locations at our disposal.
We'll learn a lot about pages 2 to 5 ($200 to $5FF, or decimal 512 to 1535), which contain information needed by the operating system. The pages above page 6 are generally reserved for DOS. Memory that the assembly language programmer can safely use without running a risk of having programs overwritten by DUP.SYS generally begins at $3200, or decimal 12800. Any cartridge which may be present generally starts at $A000 and continues up to $BFFF; after this, memory for the operating system goes all the way up to the top of memory, $FFFF Many of these locations will also be discussed in detail in later chapters, but this outline serves as an introduction to the memory allocation system in your ATARI, and, in broad strokes, paints a picture of what goes where. The details will be filled in as we proceed.
Return to Table of Contents | Previous Chapter | Next Chapter