Sometimes it's handy to be able to detect different intensities of light. Perhaps you'd like to have a simple switch to turn on your outside lights at dusk and then turn them off again at dawn. If you need to detect different degrees of lighting, you need an analog light sensor.
The analog light sensor built in this chapter is a cadmium sulfide photocell. It's a variable resistor whose resistance changes proportionally to the amount of light which strikes its light-sensitive surface. This, in turn, provides the computer with information regarding just how much light is present. The resistance increases as the amount of light striking it decreases. Exposed to bright light, the cadmium sulfide photocell has a resistance of a few hundred ohms between its terminals. In darkness, this resistance increases to approximately 0.5 megohms-about the same value range as the potentiometer on the Commodore paddles. In fact, it's possible to connect the cadmium photocell in much the same manner as a paddle.
Light Sensor-Commodore Computers
To build an analog light sensor for a Commodore 64, Commodore 128, or VIC-20, you'll need the following parts:

|
To complete the project, follow these steps: |
|||||||||||||||||||||
|
1. Cut two pieces of the stranded copper
wire about 24 inches long and strip about 1/4 inch of insulation from
each end. Cut several small pieces of solid wire about 2 inches long to
use as jumpers. (You'll need them in this circuit and most others in this
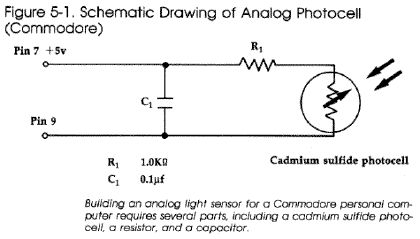
book.) 2. Solder the end of one wire to pin 7, and the other wire to pin 9 of the 9-pin plug. 3. Connect the wire attached to pin 7, the +5-volt lead, to point X1 on the solderless breadboard. Place the other wire (that attached to pin 9) to point Y1 on the board. 4. Install jumper wires between points Y2 and J2, points X2 and A2, and points J13 and Y13. 5. Place the 0.1 microfarad capacitor between points F2 and E2. 6. Bend the leads of the 1K ohm resistor, and install it between points B2 and B13. 7. Install the cadmium sulfide photocell between points E13 and F13. |
|||||||||||||||||||||
Light Sensor-Atari
Putting together an analog light sensor for the Atari computer series
involves some different components and different directions.
You'll need:
|
|
|
||||||||||||||||||
|
|
1. Cut two pieces of the stranded copper
wire about 24 inches long and strip about 1/4 inch of insulation from
each end. Cut several small pieces of solid wire about 2 inches long to
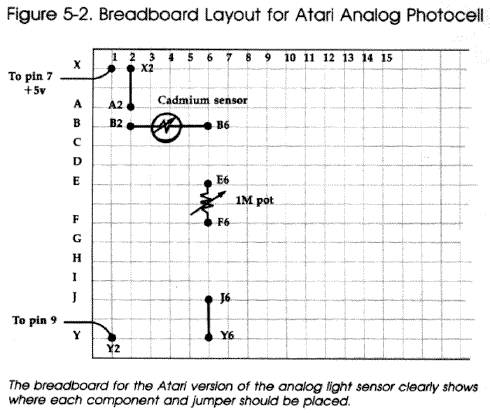
use as jumpers. 2. Solder the end of one wire to pin 7, and the other wire to pin 9 of the 9-pin plug. 3. Connect the wire attached to pin 7, the +5-volt lead, to point X1 on the solderless breadboard. Place the other wire (that attached to pin 9) to point Y2 on the board. 4. Install jumper wires between points Y6 and J6, and points X2 and A2. 5. Place the 1M potentiometer between points E6 and F6. 6. Install the cadmium sulfide photocell between points B2 and B6. |

|
To see how your analog light sensor works, use Program 4-1 from the previous chapter. If you're using a Commodore 64, or a Commodore 128 in 64 mode, you can use Program 5-1 below instead. If you have an Atari computer, enter and run the two-line program you see below. For a Commodore 64 or 128, the light sensor should be plugged into port 2. Plug the Atari light sensor into port 1. Program
5-1-Commodore 64/128
Download (Saved BASIC) When the you run the program, numbers in the
range 0-255 (1-228 for the Atari) will scroll on your screen. These numbers
are related to the amount of light which is falling on the photocell. To
see this, try reducing the light reaching the photocell by covering it
with your hand. As you do, the numbers in the column will increase. Conversely,
increasing the amount of light which hits the photocell, perhaps by shining
a flashlight on it or by holding it closer to a lamp, causes the numbers
on the screen to decrease. |

|
Note: On the Commodore light sensor, you
may need to adjust the value of R1, the 1K ohm resistor, to cause a swing
through the entire range of values. In other words, you may need to use
a different resistor, one rated higher or lower than 1K. Just experiment
until you find the proper value for your application. That's part of the
fun in breadboarding-making changes is easy. The computer treats the light sensor as though it were a game paddle. The varying resistance of the sensor provides the computer with a signal between 0 volts and +5 volts at its port. The voltage is converted to a digit between 0 and 255 by the analog-to-digital converter in your computer. This value is stored in a memory location, where it can be read by a program. It shouldn't be hard, once you have the sensor built, to take this information and develop a light meter program which will determine the degree of light present at the sensor. |
|
|
Two analog light sensors can be connected
to your computer through the single 9-pin plug (just like two game paddles).
The second photocell is attached between pins 7 and 5 of the 9-pin plug.
To read the value of this second sensor, simply PEEK memory location 54298
($D41A) for the Commodore 64/128, or PEEK location 36873 ($9009) for the
VIC. Don't forget to set the data direction registers for output. The BASIC
command PADDLE(1) can be used to read this value for Atari computers. |
Return to Table of Contents | Previous Chapter | Next Chapter