Standard Keyboard for the Atari 400
Robert Noskowicz
While shopping for a home computer, I did quite a bit of research, eventually narrowing my decision to a choice between the Atari 400 and 800. With a little more investigation I found that the only differences between the two are the three most obvious: 1) easy access to additional memory, 2) the two ROM slots and 3) the keyboard. The processors--operating systems and ROM--are exactly alike. Since Atari still has not used the second ROM slot, and the 400 can be fairly easily upgraded to 48K, the only appreciable difference is the keyboard. The 400 has a flat membrane keyboard compared to the standard typewriter keyboard on the 800. I didn't feel at that point that the differences warranted the approximate $400 additional cost for the 800, so I purchased the 400.
|
After 6 months of use, I was extremely happy with my computer except for the keyboard. I found that the flat keyboard impairs the ability to enter data quickly as well as causing discomfort when entering a substantial amount of information into the system. I went from "I'll get used to it" to "It's not all that bad" to total exasperation.
What I will explain here is what I did to cure my problem: I added a standard keyboard to my machine.
First I opened my computer to determine how the keyboard was interfaced. I had the Atari Technical User's Notes but they did not contain any schematics for the keyboard. After calling several home computer stores to see if they had any information on changing keyboards, with no luck, I called Atari's toll free number in California. If you have ever called Atari, you already know that (like most computer manufacturers) they do not like you to make changes in their hardware and provide very little technical help.
|
|

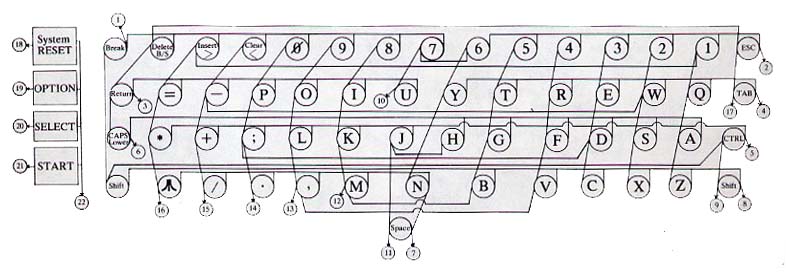
I realized that I would have to do everything myself. The one thing I did know was that the decoding of the keyboard is done in the processor. The keyboard, in the case of the Atari, is just a bunch of momentary ON switches, 61 to be exact. I sat down with my ohm meter, went from point to point, and drew the keyboard layout (Figure 1).
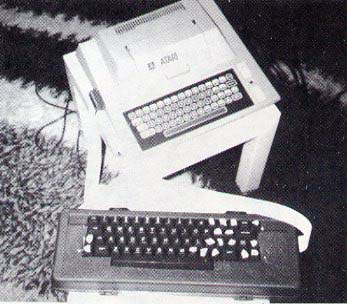
The next step was to purchase the necessary parts. The keyboard that I bought from a firm in California has 62 keys and costs $35. It is called a bare keyboard because it is not mounted on a PC board. Initially I intended to mount the keyboard on the computer but my wife suggested that I use a cable and keep it separate.
This was an excellent idea since I keep the computer on a Parsons table in front of my TV and sitting on the couch slouching over it can be a real pain in the neck, literally. Now I can keep the keyboard on my lap which I find extremely comfortable.
If you decide to go this route, you will need about seven feet of ribbon cable which costs approximately 60 cents per foot. I used 25-conductor cable because I wanted to have a connector between the computer and the new keyboard so that I would be able to disconnect it. Otherwise it would only require 22-conductor.
The connector is a 25-pin RS-232 type made for ribbon cable. It costs about $14 per set. If you want a case for the keyboard, you can purchase one for about $56. If you are like me and wish to save some money, go to your local hardware store and buy a small Permanex tool box which costs about $6 and cut it to shape.
Some of the keys on the new keyboard are in different locations. You can leave them as is or move them about, providing you follow the wiring layout in Figure 1.
|
|
One thing I had to do on the new keyboard was to keep the Cap/Lock key from locking, since on the Atari the Cap Key does not lock.
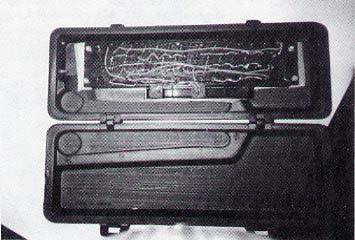
The first step was to wire up the new keyboard (Photos 1 and 2). Since I had one extra key, I used two keys in series for system reset. This prevents me from accidentally resetting my computer.
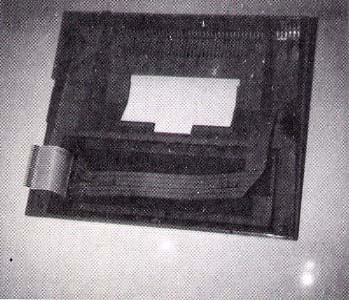
Next I soldered the new ribbon cable to the back of the Atari keyboard where the original cable is soldered, leaving the original in place (Photo 3). You will notice that I routed the cable to one side and mounted the male connector into the side of the casing. I then assembled the computer and tested the Atari keyboard to make sure that nothing shorted. So far, everything tested OK. I then plugged my new keyboard in and tested it. It worked fine.
The keys on the new keyboard are parallel to the Atari, so either keyboard can be used.
Robert Noskowicz, 44 York St., Old Bridge, NJ 08857.
Table of Contents
Previous Section: K-DOS
Next Section: The Mosaic 64K RAM Card
