Atari Silencer
John Anderson
It is commonly known that, in addition to the capability of driving sound through a television or monitor speaker, the ATARI has an onboard speaker, similar to the Apple II. This speaker can and does serve in a number of capacities, not the least of which is to sound a prompt or signal tone, to flag a specific mode or indicator.
Users of the 410 program recorder are familiar with the record and play tones sounded as an indicator before data input or output to tape. All users should be familiar with the chirp of keyboard feedback. This feature lends a surer "feel" to the keyboard than that found with other computers.
These features are, essentially, well-designed and helpful. However, I've discovered that there are times I wish I could fit a silencer onto my ATARI 800 Late night editing sessions or programming when my roommate is trying to catch forty winks have caused friction. Certain programs I use very frequently, like the ATARI Word Processor, seem to exploit the feature to a point beyond distraction. These features are helpful in a noisy office environment, but seem a bit heavy-handed in a quiet work area at home, the most common environment for the ATARI. I nearly discontinued exploration of a hi-res adventure because the program continually prompted for pressing RETURN with a long, shrill "blat" shades of operant conditioning! Is it too much to ask to be able to turn the thing on and off at will?
|
What could be simpler than the installation of a single pole, single throw switch to cut out the speaker when desirable? A "take-aparter" since earliest childhood, I had already snooped around a bit inside the ATARI, and knew how easy it really would be. But, I still had a problem. The mere thought of snipping wires or drilling holes in my pristine machine made the hairs on the back of my neck stand on end. Also, though my warranty had long since expired, I wasn't happy with the idea of doing anything that couldn't be undone. Service people can be put off quickly when they see user modifications. I determined, rather wistfully, that I could live with the buzzers.
Then, while staring at all the little packages hanging on the wall of a nearby Radio Shack, I made a fascinating discovery -- I saw a product called "two prong connectors, "catalog number 274-342 $2.49 for a package of six. I noticed that the fit would be quite close to the connector used on the ATARI speaker. I then noticed "SPST micro miniature toggle switch," catalog number 275-624 -- $1.59. Smaller than the smallest switch Radio Shack had stocked previously it occurred to me that it would fit between the vent slots on the bottom of the ATARI. I suddenly envisioned a switch modification that was totally, and easily, reversible.
|
The modification was a complete success. Now that I can toggle the speaker off, I realize it's something I should have done long ago. In case I need to bring the computer in for service, the modification can be slipped out in under five minutes.
The Project
If you wish to modify your ATARI, you will need, in addition to the products listed above, about two feet of bell or other light wire, a flat blade and Phillips screwdriver, soldering iron and solder, and a bit of tape.
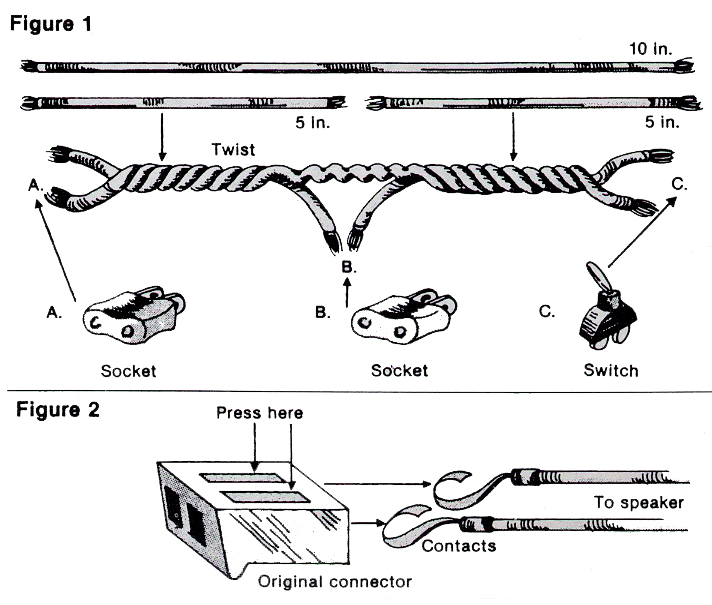
Snip the wire into two ten inch lengths. Then, take one of the wires and snip it into two five inch lengths. Strip a quarter inch of insulation off the ends of all the leads. Twist the shorter wires onto the longer wire in the manner indicated in Figure 1. This will make the modification easier to slip in and out later. Next, solder two connectors and the switch to the wires as indicated in the diagram. Unscrew all collars around the neck of the switch. Notice you are using only the socket connectors, not the plug connectors. Leftovers can be saved for another project.
Now you are ready to begin the operation. Flip your ATARI over onto something soft, like a pillow. Unscrew the five screws that hold the bottom panel, and lift it toward you. Notice that the controller ports must be cleared in order to remove the panel. Can you believe how small that speaker is? You now know another reason why you're lucky to own an ATARI. You don't depend on that little thing for all your sound effects. To disconnect the speaker, pull gently on the connector. Once the speaker is disconnected, remove it from the machine.
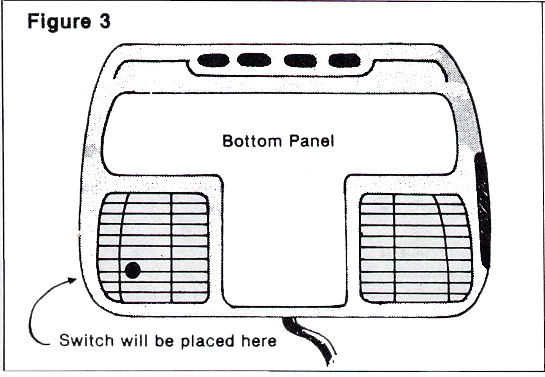
Orient the connector so that it matches the view in Figure 2. Using a screwdriver or toothpick, press down on the silver tongue on the top of the plastic connector, as you gently pull the wire from the side. Don't force anything! When you've pressed the tongue down far enough, the contact will slide right out. Pull both contacts out of the plastic container.
|
Next, take the bottom panel you removed earlier and hold it so that the vents are at the bottom, as shown in Figure 3. You will mount the switch in the left-hand vent, where there is room to spare, and nothing nearby that might get shorted out. Insert a flat blade screwdriver between the two vent slots where the switch will be mounted. (It's a good idea to stay over to the left -- this will make the switch easier to reach.) Gently twist the screwdriver to spread the slot, then press the neck of the switch through. The plastic will have to bend a bit to accommodate the switch. Put on a washer, then screw on the lock nut to fasten the switch in place.
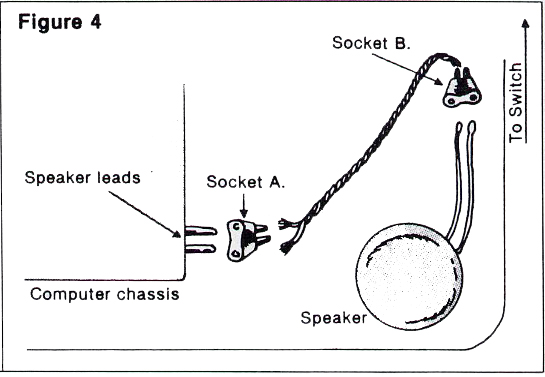
The final installation will be facilitated by repositioning the back panel so that the computer looks like an open valise. This way, the wire between switch and speaker will not be stretched. First, press the speaker contacts into the middle connector, as indicated in Figure 4. The speaker can now be repositioned in its place. Gently connect the far socket to the speaker leads from which you removed the original connector. Spreading them a bit may insure a tight fit. Finally, tuck the wire away under the keyboard post and away from boards and the speaker itself. There's enough room on that side of the computer to insure that the modification will not interfere with any other hardware.
You may wish to tape the original connector to the wire itself. Then, should you wish to remove the modification, the original connector will be right where you left it.
Screw the back panel on, plug things back in, and run a test. You can easily use the keyboard REPEAT function in memo pad mode to do this.
Listen. You can almost hear a pin drop!
John Anderson is an associate editor for Creative Computing magazine.
Table of Contents
Previous Section: Build Your Own Light Pen
Next Section: Basic A+
