MANDALAS AND COMPUTER ART
The new graphic computer presents unlimited possibilities for the programmer interested in art or the artist interested in programming. What is really appealing about computer art type programs is that they are usually short and sweet, requiring a minimum amount of time to create. Of course, you can get quite elaborate, but this is true for any program.
Example 23:
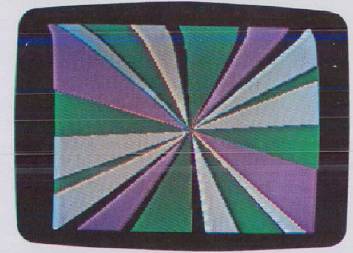
Create a “rotating fan” demonstration program using high-resolution graphics on the Apple. Make the fan rotate around the screen and have it change color on a random basis.
Solution:
15 GOTO 600 |
|
60 HPLOT 279 - X,191 - Y TO X, Y |
←Draw a line |
61 J = J + 1: IF J > CNT THEN J = 0: CNT = RND(1) * 50: HPLOT 0,0: HCOLOR = RND(1) * 7 |
←After a random number of J iterations, a new CNT value is created and a new color is selected |
62 RETURN |
|
600 REM ROTATING FAN |
|
605 HGR: POKE -16302,0: HCOLOR = 3: CNT = 25: X = 0: Y = 0: J = 0 |
←POKE -16302,2 removes scrolling text window First fan is white |
610 FOR X = 1 TO 278 |
|
615 GOSUB 60: NEXT X |
|
620 FOR Y = 1 TO 191 |
|
625 GOSUB 60: NEXT Y |
|
630 FOR X = 278 TO 1 STEP -1 |
|
635 GOSUB 60: NEXT X |
|
640 FOR Y = 191 TO 1 STEP -1 |
|
645 GOSUB 60: NEXT Y |
|
650 GOTO 610 |
See Fig. 3-22.
In this section we will see how the computer can be used to create far-out fantasy special effects, from simple mandalalike displays to complex “tunneling” demonstration programs using shape tables.
Simple Vector Graphics Art
For simple graphics programs we can use the HPLOT TO and HCOLOR statements. The main thing to keep in mind when writing a graphics program is: “How fast does it run?” If a graphics program is too slow in executing, then in general it will also be too boring for people to watch for long. So let's take a look at two simple graphics programs that use the HPLOT TO and HCOLOR = statements. See Example 23.
The line numbers in the program are 600 because we are saving line 100–599 for later demonstrations. Until otherwise mentioned a demonstration module uses line numbers 100–199, 200–299, …, 900–999. This allows for nine demonstration segments in a program.
The program is built around four FOR…NEXT loops in lines 100 to 140. The purpose of the loops is to make the values of X and Y vary as if we are following a path around the perimeter of the screen. This is accomplished by the indexes of the FOR…NEXT loops. The subroutine in line 50 does an HPLOT TO from the X, Y point on the screen edge to the exact opposite side. The subroutine then increments a variable J, compares it to the variable CNT, and, if it's larger, resets J to zero, chooses a new random color and a new value for CNT, and RETURNS. If the variable J is not larger than CNT the program simply returns to draw the next line of the fan.
You can exploit the technique behind this demonstration program to make other mandala type effects. The main idea is to make variables count up so as to represent some path around the screen edge, and then do an HPLOT TO to draw a line related to the path. See Example 24, p. 138.
This program uses the technique of storing point pairs in arrays. The resulting display appears to spiral toward a point. The equations in statements 760–765 shrink the size of the values in the arrays while shifting them slightly in one direction. Then the points are connected by the HPLOT TO statement in line 755.
Graphics Art With Shape Tables
What about artistic demonstrations using shape tables? It turns out that some incredible visual effects can be created using the shape table feature of the Apple. What is special about these demonstrations is that they are very fast and amazingly simple. Let's take a look at Example 25.
Example 24:
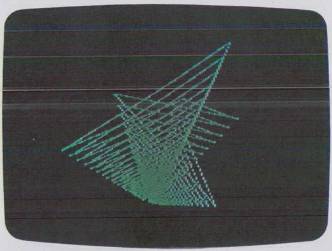
Create an artistic demonstration called “slinky” in which a point is projected into a random corner on the Apple. HINT: Fill an array with random X, Y pairs. Use the values in a simple equation that makes the set of points grow smaller. Connect the points with an HPLOT TO statement.
Solution:
15 GOTO 700 |
|
700 REM SLINKY |
|
705 CLEAR: DIM X(10), Y(10) |
←CLEAR makes all variables zero |
710 HOME: HGR: POKE -16302,0 |
←HOME clears the screen and puts cursor at top left corner of screen |
715 C = INT(RND(1) * 7 + 1): IF C = 0 OR C = 4 THEN C = 2 |
←Generates a random number for setting color |
720 HCOLOR = C |
|
725 R = RND(1) * 7 + 1 |
|
730 FOR I = 1 TO R: |
←Fill array with random points |
X(I) = RND(1) * 279: |
|
Y(I) = RND(1) * 191: |
|
NEXT I |
|
735 REM |
|
740 X = RND(1) * 279: Y = RND(1)*191 |
|
745 HPLOT X, Y |
←Locate beginning coordinate |
750 FOR J = 1 TO 30: FOR I = 1 TO R |
←Begin draw loop |
755 HPLOT TO X(I), Y(I) |
←Draw line between points |
760 X(I) = (X(I) - X) * .9 + X |
|
765 Y(I) = (Y(I) - Y)* .9 + Y |
←Shrink and shift values in array |
770 NEXT I: NEXT J |
|
775 GOTO 710 |
See Fig. 3-23.
Example 25:
Design a simple demonstration program that uses shapes. Store two simple shapes, a square and a cross, in a table. Write one demonstration that simply changes the scale and draws the shape over. Write another that changes scale and rotation together to cause a tunneling effect. Have a menu that allows the user to select a demonstration. Have the program alternate between the two shapes.
Solution:
Design the Shape Table
The first step is to design the shape table. Instead of using SHLOAD and storing our shape on tape we will store it in a DATA statement and have that program POKE it in at the beginning.
Fig. 3–24 is the layout for the shapes and the conversions to the proper hex bytes.

Next we create a little program that stores the bytes in a DATA statement and loads the values into memory when executed. The program also POKEs in the starting address of the shape table (this is necessary for the Apple when you don't use SHLOAD).
1000 REM LOADS THE TABLE START ADDRESS |
|
1005 POKE 232,0: POKE 233,3 |
←232 = low byte, 233 = high byte, here address is 300 hex |
1006 RESTORE |
|
1010 REM LOAD THE ACTUAL TABLE |
|
1015 FOR LOC = 768 TO 783 |
←Shape table decimal beginning & end |
1020 READ BYTE: POKE LOC, BYTE |
|
1025 NEXT LOC |
|
1030 DATA 2, 0, 6, 0, 9, 0, 44, 62, 0, 44, 46, 62, 62, 60, 44, 0 |
←Derived from table in Fig. 3–24 |
Menu
New before we write the actual demonstration modules a menu is needed to allow the user to select a program. Here is the menu and the beginning parts of program:
0 GOTO 1000 |
|
50 C = INT(RND(1)*6 + 1): HCOLOR = C: |
←Random color generation |
IF C = 4 THEN HCOLOR = 3 |
|
55 RETURN |
|
600-650 previous Fan program |
|
700-775 previous Slinky program |
|
1000 REM LOADS THE SHAPE TABLE START ADDRESS |
|
1005 POKE 232,0: POKE 233,3 |
|
1010 REM LOADS THE ACTUAL TABLE DATA |
|
1015 FOR LOC = 768 TO 783 |
|
1020 READ BYTE: POKE LOC,BYTE |
|
1025 NEXT LOC |
|
1030 DATA 2, 0, 6, 0, 9, 0, 44, 62, 0, 44, 46, 62, 62, 60, 44, 0 |
|
1200 M = 60: M1 = 1: MAX = 15: ROT = 0: SCALE = 5: X = 140: Y = 95: CNT = 25 |
|
2000 REM MENU STARTS HERE |
|
2001 HOME: VTAB 21 |
|
2005 PRINT "1 EXPLODE 2 VORTEX 3 SNOWFLAKE" |
|
2010 PRINT "4 FALLING 5 FLASHER 6 FAN" |
|
2015 PRINT "7 SLINKY" |
|
2020 PRINT "SELECTION?"; |
|
2021 POKE - 16301, 0: GET S |
←GET returns the key pressed in variable S |
2025 IF S < 1 OR S > 7 THEN 2015 |
|
2030 K = NOT K: SH = K + 1 |
←Switches shape (SH) between square and cross |
2035 IF SH = 2 THEN M = 60 |
|
2040 IF SH = 1 THEN M = 80 |
|
2045 ON S GOTO 100, 200, 300, 400, 500, 600, 700 |
Note that we loaded the shape data into decimal address 768 to 783. This region (300 to 3FF hex) in memory is free to the Apple user for machine language programs and it is not written over by any monitor or system commands.
The subroutine in line 50 is for selecting a color for the background for some of the demonstrations.
The menu is set up for easy expansion by using the ON…GOTO statement. As you can see in the menu there is room for our original programs (fan and slinky projection into corner) as well as some new demonstrations we will now investigate.
Demonstration No. 1. Explode
The first demonstration, Explode, is very simple. Enter it into the previous program:
100 REM EXPLODE |
|
105 HGR: POKE —16302,0: X = 140: Y = 95 |
|
110 FOR M1 = 1 TO MAX |
|
115 HCOLOR = 0: HPLOT 0, 0: CALL 62454: GOSUB 50: ROT = RND(1)*64 |
←Random rotation set |
120 FOR I = 1 TO M STEP M1 |
|
125 SCALE = I |
←Scale grows larger |
130 DRAW SH AT X, Y |
←Draw shape (SH) at X, Y |
135 NEXT I, M1 |
|
140 GOTO 0 |
←Return to menu |
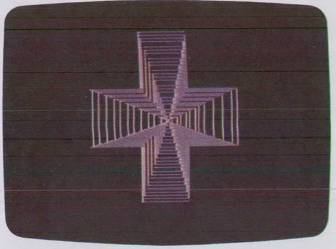
See Fig. 3–25.
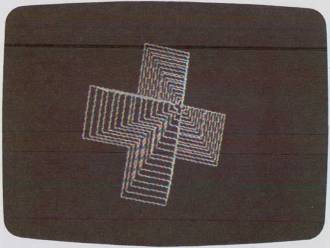
When this program is executed (by selecting 1 on the menu) it clears the screen to black. The POKE-16302,0 statement removes the scrolling window at the bottom of the screen so that the screen extends vertically to 193. The “M1” FOR…NEXT loop is used to generate STEP values of 1 to 15. Statement 115 clears the screen to black with the fast CALL statement. The GOSUB 50 chooses a random HCOLOR for the shape. The ROTation is set to a random value between 0 and 64. In line 120 we enter the main loop of the program. Here the SCALE is set to the value of I, and the statement DRAW SH AT X, Y draws shape SH (SH = 1 or 2) at position 140, 95 on the screen. Then the SCALE is expanded and we draw the shape again and this is repeated M times. The STEP size keeps increasing, so the shape appears to be drawn faster each time. The result is like an explosion. After 15 of these explosions statement 140 sends us to statement 0, which clears the screen, re-establishes the scrolling window, and sends us back to the menu.
Demonstration No. 2. Vortex
The next demonstration is called Vortex. It is like the previous program except: (1) rotation and scale are changed each time the shape is drawn so that it twists as it expands and (2) the background is made to be a color (green or violet) rather than black, and the shape's HCOLOR is made black.
200 REM VORTEX |
|
205 HGR: POKE —16302, 0: X = 140 : Y = 95 |
|
210 GOSUB 50: HPLOT 0, 0: CALL 62454 |
|
215 L = NOT L: HCOLOR = L * 4: IF L THEN 230 |
|
220 FOR I = 1 TO M |
←Expanding shape loop |
225 GOTO 235 |
|
230 FOR I = M TO 1 STEP —1 |
←Contracting shape loop |
235 ROT = I: SCALE = I |
←Change scale and rotation to I |
240 DRAW SH AT X, Y |
←Draw the shape |
245 NEXT I |
|
250 J = J + 1: IF J = 6 THEN J = 0: GOTO 0 |
←Repeat demo 6 times and then return to menu |
255 GOTO 210 |
See Fig. 3–26.
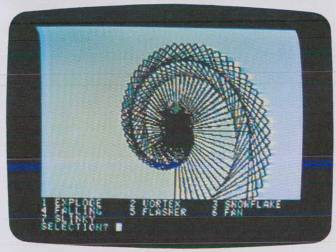
In this program we use the variable L for two things. L is made to alternate between the values 0 and 1 by the statement L = NOT L. This way L can be used to switch the color between the two blacks on Apple (The black = 0 color goes with violet and green colors while the black = 4 goes with blue and orange. The blue and orange colors are available on the new Apples.) Switching the black like this gives an unusual effect when the wrong black is used with a color (such as black = 0 on a blue background). The other use for L is to make the vortex either expand outward or contract inward. This is accomplished by using L to choose which FOR…NEXT loop will be used. One loop increments I in the direction opposite to the other.
At the end of the program, line 250 increments J and compares it to 6 to see if it's time to end the VORTEX demonstration.
Demonstration No. 3. Snowflake
Here is a simple variation of the previous program that changes the scale of the shape in steps of 7 instead of 1. The shape is rotated through 360° before the next scale is used. What this does is result in a spinning display that alternates between growing outward or inward.
300 REM SNOWFLAKE |
|
305 HGR: POKE —16302,0 |
|
310 HCOLOR = 0: HPLOT 0,0: CALL 62454 |
|
315 L = NOT L: IF L THEN 330 |
|
320 FOR H = 5 TO 50 STEP 7 |
|
325 GOTO 335 |
|
330 FOR H = 50 TO 5 STEP -1 |
|
335 SCALE = H: GOSUB 50 |
←Subroutine at 50 generates a random color |
340 FOR I = 1 TO M STEP RND(1) * 6 + 2 |
←Step is made random 2–8 |
345 ROT = I |
|
350 DRAW SH AT X, Y |
|
355 NEXT I,H: FOR D = 1 TO 1000: NEXT D |
|
360 J = J + 1: IF J > 4 THEN J = 0: GOTO 0 |
|
365 GOTO 310 |
See Fig. 3–27.
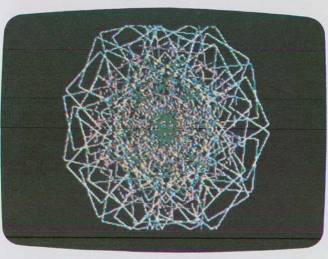
Fig. 3–27. “Snowflake” demonstration.
Demonstration No. 4. Falling
This demonstration is another variation of EXPLODE, except it changes the values of X and Y so that the shape expands equally in all directions. This gives a visual experience similar to falling down an elevator shaft.
400 REM FALLING

406 HGR: POKE -16302,0

410 HCOLOR = 0: HPLOT 0,0: CALL 62454

415 M1 = RND(1) * 3 + 1: X = 140: Y = 95

420 FOR I = 1 TO M STEP M1

425 SCALE = I

430 DRAW SH AT X, Y

435 X = X + 1: Y = Y + 1: IF X > 278 OR Y > 191 THEN X = 140: Y = 95: GOTO 445

440 NEXT I

445 J = J + 1: IF J > 6 THEN J = 0: GOTO 0

450 GOTO 410
See Fig. 3-28.
Demonstration No. 5 Flasher
The author won't give you any hints on this one. Suffice it to say that no one opens a coat at any time.
500 REM FLASHER

505 HGH: POKE -16301.0

510 HCOLOR = RND(1) * 6, 1: HPLOT 0,0: CALL 62454

515 J = J + 1: IF J > 20 THEN J = 0: GOTO 0

520 GOTO 510
Demonstrations Nos. 6 and 7. Fan and Slinky
The remaining demonstrations (6 and 7) are already installed in the program. Modify the end of each so it returns logically to the calling menu (add the J = J + 1 counter).
Using the ideas covered here you can design your own artistic demonstration programs. Because this is such a virgin area, there are still hundreds of effects to be pioneered.
Return to Table of Contents | Previous Section | Next Section