3 Multiple Socket Extensions
In this chapter we will show you how to build multiple socket extensions
for Apple computers. These devices provide a number of convenient functions
for the computer user: they bring the paddle socket out of the case to a
position beside the keyboard, they permit switching between paddles without
interrupting the program currently running and, with appropriate software,
they will let you use two standard joysticks at once.
Socket extensions are available commercially, of course,
but no single unit will have all the features of the socket extension we
will describe. Besides, you can construct a home built unit for about half
the cost of a commercial one. A multiple socket extension is an excellent
first project for learning to work on computer hardware, since the device
is simple and easy to construct. The materials to build it are easy to obtain,
and only a small multimeter is required for testing the finished unit. What
more could you want?
Figures 3-1 through 3-5 give you the details of units
that were built for the Apple II. We will discuss what might be done to
construct multiple socket extensions for other computers later in the chapter.
TYPES OF MULTIPLE SOCKETS
There are two types of multiple socket extensions. Those which permit the
choice of one of two or more paddles will be referred to as selection units.
Those which permit two standard paddle sets or joysticks to be used at the
same time will be called two person units.
We will also describe special features for each type
of unit, including click action power switches, isolation diodes that prevent
paddles from affecting each other's readings, and zip (zero insertion pressure)
sockets. These special features will let you customize the unit to your
exact needs.
A WORD OF CAUTION
Good practice for working on electronic equipment requires that the power
to the unit be turned off before any plug is installed or removed. The power
switches on these multiple sockets are intended to allow you to select among
paddles already plugged into the sockets. Plugging in a paddle when the
power switch is off but the computer is turned on violates good practice,
although it is preferable to plugging the paddle into a live socket. Remember:
turn off the main power supply to your computer before plugging in or unplugging
a paddle from any of these socket extensions.
TOOLS REQUIRED
The construction of a socket extension is primarily a precise and somewhat
tedious soldering job. Soldering is the keystone of all hardware skills
and one that can only be learned through practice. It is definitely a skill
worth mastering.
For this project you need a small pencil soldering
iron of about 25 watts and a stand to hold it, a sponge to clean the tip
of the iron, desoldering braid to remove solder bridges, and fine resin-core
solder. Other tools you should have on hand include a pair of small diagonal
cutters, long-nose pliers (for bending fine wires), an X-acto or other small-bladed
knife, and wire strippers. The plier-type wire strippers with an adjustment
bolt work well but must be adjusted and tested on each new wire size.
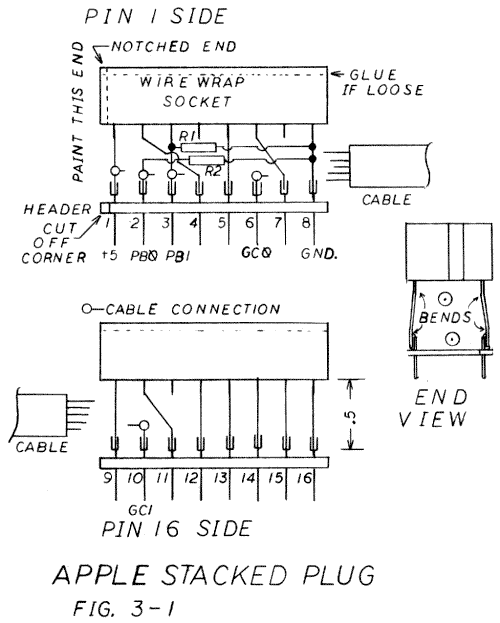
THE STACKED PLUG UNIT
The plugs on Apple paddles are easily damaged and therefore have to be
replaced in many cases. It is helpful to replace the paddle plug with a
stacked plug and socket, thus providing an extra socket of the two-person
type. For this replacement you will need a 16-pin wire wrap socket and a
16-pin DIP header. The construction details are given in figure 3-1. The
socket will ride on top of the header, providing not only a new socket but
also a handle for the plug.
First trim off the socket pins to an even 1/2-inch
and bend them out slightly. (You might cut the #2 pin 1/16-inch longer.)
Then straighten the pin ends as shown in the end view of figure 3-1; this
allows the wire-wrap pins to slip over the spades of the header. Double
check to be sure that the pin 1 end of the header, marked with a cut off
corner, is matched to the pin 1 end of the socket, marked with a notch or
cut off corner.
Plug the header into another unattached socket so that
its pins will not misalign when heated. Solder pins 1, 8, 9, and 16. Then
solder pins 3, 5, 12, 13, 14, and 15. Cut off pins 4, 7, and 11 about 1/8-inch
down from the socket. Using long-nose pliers, bend pin 6 over to fit into
spade 7 and bend pin 10 over to reach spade 4.
Now for the tricky part: pin 2 must be bent around
behind pin 3 to reach spade 4, but without touching pin 3. If this gives
you trouble, try cutting off the #2 pin 1/8 inch from the socket and soldering
a 3/4-inch piece of insulated #22 solid wire between the pin 2 stub and
spade 4.
If the old paddle plug that you are replacing with
the stacked unit needs pull-down resistors for its pushbuttons, these can
be installed between the socket pins. We used two 1/4 watt, 1K ohm, 5% tolerance
resistors. They share pin 8 for ground; one resistor goes to spade 2 and
the other to pin 3. Trim the wires carefully, bend them neatly around the
pins, and then solder.
The cable should be stripped of its outer cover for
3/4-inch and the wire trimmed. Since the cable normally enters from the pin
8 end, the +5 wire will be longest and the ground wire shortest. Strip the
wire back 3/16-inch, twist the strands, bend them into a small hook, and tin
the wire. Your wire stripper must be set so that none of the fine wires are
cut. Try several adjustments on a scrap of the same wire until you have it
set correctly. One at a time, press each wire into the correct fork or close
the hook around the pin shaft, and solder it.
The pin 1 end should be marked with light-colored fingernail
polish, model enamel, or white typing correction fluid covered with clear
fingernail polish. Sometimes the plastic top of the socket comes loose and
has to be glued back on with Super Glue or clear nail polish.
TESTING THE STACKED PLUG UNIT
If you have a multimeter you should check your wiring for continuity and
to insure against shorts. Pin 1 to pin 8 must measure in excess of 50 ohms,
and the measurement is usually much greater.
If you have difficulty inserting a plug into the new
socket the first time you try it, stick a medium sewing needle into each
of the holes in the socket to realign the internal parts with the holes.
If you plug the control with this stacked socket into the Apple and then
plug a standard set of paddles or a joystick into the new socket, pot 0 of
the second joystick acts as pot 2, and its pot 1 acts as pot 3. Similarly,
its pushbutton 0 acts as pushbutton 2, but its pushbutton 1 remains pushbutton
1 and is shared with the original paddle (the Apple II has only three pushbuttons).
Incidentally, if you have made the shift key modification for upper/lower
case, it will hold pushbutton 2 closed unless the shift key is pressed.
This will interfere with the use of the pushbutton on the second joystick
plugged into the stacked plug.
You now have all the hardware you need to play two-person
competitive games with full joystick control. There is not much software
available that has this feature, but you can dream, or even write your own.
THE SELECTION SWITCH
Now let's look at the construction of a multiple socket that can be placed
beside the Apple to let you choose between two paddles with the flick of
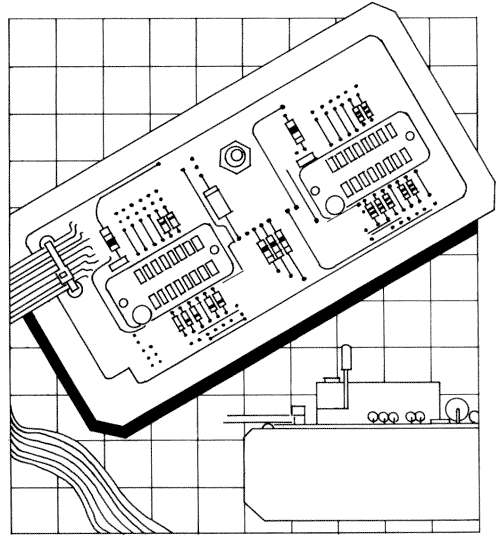
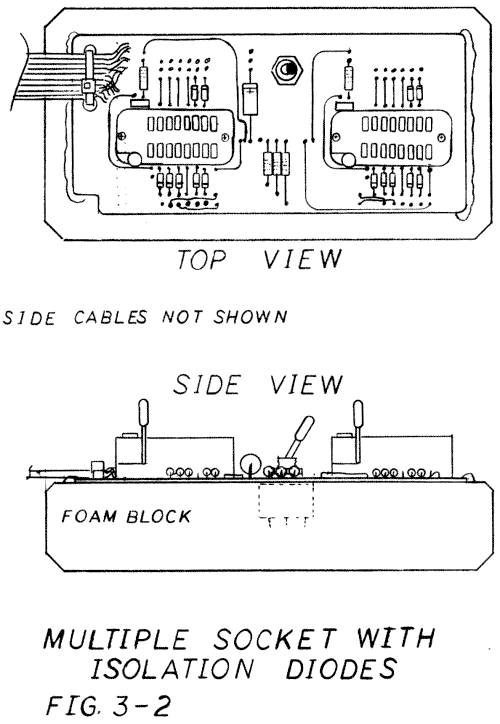
a switch. Figure 3-2 is a sketch of this unit showing the component layout.
The terminations of the main cable wires and two side cables are not shown
because they would hide the components. These cables will be discussed later.
This multiple socket extension has all the most popular features, including
zip sockets, a click switch, and isolation diodes. If you don't need all
of these features and want to leave one or more of them off, the cost of
the parts will be reduced.
The zip plugs used for this unit cost about $6.20 each
(see the parts list at the end of the chapter), compared to $1.00 for a
good standard socket. The zip plugs are larger and have a small lever on
the side that locks and unlocks the socket. If you have only one set of
paddles and a joystick and want to switch back and forth between them, you
probably won't want to pay extra for zip plugs, so buy standard, gold-plated
sockets.
We prefer a switch that clicks and makes positive contact
to the simple slide switches commonly used on commercial extension sockets.
A click switch, however, extends below the circuit board, requiring the
foam block shown in figure 3-1 for a base.
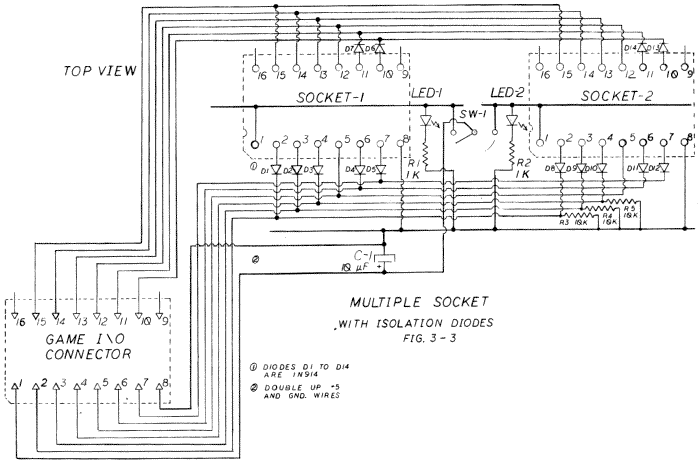
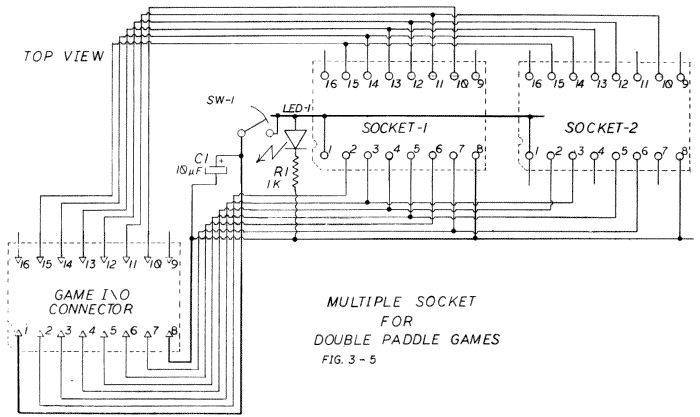
Figure 3-3 is the schematic for the selection socket.
It is basically very simple: 13 pins of the plug are connected to their
counterparts on each socket. The +5 supply (pin 1) is filtered with a capacitor
and switched between the two sockets. The isolation diodes are the only
complication.
Each socket has seven 1N914 or equivalent general purpose
silicon diodes. On the pushbutton lines, they prevent the pull-down resistors
of the plugged in paddles from being in parallel. This would waste +5 current
and, if more than four paddles were plugged in at one time, might overload
the +5 supply. The use of these diodes makes necessary the three 10K pull-down
resistors (R3, R4, and R5) on this board.
The four diodes on the game control inputs prevent
the pots in the unused paddles from affecting the readings of the one in
use. These diodes are a must if correction caps are used on a controller
in that socket. Since they have an effect on the paddle readings, some devices,
such as the sketch pad in the next chapter, will have to have their calibrations
checked when used in sockets with diodes.
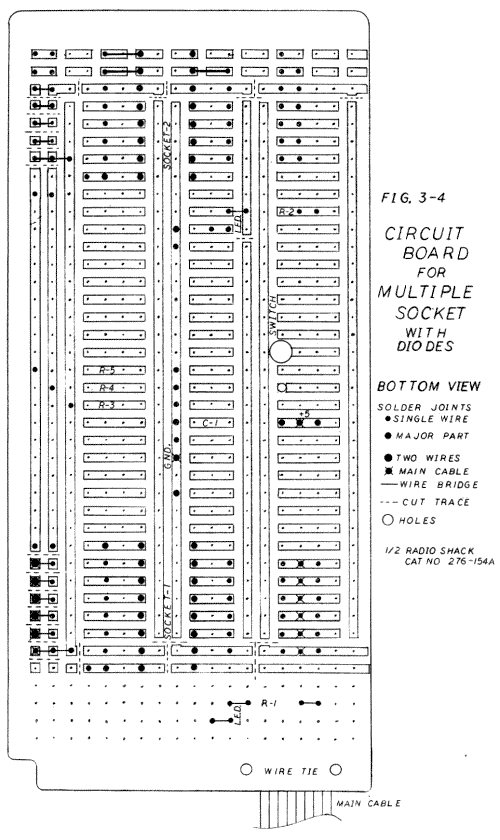
THE CIRCUIT BOARD FOR THE SELECTION SWITCH
Figure 3-4 shows the bottom of half of a Radio Shack printed circuit board
(Cat. No. 276-154A Experimental), with modifications to suit this device.
The board was cut in half by scoring both sides with an X-acto knife and
breaking it over the edge of a table. Each half will make a two-socket unit.
Drill a hole in the board to suit the switch you choose and 2 holes for a
wire tie to secure the main cable.
The existing copper lanes then have to be cut in 24
places, as shown by the dashed lines in figure 3-4. This is done by making
two cuts, 1/32 of an inch apart, with an X-acto knife and removing the copper
sliver between the cuts. Some skill and practice, as well as a sharp knife
blade, are required for this step.
Smooth the edges of the board and the drilled holes
with a fine file. Clean the copper lanes by rubbing them vigorously with a
pink eraser. This last step, a standard electronics practice, is vital.
The sockets are installed first. Figure 3-4 shows the
pin locations from the bottom: both # 1 pins go toward the cable end. The
socket pins and all wires should be bent over flat for 1/16 of an inch before
soldering, since this circuit board does not have the metal-lined holes
(often called "plated-through") that a more expensive board would.
The 1N914 diodes can now be installed on pins 2, 3,
4, 6, 7,10, and 11 of each socket. The end with the black band is the cathode,
or positive terminal, and must point away from the socket. Bend the wires
over flat, solder them, and cut off the excess. In eighteen places shown
in figure 3-4, the wires must be bent across an open space to make a bridge
from one small copper pad to another. Use the wires cut off of the diodes
to make striaght wire jumpers the same length as the diodes for pins 5, 12,
13,14, and 15 on both sockets. This step will make it easier to install the
cables.
One of the long copper traces that runs through the
socket is used for the ground bus. The negative lead of the capacitor and
one end of each pull-down resistor (R3, R4, R5) go to the ground bus. In addition,
a wire from pin 8 of each socket must be run to this bus, as shown in figure
3-2.
The single-pole double-throw switch requires three
insulated wires on the underside of the board. The first wire runs from
the plus wire of the cap to the center common of the switch, and the other
two wires run from pin 1 of each socket to the opposite switch terminal.
The LEDs (light emitting diodes) used for the prototype
are small and rectangular, one red, one green. They are slightly more expensive
than round LEDs, but that is the only difference. Purchase round ones of
any color, if you prefer them. Install the LEDs beside the socket and even
with its top. From the positive terminal, run a wire around to pin 1 of each
socket. Then install the current-limiting resistors R1 and R2 on a wire run
to the ground bus for each. The LED for socket 1 is in an area where there
are no copper pads, so loop one wire around the other one before you solder
them.
On the pin 1 side (see figure 3-4), three bus lanes
are used for the pull-down resistors of the pushbuttons. Short insulated jumper
wires are needed to run between pins 3 and 4 and these buses on each end,
as shown in figure 3-2. Both #2 pins are jumped to a bus below the board.
As detailed in figure 3-5, two of these jumper wires go into holes through
which cable wires must also be inserted, so you must wait until the second
wire is ready before you solder them both. There are a total of five such
double-wire holes, and it is somewhat tricky to install and solder the wires.
When using a general-purpose circuit board, you will run into a few difficulties
like this as a matter of course.
CABLES FOR THE SELECTION SWITCH
The two side cables noted previously must now be made up and installed.
(They were omitted from figure 3-2 for the sake of clarity; their locations
are shown on figure 3-5.) The one on the pin 1 side has three conductors for
pins 5, 6, and 7. The one on the pin 16 side has six conductors for pins
10, 11, 12, 13, 14, and 15. You can use two pieces of ribbon cable or individual
wires for these cables.
The main cable requires 14 conductors. You can use
a DIP jumper cable; these come with DIP plugs on each end. Cut off one plug
and fan out the wires. Be certain to check the jumper for continuity end
to end and for each wire, since DIP jumpers sometimes have open pins.
We prefer to use 16-wire ribbon cable (cut from 20-wire
ribbon) and double up the wires on pins 1 and 8. This improves the electrical
characteristics of the unit and lets you add the stacked plug/socket described
earlier. The pull-down resistors R3, R4, and R5 need not be put inside the
plug since they are on the board, but careful soldering is required to place
16 wires in so small a space.
Separate two inches of ribbon on the board end of the
cable into individual wires and trim them to the required length. The longest
wire is the double ground that runs to the central bus. The +5 wires that
run to the plus end of the cap are only a bit shorter. The rest of the wires
connect along each side of socket 1. Each wire is trimmed, stripped, twisted,
tinned, inserted into its hole, and then soldered.
People with small hands have a definite advantage in
doing this type of electronic work. You will find that a stand or clamp
to hold the board is a great help.
The cables should be laid down neatly and secured with
a wire wrap. A 1-inch thick block of white plastic foam, stiff but flexible,
from a shipping box makes an excellent base for the unit. Cut out a hole
for the switch and secure the board in place with a small amount of silicone
sealant. If you are concerned about the exposed wires you could cover the
top with a sheet of plastic with three holes cut into it
TESTING THE SELECTION SWITCH
To test the selection unit, measure the resistance from pin 1 to pin 8
of each socket. The reading should be infinite at all switch positions.
Inspect the solder side of the circuit board, looking for bridges between
copper lanes and cold solder joints that have an excess of dark resin. To
double check your work, ask a friend to check conductance wire-by-wire, with
the multimeter on a low ohms setting, and color in a second photocopy of
the schematic.
When you are satisfied that the circuit tests out correctly,
plug in the selection socket and turn on your computer. (We assume that
you first turned your computer off if it was already on.) If the computer
does not start up in a completely normal fashion, turn it off at once and
recheck your work. If the computer starts up correctly, try the switch and
watch the LEDs. Next, turn off the computer and plug a trusted paddle into
your new socket extension. Start up the computer again and run the Controller
Checkout program from chapter 15.
If there are any bugs in the unit, they will quickly
become apparent. Turn off the computer and carefully check the solder joints
associated with any feature that didn't work properly. Most problems are
visible on close inspection. Also, remember to test the stacked plug that
is now inside the computer case.
CONSTRUCTION OF OTHER TYPES OF EXTENSIONS
Figure 3-5 is the circuit schematic for a two-person game multiple socket
board. This unit has an ON/OFF switch for both sockets and does not need
isolation diodes. Pins 2 and 4, 6 and 7, and 10 and 11 are cross wired. Like
the stacked plug, this circuit gives you the two-person game feature, but
makes it available outside the Apple case.
Alternatively, you could make up a four-socket board
that included both schematics (figures 3-4 and 3-5), with a three-position
rotary switch in the center. The rotary switch would direct power to sockets
1, 2, or 3, while the fourth socket on the board would be attached to socket
3 as shown in figure 3-5. Seven isolation diodes would be required for socket
3 (none for socket 4), but the connection to socket 4 would be located between
the diodes and the sockets. But why stop at four sockets? There is no particular
limit except the size of the circuit board.
The owners of computers other than the Apple will find
it beneficial to bring the game ports out of the case and add a choice switch.
The type of plug is different for each computer, and of course the pin numbers
will change. In many systems, all the plugs and sockets would be on short
cables, with the switch, diodes and resistors on a circuit board in the
center. It will take some work to find the correct pin out information and
to locate a supplier for the connectors. Some systems may use pull-up resistors,
connected to the +5 rather than the ground, instead of the Apple pull-down
resistors. Other systems may not need resistors at all.
There is one other type of multiple control worth mentioning.
The multiplexing control, for which the computer chooses the active control,
is not used for games. When the control input is a measurement (for example,
of temperature or light level) and you must log the measurements from more
than four sensors automatically, you would use a multiplexing control. In
this way you could monitor a solar hot water system or a science project.
This type of multiple socket is quite similar to the units we have just
described but requires a few additional integrated circuits.
IN CONCLUSION
The multiple socket extension is one of the most popular additions to the
Apple and other personal computers. The home built version not only costs
less than a commercial unit but has more features and is an excellent beginning
project in computer hardware.
| Parts List Multiple Socket Extensions |
||||||||||||||||||||||||||||||||||||||||||||||||||||||||
|
||||||||||||||||||||||||||||||||||||||||||||||||||||||||
|
Return to Table of Contents | Previous Chapter | Next Chapter
