Chapter 1
Graphics Modes And Color Registers
The ATARI 400/600/800/1200/1400 home computers are some of the most impressive graphics machines available at prices under $1000. Each of these very special machines, in addition to containing a 6502B microprocessor that runs at nearly twice the speed of many competing computers, also contains a number of custom hardware chips. One of these is a separate graphics microprocessor called ANTIC. These powerful chips free the 6502B to do what it was designed to do, calculate.
The computer was built to be extremely flexible with multiple graphics modes, redefinable character sets, indirect color registers, player-missile graphics, collision registers, display list interrupts, fine scrolling, and a built-in sound generator. These features give a polished, smooth, colorful look to the display, almost an arcade look. The effect isn't a coincidence, for the computer is nearly a clone of the hardware used in some of Atari's arcade machines like Missile Command.
Skilled Assembly language programmers can harness many of the Atari's capabilities, but less skilled or even beginning programmers may find the machine's flexiblity downright intimidating. Atari BASIC limits the programmer's choices, but it also eliminates much of the error prone graphics initialization that might produce wacky displays. Fortunately, capabilities like player-missile graphics and four-voice sound can still be accessed by PEEKing and POKEing to the machine's hardware addresses.
Most computers limit their graphics display to one or two modes because they are hardware dependent and memory specific. The Apple Ile, for instance, has Lo-Res and Hi-Res graphics. The 8K block of Hi-Res graphics is hard wired to specific memory locations $2000-$3FFF. Each byte (7 pixels) in display memory contains both pixel and color information that hardware uses to raster color dots on the television screen. If you move an object, you must change all of the bytes at both the old and new locations in screen memory without erasing the background. Worse yet, if you want to change an entire blue screen to red, you need to rewrite all 8K bytes of screen data. Similarly, scrolling requires a memory shuffle and at best results in slow, jerky motion.
The Atari, on the other hand, uses the ANTIC graphics microprocessor to interpret the graphics data in screen memory and another chip, the CTIA/GTIA, to plot the color information. Each of the fourteen different graphics modes (six text/character and eight graphic) uses differing amounts of screen memory for display. As a rule of thumb, the higher the resolution and the more colors available for display, the more memory required. Essentially, you need one bit of information for each pixel displayed plus additional bits for color information. Required screen memory, including the accompanying display list, can be as little as 261 bytes for double width, double height text, or as much as 7891 bytes for a hi-resolution 320 x 192 pixels screen. The screen can be placed nearly anywhere in memory as long as you tell ANTIC where to obtain its data.
The programmer can mix graphics modes because he can instruct ANTIC to display data from a specific part of memory in a particular graphics mode. This means you can have medium resolution graphics at the top of the screen, text in the middle and hi-resolution graphics at the bottom, if you like. The display is stacked in horizontal bands that stretch across the entire width of the screen. Any combination of display modes can be chosen as long as the entire display does not exceed 192 scan lines.
You are not even limited to using just the graphics characters in the ROM character set for your playfield graphics. A new character set can be customized with a character set editor. The computer will substitute the new set when you set the character set pointer to its address.
The unique way that the Atari computer handles color information through a series of addressable color registers gives the programmer added flexiblity. Each screen pixel is assigned to one of four playfield color registers when it is plotted. Simply changing the color value in one of these registers changes the color of every pixel assigned to that register. An entire background can be changed from red to blue with one simple POKE.
Although you can choose from 128 colors, you can work with only four at a time. Fortunately, you can gain extra colors either by adding different colored players to the display, or by changing the colors in mid-display using display list interrupts. Moreover, the addition of three GTIA modes allows either sixteen colors with one luminance, or one color with sixteen luminances, or nine colors. Although these modes sacrifice resolution to some extent, they are useful for three-dimensional shading, or adding a lot of color to the screen easily.
Perhaps the most powerful and useful graphics feature on the Atari is the playermissile graphics. Since these objects are completely independent of playfield memory, they can move smoothly over the display without affecting it. If the programmer wishes, he can set the priority so that one or more of the four players (five without missiles) can pass behind other players or playfield objects. Each player can be of different color, height and width, with a maximum width of eight pixels. In addition each player and each missile has individual collision registers that keep track of any collisions between each other and the playfields.
The Atari computer was the first home computer with player-missile or sprite graphics. It unfortunately doesn't allow true X,Y positioning. While the horizontal position can be set with a single POKE, the player's data must be shifted within a 128 or 256 (depending on the resolution) block of player memory to obtain true vertical positioning. In addition, although players can be plotted in double or quadruple width, the basic width of eight pixels imposes further limitations on the programmer.
Certainly, the use of player-missile graphics makes programming smooth animated graphics light years easier than on non-sprite-oriented computers like the Apple. But some of the newer computers like the Commodore 64 have eight players, each 24 x 21 pixels with true X,Y positioning, and both Coleco's Adam and the Texas Instrument's TI-99A have thity-two sprites, each 32 x 32 pixels with true X,Y positioning. While it may be easier to program these computers using players exclusively, each has only three or four graphics modes that can't be mixed, and none can smooth-scroll the playfield without extensive memory shuffling.
The Atari's ability to fine scroll the graphics display either horizontally or vertically sets the Atari apart from all other home computers. The Atari does this easily because the ANTIC chip can begin with data anywhere in memory and automatically map to the screen sequential memory bytes on a line by line basis. To vertically rough scroll a 40 character per line text screen you only need to change by 40 bytes the start of the memory area from which ANTIC gets display data. You can scroll the screen less, just a few scan lines at a time or a portion of one character, by setting the vertical fine scroll register. Horizontal scrolling is done similarly, but the data structure is much more difficult to set up because the data lines do not follow sequentially in memory but have gaps to store the off-screen image. To move any row requires only resetting the memory pointer by one byte; however, the reset must be performed for each row or mode line that you want to scroll.
Since the Atari computer is interrupt driven, time critical program code can be executed during the computer's vertical blank period at a rate of exactly 60 times a second. It is also the perfect time to scroll the screen, move players, and check collisions, for discontinuous screen jumps can't occur when the electron beam is between frames.
The Atari computer has many powerful graphics features that overall far surpass any home computer on the market today. We will explain each of these features in greater detail through working arcade game examples in the appropriate chapters in this book.
Display Modes
The Atari computer's fourteen display modes includes six text or character graphics modes, and eight bit-mapped graphics modes of varying resolution. In addition, computers containing the GTIA color chip have three extra graphics modes which are special cases of the highest resolution bit-mapped graphics mode.Programmers using the Atari BASIC cartridge from non-XL machines can easily access only nine of these fourteen display modes. Although XL machines can access four of these five additional modes directly from BASIC, these extra modes, which include several multi-colored character set modes requiring custom character sets, are best left to the Assembly language programmer.
The character graphics modes 0, 1, and 2 are easy to understand. The normal text display is graphics 0. It consists of twenty-four rows of forty characters. Each character is eight dots wide by eight dots or television scan lines high. Graphics mode I characters are just graphics mode 0 characters stretched twice as wide; only twenty of these characters fit on any row. Graphics 2 characters are as wide as graphics one characters but are twice as deep. Since each character is sixteen scan lines high, only twelve rows would fit on the screen in the full screen mode.
Normally a text window occupies the bottom four rows (32 scan lines) in all BASIC graphics modes except the GTIA modes. If you were to set the display for graphics mode 2 characters, ten rows of these characters would be displayed above four rows of graphics 0 characters. The display can be set to full screen by adding 16 to the graphics mode. Thus, invoking GRAPHICS 2+16 sets up a full screen display consisting of twelve rows of graphics 2 characters.
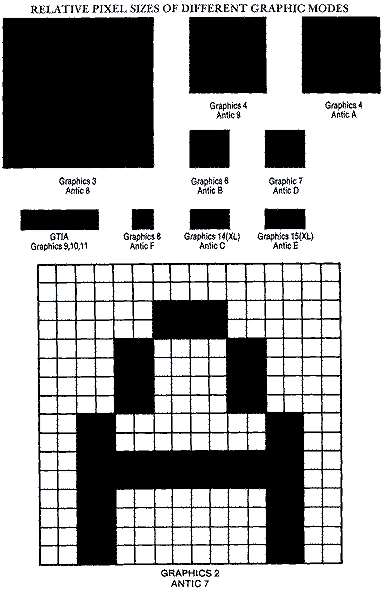
Graphics modes 3 thru 8 are bit-mapped graphics modes that don't involve characters. Instead they plot colored dots or pixels of varying resolution. A pixel can be as large as eight dots by eight dots in graphics mode 3, be four dots by four dots in graphics mode 5, two dots by two dots in graphics 7, or be as small as one single dot in graphics mode 8. The finest resolution in graphics mode 8 gives us complete control over every dot on the screen.
Obviously, there are more reasons to use each of these modes beyond the varying degrees of resolution. As the graphics modes increase in resolution, more memory is required for display. Bigger pixels simply fill up the screen faster and therefore require less memory. For example, a graphics 3 screen that has pixels the size of a character and a screen resolution of forty pixels by twenty-four, requires only 480 bytes for screen memory. A graphics 8 screen that stores groups of eight pixel-sized dots in one byte, requires 7680 bytes of screen memory. A programmer using this mode on a 16K Atari 400 or 600XL, would have very little room for his program.
The number of colors available is another reason for choosing a particular graphics mode. As a rule, more memory is required to display more color because the color information must be encoded within the screen data. For example, the only difference between the two color graphics modes 4 and 6, and the four color modes 3, 5, and 7 is in the amount of memory required. Graphics modes 4 and 5 have the same resolution (80 x 48), but graphics mode 4 uses only half as much memory. Graphics mode 5 must use two bits to encode the color for each pixel, where only one bit is needed to tell the computer how to display graphics mode 4 pixels. A similar relationship exists between graphics modes 6 and 7.
You have probably noticed that each graphics mode is displayed in a series of rows. A full-screen graphics 5 screen consists of forty-eight vertically stacked rows of pixels, each four scan lines high. A graphics seven screen consists of ninety-six vertically stacked rows of pixels, each two scan lines high. In each case there are 192 scan lines displayed on the screen. This number is no accident but is determined by the way television sets draw or scan a picture.
How Televisions Work
Most television sets, including the ones on which you actually watch TV, are raster scan devices. A moving electron beam strikes the individual phosphors that are painted on the inside front surface of the television tube. Each time an electron strikes a phosphor, it glows momentarily. If the beam continues to strike the same phosphor it will glow, continously.
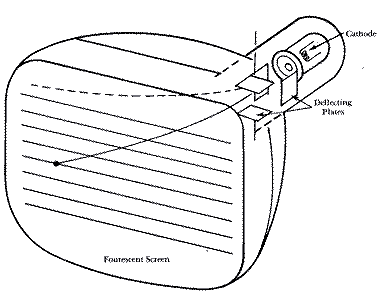
In order to draw an entire screen full of glowing dots the electron beam has to move in a series of accurate sweeps across the picture tube. A charged deflection plate bends the electron beam so that the stream of electrons strikes a series of adjacent phosphors along a straight horizontal line. These closely packed individual dots appear to be a solid line. The electron beam starts at the top of the screen and scans from left to right. When it finishes a line, it shuts down briefly while it returns to the left edge and drops down to the next scan line. This period is known as the "horizontal blank." The electron beam does this 192 times in a process known as "raster scan." When the beam finishes it returns to the top of the screen in a time period known as "vertical blank."
Obviously, if the pixels are to remain lit for longer than a brief moment the screen will have to be refreshed quite often. The electron beam retraces its 192 line path sixty times a second. A television set actually scans 262 scan lines, but the average set can only display slightly more than 200 lines. The area above and below your rectangular playfield contains some of these extra lines.
In order to get an image other than solid white, the electron beam's intensity is varied while it is scanning. By varying the intensity or the number of electrons that hit individual phosphors, different brightness levels are achieved. This gives us shading on black and white television sets that ranges from black through various shades of grey to pure white.
The process of producing a color image is only slightly different. The electron beam scans as usual from left to right over the playfield's 192 scan lines at sixty times per second. The difference is in the phosphors on the screen's surface. Each dot consists of a triangular pattern of three sub dots; one blue, one green and one red. Instead of one electron beam there are three beams, one for each color. Each beam is aimed very precisely through a mask at the subdots containing its color. Thus, when the Atari sends to the television set or color monitor color (frequency) and luminance (amplitude) information at a particular time during the scanning process, the electron beams will produce the desired display. The Atari doesn't tell the electron beams where to display information on the screen, but instead when to display information. The Atari's special hardware chips wait until the electron beams reach a particular point on the screen before immediately sending the proper color and luminance information.
The time unit used to determine when to send color information is called the color clock. This is the amount of time it takes to change the frequency between the different colors. The electron beam has time to send 228 color clocks on one scan line. Again some of the information is plotted off screen so that the Atari displays only 160 color clocks. The color information is transmitted to the TV in the form of a square wave. When the signal is high during one clock cycle, you get one color, and when it is low you get the complementary color. Other colors are obtained by phase shifting the signal slightly.
Memory Map
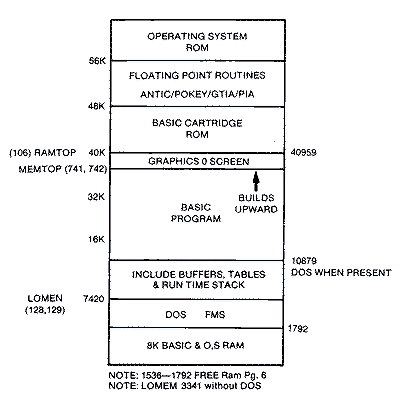
It is best at this time to develop an understanding of where the Atari computer stores your BASIC computer program and the location of display memory. All 6502-based Atari computers, address 64K bytes of memory whether physical memory exists or not. The computer is divided into RAM (Random Access Memory) and ROM (Read Only Memory). You can store things like your BASIC program in RAM memory. Atari 400's and 600XL's contain 16K of RAM memory, while the larger 800's, 1200's and 1400's contain 48K or 64K of RAM memory. Most of the area above 48K, from 52K to 64K is reserved for the computer's Operating System (OS), and the use of various hardware chips ANTIC, POKEY, CTIA/GTIA and PIA. The OS and all of these chips are in ROM. Locations in them can be read, but only a very few hardware locations in some of the chips can be written to. Since many of these writable hardware locations can't hold information for longer than 1/60 of a second, they are "shadowed" by RAM memory locations in the lower portion of the computer's memory. These "shadowed" memory locations, that contain information such as joystick/paddle values for each of the registers, are copied to the appropriate RAM locations during the vertical blank period between television frames. Color information "shadowed" in RAM is copied to the hardware registers at the same time. This not only saves you the trouble of refreshing the hardware each cycle, but allows you to read the "shadowed" values.The lowest section of memory contains zero page, BASIC and OS system RAM, the stack, and the keyboard buffer. All of this occupies the space between 0 and 1535 ($000-$5FF). The area between 1536 and 1791 ($600$6FF) known as page six is free for user Machine language subroutines. The area above 1792 to location 7420 or LOMEM is reserved for the DOS File Management System. LOMEM drops to 1792 in computers that don't use a disk drive or interface module.
The 8K ROM BASIC cartridge occupies memory from 40K to 48K regardless of memory configuration. When the cartridge is engaged, RAMTOP or HIMEM drops to 40959 in 48K and 64K machines and remains at 16384 in 16K machines. The memory between LOMEM and HIMEM is the area available for running and storing your BASIC language programs.
BASIC programs are stored beginning at LOMEM. The program along with its buffers, tables, and run time stack build upwards in memory. When a graphics mode is invoked, BASIC reserves the area just below HIMEM for the graphics screen and text window if there is one. It stores a small program called the display list just below the graphics screen. This display list, which we will discuss in greater detail in the next chapter, tells ANTIC where to find display data and in which graphics mode to display it. In brief, the list contains an instruction for each row of graphics data, plus
instructions about the number of blank lines to skip before plotting plus the locations of the screen's data and the beginning of its own display list.
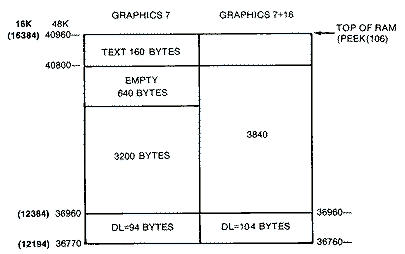
For example, if we set up a full screen graphics 7 screen (40 x 96), BASIC places the beginning of screen memory automatically at 36960 for a 48K machine. The screen's memory is 3840 bytes. The 104-byte display list is placed at memory location 36760. If we choose instead a graphics 7 screen with a text window (40 x 80), only 3200 bytes of screen memory are required. BASIC puts screen memory at the same location but leaves the top 640 bytes empty. It stores the data for the 160 byte (4 line) text screen beginning at 40800. The display list is 10 bytes shorter and begins at location 36770 for 48K machines. The diagram below shows the appropriate addresses for 16K machines.
The advantage of having BASIC set up your graphics screen and display list is that it avoids errors that might produce weird displays. This includes displaying the proper screen data in the wrong graphics mode, or displaying a section of memory that isn't your screen data. The disadvantage is that you can't mix graphics modes or custom design a display. You are limited to displaying a single graphics mode with or without a four line text screen at the bottom.
Color
The Atari uses a very flexible method to display color. Instead of storing the color of each pixel directly in display memory, the Atari refers the color information to a specific color register. Each pixel has the color register number stored rather than a specific color. This method, is extremely flexible, but it allows only a maximum of five colors on the screen at any one time. In an effort to save screen memory at most only two bits are used to specify a pixel's color. On the other hand, if you wish to change the background color or the color and luminence of all the pixels referring to a particular color register, you need only to change the color value in that one color register.There are five available color registers numbered 0 through 4. Color register 4 is also known as the background color register because it specifies the color and luminance for any place on the screen where nothing else is written. In the bitmapped graphics modes 3-8, this means the color between any of the plotted pixels. In text mode 0 it means the border area, not the color behind the character.
The color registers are each one byte long. The upper four bits determine the color (0-15), and the lower four specify the brightness. Only the highest three of the four luminance bits are used, so that there are eight levels of brightness. Sixteen different colors and eight levels of brightness create 128 shades of color. The arrangement for each color is in groups of sixteen. Values 0- 15 are for color #0 in different intensities, 16-31 for color #1, etc. The table below lists the values for many of the common colors.
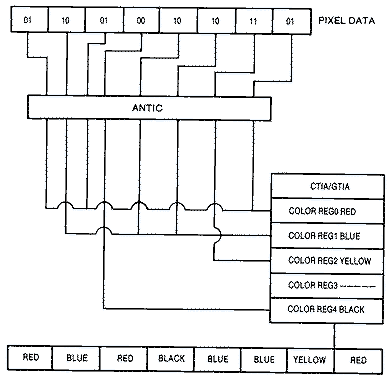
As we said, there are five different color registers. Think of these as paint pots. You can put a color into any one of these color registers and then draw points (pixels) and lines using that color register. It is similar to drawing on a canvas with a brush. The difference is that if you draw a green line five pixels long with color register 0, screen memory doesn't store it as green, green, green, green, green, but as a series of bits 01 01010101. When ANTIC fetches screen data and feeds it to the CTIA/GTIA chip, this color chip looks to the appropriate color register to determine which color is to be put on the screen for each separate pixel. For most of the four color graphics modes the bit pattern is as follows:
00 BACKGROUND

01 REGISTER #0

10 REGISTER #1

11 REGISTER #2
Thus, if we had the following screen data for eight pixels, the colors drawn by the color chip would reflect the values stored in the different color registers. In the example below, black is in the background color register and red, blue and yellow are in the other color registers.
These five color registers are located in hardware in the actual CTIA/GTIA chip. Each time ANTIC feeds it data, it looks to these hardware locations before plotting the color. Even what appears to be a blank empty screen is still generated from the CTIA/GTIA's interpretation of the data. Even all zero bits indicate that the entire screen is just background. The chip looks to these registers thousands of times during the refresh process of updating the screen.
The operating system also maintains copies of these color registers in RAM memory. These are called shadow color registers. They are maintained because the hardware locations are "write only" locations. Since they can't be read, we need RAM locations where they can be read. At the beginning of each refresh cycle, these five shadowed registers are copied into the hardware locations.
CTIA REGISTER                           O.S. SHADOW REG.
PLAYFIELD #0 /COLOR REG #0  708	($2C4)  53270	($DO16)
PLAYFIELD #1 /COLOR REG #1  709	($2C5)  53271	($D017)
PLAYFIELD #2 /COLOR REG #2  710	($2C6)  53272	($D018)
PLAYFIELD #3 /COLOR REG #3  711	($2C7)  53273	($D019)
PLAYFIELD #4 /COLOR REG #4  712	($2C8)  53274	($D01A)
(BACKGROUND)
BASIC uses the SETCOLOR command to set up the color registers. It is in the form of SETCOLOR (color reg #), (color #),(luminance #). A direct POKE to the O.S. shadow register is equivalent to SETCOLOR and is faster. For example SETCOLOR 1,3,8 is the same as POKE 709,(3*16)+8 or POKE 709,56.
COLOR VALUES FOR COLOR REGISTERS
          VALUE  HUE  LUMINANCE                VALUE     HUE  LUMINANCE
BLACK	  0($00)  0       0       MAGENTA       82($52)   5       2
DARK GREY 4($04)  0       4       PURPLE        96($60)   6       0
GREY      6($06)  0       6       LAVENDER     102($66)   6       6
WHITE     14($0E) 0      14       BLUE         116($74)   7       4
GOLD      20($14) 1       4       LTBLUE       120($78)   7       8
YELLOW    24($18) 1       8       TURQUOISE    164($A4)  10       4
BROWN     34($22) 2       2       GREEN        196($C4)  12       4
TAN       36($24) 2       4       LIGHT GREEN  200 ($C8) 12       8
ORANGE    54($36) 3       6       YELLOW GREEN 214($D6)  13       6
RED       66($42) 4       2       OLIVE GREEN  228($E4)  11       4
PINK      72($48) 4       8       PEACH        246($F6)  15       6
Atari BASIC's COLOR command, used to specify a particular playfield register that plots points or draws lines, is probably the most confusing aspect of Atari graphics. When you choose a COLOR #, it selects a color register assigned to a playfield. It uses that color register to plot with until a new color register is chosen. The problem is that the COLOR # often doesn't correspond to the color register and varies with the graphics mode.
There is a logical explanation for the discrepancy, but it is more apparent to the Assembly language programmer than to the casual BASIC programmer. Remember that in most modes two bits are used to specify the color. This is true in all of the bit-mapped graphics modes. Color #0 is usually background because a Machine language 00 written into display memory usually plots nothing. If COLOR # is I it writes a 01 in display memory for that pixel, if equal to a 2 it writes a 10, and if equal to a 3 it writes an 11. Unfortunately, if you refer to the table above, bits 01 corresponds to color register #0, bits 10 to color register #1, and bits I I to color register #2. On the other hand, the two color modes use only COLOR #1 to plot points because just a single bit is used to direct the CTIA to the color register.
The character graphics modes, 0, 1, and 2 are even more confusing. The upper two bits in each character not only determine which color register is selected, but effect which character is displayed. Essentially, parts of the character set appear in different colors. For example, if you are using the computer's default colors and you are in character mode #1, a 20 character per line mode, upper case letters appear in orange, lower case in light green, inverse upper case characters in dark blue, and inverse lower case graphics characters in red.
                                          COLOR
                               ATASCII   REGISTER
Uppercase alphabet (A-Z)        39-90       0
numbers, punctuation

Lowercase alphabet              61-122      1

Inverse uppercase alphabet     160-218      2
numbers, punctuation

Inverse lowercase alphabet     225-250      3
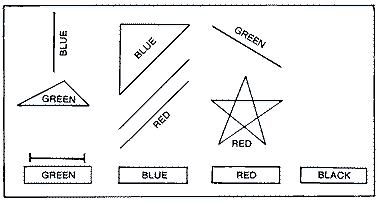
Since the relationships between the COLOR # and the playfield it refers to differ in many of the graphics modes, beginners will do best by refering to the table below or the one in their BASIC reference manual. The concept of drawing lines and shapes using color registers as paint pots is best illustrated with the following demonstration. We will draw in graphics mode 7 full screen. This is a four color mode with three foreground colors and one background color. Initially, we will fill our paint pots or color registers with dark gray, green, blue and red.
COLOR REG. #0   GREEN       COLOR #1
COLOR REG. #1   BLUE        COLOR #2
COLOR REG. #2   RED         COLOR #3
COLOR REG. #4   DARK GREY   COLOR #0
We will draw our rectangular paint pots at the bottom of the screen and one shape in its color above each pot. We will also draw another shape or line above one of the other paint pots. When we are finished we will have six shapes above three paint pots. The solid shapes are filled in using the standard XIO color fill command in BASIC.
The XIO fill command is designed to work with four-sided figures, but if you are careful it will work with triangles. In general you plot a point in the lower right hand corner of the figure and use DRAWTO statements to reach the upper right hand corner of the figure. You next use the position statement to move the cursor to the lower right hand corner and use the POKE statement to place a number, equal to the COLOR number to be used for plotting into memory location 765. Last, you perform a XIO 18, #6,0,0,"S". The fill commands works from left to right and will fill the figure until it encounters any illuminated pixel between the left and right sides of the figure being filled. For example:
20 GRAPHICS 7+16
50 SETCOLOR 1,7,2:REM BLUE
80 COLOR 2
140 PLOT 35,90:DRAWTO 35,80:DRAWTO  5,80
150 POSITION 5,90
160 POKE 765,2
170 XIO 18,#6,0,0,"S"
180 GOTO 180 180
When you fill a triangle, two sides of the figure are drawn. While you may not be at the top of the figure when you finish, you will be on the left side when you reposition the cursor to the bottom right. Usually, the color fill works properly; but, if you look at the blue triangle, you will notice that we repositioned the cursor at the bottom one pixel to the left. This is because when the last line fills on the bottom it must have a right boundary to fill to. If the boundaries are equal, the line will begin filling from there to the right edge of the screen.
The colored bar above the paint pot indicates which paint pot or color register can be adjusted by the joystick. You can select an individual paint pot with the select key. When the bar is to the far right beyond the last paint pot, it points to the paint pot used to color the background. You can adjust the color in the paint pot by moving the joystick up or down. If you begin at the first paint pot, which is intially green, and change the color, you will notice that the two shapes that were green changed to the new color in the paint pot. It doesn't matter if the shape is above the paint pot or somewhere else on the screen. What matters is which color register or paint pot was in effect when the shape was drawn, for those pixels contain data that point to a particular color register.
You can play with the four paint pots and watch the various shapes change color. When you change the background color one or more of the other shapes will vanish if the two paint pots are identical. The shape is still there, but the pixels instruct the CTIA/GTIA chip to produce the same color as the background. The shape just blends in to become invisible.
Download PAINTPOT.BAS (Saved BASIC)
Download / View PAINTPOT.LST (Listed BASIC)
Graphics Modes
ATARI computers can display fourteen graphics modes of which nine can be directly accessed from BASIC on older machines and thirteen on the newer XL units. This section of the book will explain each of the various graphics modes, their resolution or size, the method by which they are mapped to the screen, and how colors are generated.Graphics Mode 0 (ANTIC 2)
This is the normal-sized character or text mode that the computer defaults to on start up. Being a character mode, screen memory consists of bytes that represent individual characters in either the ROM or a custom character set. ANTIC displays forty of these 8 x 8 sized characters on each of twenty-four lines.Graphics 0 is a 1 1/2 color mode. Color register #2 is used as the background color register. Color register #1 sets the luminance of the characters against the background. Setting the color has no effect. Bits within a character are turned on in pairs to produce the luminace color. Otherwise single bits tend to produce colored artifacts on the high resolution screen. These colors depend on whether the computer has a CTIA or GTIA chip, and the color of the background.
Graphics 1 (ANTIC 6)
This is one the expanded text modes. Each characters is 8 x 8 but the pixels are one color clock in width instead of the 1/2 color clock mode of Graphics 0 making the characters twice as wide. Only twenty characters fit on any line. A graphics I screen has twenty rows while the full screen mode has twenty-four rows of characters.The two high bits of each ATASCII character, that normally identify lowercase or inverse video text in Graphics 1, set the color register for the 64 character set. Decimal character numbers 0-63 use color register zero, while those same 64 characters if given character numbers 64-127 use color register #1. If you are typing from the Atari keyboard, the uppercase letters A-Z ATASCII 65-90 (Internal # 33-58) are assigned to color register zero, while the lowercase numbers 97-122 (Internal # 97-122) are signed to register #1.
Graphics Modes
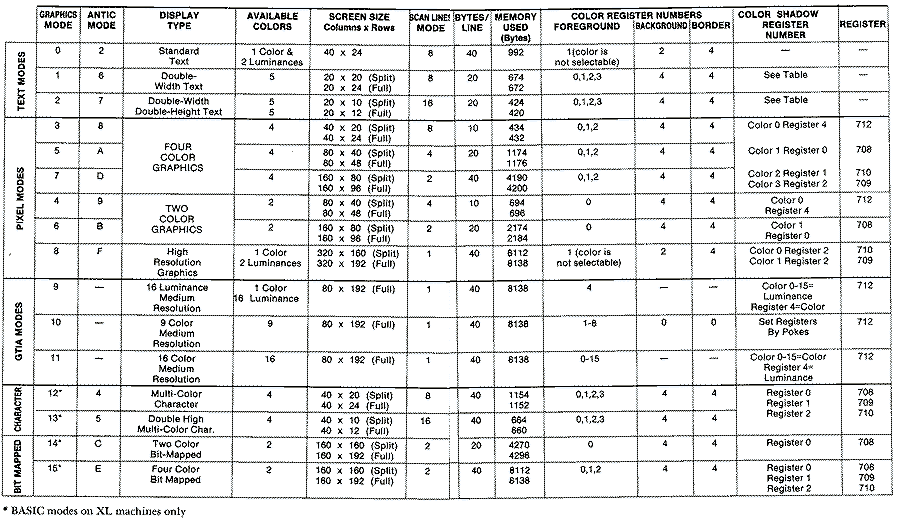
Graphics 2 (ANTIC 7)
This text mode is basically the same as the previous mode except that each row of pixels is two scan lines high. Thus 12 rows of 20 characters are displayed on a full screen. Only ten rows fit on a split screen.Graphics 3 (ANTIC 8)
This four-color graphics mode turns a split screen into 20 rows of 40 graphics cells or pixels. Each pixel is 8 x 8 or the size of a normal character. The data in each pixel is encoded as two bit pairs, four per byte. The four possible bit pair combinations 00, 0 1, 10, and I I point to one of the four color registers. The bits 00 is assigned to the background color register and the rest refer to the three foreground color registers. When the CTIA/GTIA chip interprets the data for the four adjacent pixels stored within the byte, it refers to the color register encoded in the bit pattern to plot the color.Graphics 4 (ANTIC 9)
This is a two-color graphics mode with four times the resolution of GRAPHICS 3. The pixels are 4 x 4, and 48 rows of 80 pixels fit on a full screen. A single bit is used to store each pixel's color register. A zero refers to the background color register and a one to the foreground color register. The mode is used primarily to conserve screen memory. Only one bit is used for the color, so eight adjacent pixels are encoded within one byte, and only half as much screen memory is needed for a display of similiar-sized pixels.Graphics 5 (ANTIC A or 10)
This is the four color equivalent of GRAPHICS 4 sized pixels. The pixels are 4 x 4, but two bits are required to address the four color registers. With only four adjacent pixels encoded within a byte, the screen uses twice as much memory, about IK.Graphics 6 (ANTIC B or 11)
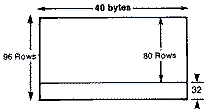
This two color graphics mode has reasonably fine resolution. The 2 x 2 sized pixels allow 96 rows of 160 pixels to fit on a full screen. Although only a single bit is used to encode the color, screen memory still requires approximately 2K.Graphics 7 (ANTIC D or 13)
This is the four color equivalent to GRAPHICS mode 6. It is the finest resolution four color mode and naturally the most popular. The color is encoded in two bit-pairs exactly the same way as in GRAPHICS 3. The memory requirements of course is much greater as there are 96 rows of 160 - 2 x 2 sized pixels. It requires 3840 bytes of screen memory with another 104 bytes for the display list.Graphics 8 (ANTIC F or 15)
This mode is definitely the finest resolution available on the Atari. Individual dot-sized pixels can be addressed in this one-color, two-luminance mode. There are 192 rows of 320 dots in the full screen mode. Graphics 8 is memory intensive; it takes 8K bytes (eight pixels/byte) to address an entire screen.The color scheme is quite similar to that in GRAPHICS mode 0. Color register #2 sets the background color. Color register #1 sets the luminance. Changing the color in this register has no effect, but, this doesn't mean that you are limited to just one color.
Fortunately, the pixels are each one half of a color clock. It takes two pixels to span one color clock made up of alternating columns of complementary colors. If the background is set to black, these columns consist of blue and green stripes. If only the odd-columned pixels are plotted, you get blue pixels. If only the odd-columned pixels are plotted, you get green pixels. And if pairs of adjacent pixels are plotted, you get white. So by cleverly staggering the pixel patterns, you can achieve three colors. This method is called artifacting. This all depends on background color and luminance.
The following five graphics modes have no equivalent in BASIC on older machine but if indicated do correspond to an equivalent graphics mode on the newer XL models.
Antic 3
This rarely used text mode is sometimes called the lowercase descenders mode. Each of the forty characters per line are ten scan lines high, but since each of the characters are only eight scan lines high, the lower two scan lines are normally left empty. However, if you use the last quarter of the character set, the top two lines remain blank, allowing you to create lowercase characters with descenders.Antic 4 (Graphics 12-XL computers only)
This very powerful character graphics mode supports four colors while using relatively little screen memory (1 K). In addition its 4 x 8 sized characters have the same horizontal resolution as GRAPHICS 7, yet twice the vertical resolution. A large number of games with colorful and detailed playfields use this mode.These characters differ considerably from ANTIC 6 (BASIC 2) characters, in that each character contains pixels of four different colors, not just a choice of one color determined by the character number. Each byte in the character is broken into four bit pairs, each of which selects the color register for the pixel. That is why the horizontal resolution is only four bits. A special character set generator is used to form these characters.
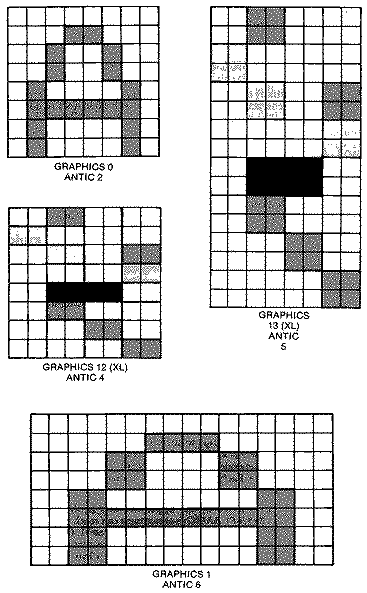
Antic 5 (Graphics 13-XL computers only)
This mode is essentially the same as ANTIC 4 except that each character is sixteen scan lines high. The character set data is still eight bytes high so ANTIC double plots each scan line.Antic C (Graphics 14-XL computers only)
This two-color, bit-mapped mode the eight bits correspond directly to the pixels on the screen. If a pixel is lit it receives its color information from color register #0, otherwise the color is set to the background color register #4. Each pixel is one scan line high and one color clock wide. This mode's advantages are that it only uses 4K of screen memory and doesn't have artifacting problems.Antic E (Graphics 15-XL computers only)
This four-color, bit-mapped mode is sometimes known as BASIC 7 1/2. Its resolution is 160 x 192 or twice that of GRAPHIC 7. Each byte is divided into four pairs of bits. Like the character data in ANTIC 4, the bit pairs point to a particular color register. The screen data, however, is not character data but individual bytes. The user has a lot more control, but this mode uses a lot more memory, approximatelyGTIA
There are three additional graphics modes in the GTIA chip that are actually special interpretations of ANTIC mode $F, a high resolution graphics mode. They are designed to add a lot more color to the screen without sacrificing too much resolution. Graphics mode 9 is a one-color, sixteen luminance mode. Mode 10 is a nine-color mode with independent luminance setting, and mode 11 offers sixteen colors set at one luminance. Each mode has a resolution of 80 columns by 192 rows. There is no split screen in these modes.The GTIA modes are selected by the upper two bits in the priority register shadowed at location 623 ($26F). BASIC programmers can reach any of these GTIA modes by normal graphics statements GRAPHICS 9, 10, or 11. Others will need to POKE the correct bit. Graphics mode 9 can be activated by turning on bit 6 with a POKE 623,64. GRAPHICS 10 is activated by turning on bit 7 with a POKE 623,128. Both bits 6 and 7 need to be set with a POKE 623,192 to activate graphics mode 11. These values will disturb the other bits in GPRIOR that set various functions, so take care if you have set any other bits previously by POKEing a value that combines both. These other bits allow the combination of all four missiles into a fifth player, establish player-missile and playfield priorities, and enable multiple-colored or overlapping players.
The GTIA chip was not standard equipment on Atari computers until December, 1981. Those with older computers may wonder if this chip is installed. If you are on the text screen (GR.0) and do a POKE 623,64, the screen will go black and become unreadable with the GTIA chip. If nothing happens, you have the CTIA chip. Your machine can be updated to the newer GTIA chip by your Atari dealer if you desire.
Since GTIA modes allow a lot more color while using the same screen memory as GRAPHICS 8, more bits are needed to keep track of the color. In fact sixteen colors require four bits, so that only two pixels are encoded within a byte instead of the usual eight. This is the reason the horizontal resolution drops from 320 pixels to 80 pixels per scan line. The pixels are elongated instead of square. Also, since there are only nine color registers in the computer, the sixteen colors are bit mapped to the screen as in other computers, instead of by the Atari method of color indirection.
Graphics 9
GRAPHICS mode 9 produces up to sixteen different luminances of the same hue. This is quite useful for drawing pictures that require alot of shading, or for digitizing pictures. The main color is set by the background color register #4. You can use the SETCOLOR command to set the color value in the upper four bits (nybble), and the luminance in the lower four bits to zero. The COLOR command is used to vary the luminance. What actually happens is that the pixel data from ANTIC is logically ORed with the lower nybble of the background color register to set the luminance that appears on the screen. A quick little program that will demonstrate the mode is listed below.10 GRAPHICS 9 20 SETCOLOR 4,1,0 30 FOR I=0 TO 15 40 COLOR I 50 PLOT I+20,10 60 DRAWTO I+20,40 70 NEXT I 80 GOTO 80
Graphics 11
GRAPHICS 11 is a one luminance, 16 color mode. The luminance this time is set by the background color register #4. The SETCOLOR command is used to set up the single luminance value in the lower nybble of this register, while zeros representing the hue are placed in the upper nybble. The COLOR command is used in this mode to select the various colors. This time ANTIC's pixel data is logically ORed with the upper nybble of the background color register to set the hue that appears on the screen. A typical example follows:10 GRAPHICS 11 20 SETCOLOR 4,0,6:REM LUMINANCE = 6 30 FOR I=0 TO 15 40 COLOR I 50 PLOT I+20,10 60 DRAWTO I+20,40 70 NEXT I 80 GOTO 80
This sixteen-color mode doesn't use the four playfield color registers for color indirection. The colors on the screen are determined directly by the data bits stored in memory. Each pixel has the value for the hue stored in memory. For example, a blue hue, which is number 7, has a bit value 0 111. This is what is stored in the nybble. Two adjacent pixels, which are stored in the same byte have a value of 01110111 or 119 decimal ($77). All have the luminance assigned to the background color register.
There is a slight advantage to not using the color registers in either GRAPHICS 9 or 11: even more color can be added to the screen by adding players of different colors. The disadvantage is that the collision registers are useless in both modes.
Graphics 10
GRAPHICS 10 is probably the most versatile of the GTIA modes. While it only has nine colors with variable luminance, it does use color indirection to produce its color. This means that the screen data points to one of the five playfield-color registers and the four player-color registers to obtain its color information rather than storing the color data on the screen as in the other two GTIA modes. Since players use the same color as part of the background, you must be careful. They will blend in when they coincide with that portion of the playfield using the same color. Collision registers don't work in this mode either. We believe ANTIC's collision registers are bypassed in all GTIA modes. A typical GRAPHICS 10 example follows;10 GRAPHICS 10 20 FOR I=0 TO 8 30 N=I 40 POKE 704+I,N*16+6 50 COLOR I 60 PLOT I*2+20,10 70 DRAWTO I*2+20,30 80 NEXT I 90 POKE 704,0:REM FOR BLACK BACKGROUND 100 GOTO 100
When you choose the color register via the COLOR statement in BASIC, 16 different values can be used but only the first nine are valid. The remainder just repeat various playfield registers. The chart is listed below. You will notice that COLOR 4 no longer sets the background color. Instead it is set by player O's color in register number 704. It is best to use POKEs to set the color registers rather than SETCOLOR.
  COLOR     REGISTER
STATEMENT       #        PLAYFIELD
    0          704       PCOLOR0
    1          705       PCOLOR1
    2          706       PCOLOR2
    3          707       PCOLOR3
    4          708       PLAYFIELD 0
    5          709       PLAYFIELD 1
    6          710       PLAYFIELD 2
    7          711       PLAYFIELD 3
    8          712       PLAYFIELD 4
You can achieve some really nice animation effects when using this mode through the power of color indirection. If you don't count the background, you can rotate eight colors through the color registers to create a sense of motion.
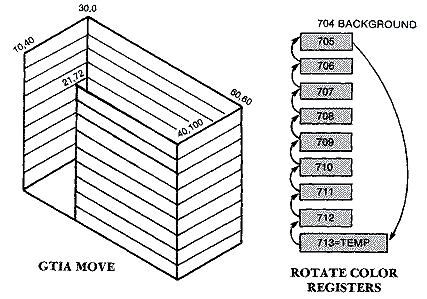
The example below draws a very colorful rectangular box in perspective. Part of one side was left open so that you can see more of the left and back sides. The different color registers or paint pots are set up in a bucket brigade. Since location 713 isn't used for anything, we used this as a temporary storage location. The color or paint from register 705 is first put into this temporary bucket or storage location, then shift the rest of the colors by moving them from the higher color register to the next lower one. This is done in a FOR ... NEXT loop. We POKE the lower color register with the value we find in the next higher color register.
Download GR10DEMO.BAS (Saved BASIC)
Download / View GR10DEMO.LST (Listed BASIC)
GTIA Trick
The GTIA modes, because they are special cases of GRAPHICS mode 8, require a considerable amount of display memory, approximately 8K. Graphics mode 0, a text mode, in many respects is very much like our high resolution mode. It is a 1 1/2 color mode, and the individual pixels within a character are the same.If you turn on GTIA mode I I from GRAPHICS 0 by POKING 623,192 the screen turns black and you get weird colored pixel patterns where your characters were. Recall from the above discussion that the color pixel patterns are directly bit mapped in screen memory in pairs of four bits, or nybbles, two per byte. If we could rewrite the character set so that the sixteen possible nybble pairs were in the first sixteen characters in the set, we could plot colored blocks the size of characters. While it wouldn't be as fine a resolution as in normal GRAPHICS 11, it would only require 960 bytes of screen memory, quite a substantial savings.
The bit pattern that is used to set color registers is the same one that we need to set up our pair of nybbles in each row of our character. The chart is listed below.
BITS	VALUE	COLOR
0000	0	grey (no color)
0001	1	light orange
0010	2	orange
0011	3	red orange
0100	4	pink
0101	5	purple
0110	6	purple blue
0111	7	blue
1000	8	blue
1001	9	light blue
1010	10	turquoise
1011	11	blue green
1100	12	green
1101	13	yellow green
1110	14	orange green
1111	15	light orange
We need to POKE a $00 into each of the bytes of the Oth character, a $11 (decimal 34) into the bytes for the 1st character, a $22 (decimal 34) into the bytes of the third character, etc. The values are seventeen apart so that it is simple to put the correct color nybble values into an array CT(16). Then it is a straightforward affair to method of POKEing the values in eight at a time into the proper character position in the new character set.
Any of these special GTIA color characters can be plotted to the screen at a specific position by calculating the offset from the beginning of screen memory. This location is stored at locations 88 and 89.
SCREEN PEEK(88)+PEEK(89)*256
OFFSET (40 x row #) + column #
LOCATION = SCREEN + OFFSET
So if you want to plot a purple pixel at character location (2,2) you do a POKE SCREEN + 82, 85. The luminance is set by the background color register 712.
An example of putting a row of sixteen different-colored GTIA pixels in GRAPHICS 0 is shown below.
Download GTIATRIC.BAS (Saved BASIC)
Download / View GTIATRIC.LST (Listed BASIC)
Return to Table of Contents | Previous Chapter | Next Chapter