Atari Program Exchange
Program Author's Handbook
TRADEMARKS OF ATARI
The following are trademarks of Atari. Inc.
|
ATARI® |
Distributed by
The ATARI Program Exchange
P.O. Box 427
155 Moffett Park Drive, B-1
Sunnyvale, CA 94086
To request an APX Product Catalog, write to the address above, or call toll-free:
800/538-1862 (outside California)
800/672-1850 (within California)
Or call our Sales number, 408/745-5535.
© 1982 Atari, Inc.
All rights reserved
Printed in U.S.A.
| PREFACE |
|
The ATARI Program Exchange (APX) acquires and distributes programs written for ATARI 400 and ATARI 800 Home Computers by a variety of people - from professional software vendors to hobbyists. Our goal is to increase the usefulness of ATARI Home Computers by offering an extensive library of programs appealing to users of various ages and with differing needs and interests. We'd like to consider your best programs for inclusion in APX. We evaluate programs from several perspectives. The most important are whether they work, whether they're useful or entertaining, and whether they're easy to use. Other factors we consider are their use of ATARI Home Computer features and their flexibility. To contribute programs to APX, use an APX Program Submission Packet, which consists of two booklets. This booklet, the "Program Author's Handbook" contains (1) guidelines for writing your program's user instructions and (2) programming procedures and suggestions for designing the kinds of programs we want to offer ATARI Home Computer owners. The other booklet, the "Program Submission Materials", contains two copies of the APX Program Submittal Agreement and one copy of the APX Program Submission Form. Send us these three documents whenever you submit a new program. The booklet also contains a question and answer section addressing various aspects of contributing programs to APX, and it includes all details about our quarterly software contest. |
| CONTENTS |
| CHECKLIST |

|
Use these reminders to guide you as you write programs and user instructions for submission to APX. |
| AUTHOR'S GUIDE | |
|
This guide can help you organize and write your instructions. It outlines suggested topics to cover for two kinds of programs. Outline I is useful for programs with these characteristics: a. User options and variations (e.g., multiple players) Typical of this group are games and educational programs with game overtones. Outline II is useful for programs organized around menus, functions, or commands. Typical of this group are data bases and system utilities. In addition to the sections described in the outlines, a table of contents and a list of figures and/or tables is always useful. |
|
If you use an ATARI Home Computer and a disk-based text editing/text formatting system to write your instructions, please send us both a copy of the diskette file and a printed copy (if you have a printer). We prefer that you use the Text Formatter and ATARI Program-Text Editor™ programs available through APX to create your manual since we use these programs to produce APX manuals. However, we'll also accept diskette files created by other word-processing systems written for ATARI Computers. If you send us a text file on diskette, please indicate the name of the word-processing system you used. If you don't put your instructions on diskette, then please send typed user instructions. Send us a copy and keep the originals for your records. |
|
|
Although we include a copyright notice on the title page of your user instructions, we don't register copyrights for APX software. You may want to copyright your program and user instructions yourself. To do so, follow the copyright instructions described under "Programming Procedures". In addition, write to the Register of Copyrights, Copyright Office, Library of Congress, Washington, D.C. 20559, for information to complete the process. |
|
|
If you have a program accepted by APX and later need to revise the user instructions (to correct mistakes or to incorporate information about program revisions), use one of the following procedures. If we asked you to produce the master copy for duplication, then please send us a new, revised master copy. If APX produced the master copy, then please send us a copy of the current instructions marked with your revisions. |
|
| OUTLINE I | |
|
Overview |
|
|
|
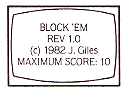
This section orients users. Try to keep your description under 300 words. Throughout your instructions, avoid using technical terms when you can convey the same idea with more generally understood terms. If you do use technical terms, keep them to a minimum and be sure to define them when you introduce them. Briefly mention your program's major features, the intended users, and the benefits of using your program. For example, if it's a game, mention the general category of game, how it's played (e.g., with Joysticks), the object of the game, and any options and game variations. But save the detailed instructions for later. An example is: BLOCK 'EM is an exciting, two-player action game for preteens on up. You and your opponent each maneuver a moving wall with your Joysticks to be the first to force the other to collide. Every time your opponent collides with a wall or playing field boundary, his wall glows and disintegrates, and you score a point. BLOCK 'EM offers several options. You determine the winning score for quick or prolonged games. You also choose whether to build small-block or large-block mazes, and you can select from six play speeds. BLOCK 'EM calls for both fast reflexes and strategy! |
|
Minimum RAM and Accessories |
|
|
|
A simple way to organize information about the RAM and accessories needed to run your program is to arrange it like a list. Include here both required and optional accessories. For example: REQUIRED ACCESSORIES OPTIONAL ACCESSORIES |
|
Contacting the Author |
|
|
|
If you're willing for users of your program to contact you by mail and/or telephone, please include your address and/or telephone number in the introduction. (Note. We'll mention your willingness to be contacted in the description of your program in the APX Product Catalog.) An example is: Users wishing to contact the author about BUDGET BENDER may write to her at: 3397 Bryant Street
|
| GETTING STARTED |
|
|
A simple way to explain how to set up the necessary equipment and load your program into computer memory is in numbered steps. First indicate what accessories and/or cartridge must be in place before loading your program. Then describe how to load your program. You load a program from diskette or cassette. For each medium, your load the program one way if it's autoloading and another way if users must use commands to load it into computer memory. (Note. We prefer that your program be autoloading, unless you have a compelling reason not to make it so. The APX program LOAD 'N GO (APX-20037) can create the AUTORUN.SYS file needed to autoload an ATARI BASIC program on diskette.) Here are examples for loading an autoloading, machine-language program. LOADING (PROGRAM) INTO COMPUTER MEMORY
|
|
The First Display Screen |
|
|
|
Start your instructions for the program itself by describing the first display screen, which also tells users what to expect if the program has loaded correctly into computer memory. An illustration of the screen is often useful. For example: The first display screen contains the program title and the prompt for entering the game-winning score. It looks like this:
|
|
Program Options and Variations |
|
|
|
If your program has variations chosen by pressing the OPTION or SELECT keys or by responding to prompts, describe each choice. An example of variations chosen by a function key is: Press the OPTION key until the arrow points to the NUMBER OF PLAYERS option. Then press the SELECT key until the arrow points to the number you desire - one player or two. If you select a one-player game, a "#1" appears in the scoring area at the top of the screen. If you select a two-player game, a "#1" and "#2" display at the top. An example of variations chosen by responding to a prompt is: You'll see the prompt DIFFICULTY LEVEL (0-9) below the game grid. Select the level you want by pressing a number key, followed by the RETURN key. Zero is the easiest level and nine the most challenging. |
|
How To Start |
|
|
Finally, you want to be sure to tell users how to start if your program doesn't start automatically. A game example is: After you've chosen your bonus level and number of players press START to begin playing. The avalanche will start falling in about 10 seconds, or you can press the red button on your paddle to start sooner. |
|
| USING <PROGRAM NAME> |
|
The Playing Field or Main Display Screen |
|
|
|
If the program's main display screen differs from the initial display, you'll want to explain any items on the screen that aren't self-explanatory. For example, a skiing course can be described as follows: The top of the screen displays your running time, the best time for the current course this game session, and the number of gates you've skied through so far on your current run. Below this display is a bird's-eye view of your skier and the course. Your skier starts in the middle of the screen and the starting line is near the top of the course. Two red dots with a yellow line between them represent each gate. The gates are numbered sequentially going down the hill. The green shapes are trees - to be avoided at all costs! If sounds or color changes denote specific conditions users should be aware of--such as a flashing red to denote danger or an incorrect response--you might want to describe these here as well. If the display screen changes under some circumstances, describe the screen variations and the conditions controlling them. |
|
Rules/Moves/Actions/Commands |
|
|
|
Organize this information to fit the nature of your program. For example, a simply played game might need only one paragraph. That's all it took to explain this paddle game: By turning your paddle knob, maneuver your six shields to keep the rocks from hitting the ground. Each rock that gets by you counts as amiss (that is a turn). As you absorb the rocks, your shields wear away--each one decreases in size and then disappears altogether, until you have only one small shield. At the same time the rocks fall faster as you progress through the layers to the smaller rocks. If you're dexterous enough to absorb the entire mass, you face successive avalanches, but you start each new round with fewer shields. On the other hand, if your program has many rules, or if it uses several keyboard commands, describe each. One approach is to explain rules and commands in the order users typically need to know the information while using the program. A second approach is to group similar commands or rules. Your program might call for yet another approach. When you explain commands or actions, a "picture" of menus or data displays along with an explanation can be very helpful. An example is: The object of the game is to place your symbol (X or O) on three consecutive squares before your opponent does. You can place them in a row, for example, in squares 1, 2, and 3. Figure 3 shows this completed row. X:X:X Figure 3. Completed Row |
|
Scoring |
|
|
|
If your program keeps scores, explain the scoring system. If scores display on the screen, explain what each piece of information represents. For example: Each player's current score displays in the second line. You earn one point per rock in the first layer, two points per rock in the second layer, and so on, up to six points per rock in the sixth layer. The same scoring applies to each avalanche you work your way through. |
| PROBLEMS |
|
|
Use this section to warn users about potential problems and to explain what happens when they do something unexpected. An example of a program operation warning is: Be sure to wait for the "beep" sound indicating the computer has read your command before you press another key. Otherwise, the program might lose some of your commands. An example of an unanticipated move with program response and recommended recovery is: If you try to enter a move for a unit that already displays four moves, the program will bump you back to the "INPUT COHORT #" prompt. You must either wait for the program to execute at least one move for that unit before entering another move, or erase one or more moves for the unit and then enter new moves. |
| SUGGESTED STRATEGY/HELPFUL HINTS (optional) |
|
|
Consider giving novice users some hints or strategy, especially if your program is complicated. An example for a game is: If you're a beginner, a simple strategy to follow is: (1) fight only one attacker; (2) pursue him (code 8) at warp factor 1; (3) lock on all phasers (code 4); (4) continuously take his position and watch his voyage; (5) when he gets within 1100 M, fire all phasers (code 1) and keep on firing while he is in range; and (6) when the enemy is out of range, scan him (code 9). After a few trial games, you'll become as proficient as the enemy at firing photon torpedoes. Finally, when you master launching anti-matter probes, designate more than one opponent. |
| RESTARTING OR REPLAYING THE GAME |
|
|
Describe here how users can interrupt a program in progress to start over and how they can continue with another round. Examples are: You can interrupt the game at any time and start over by pressing the START key. When you finish a game, responding Y to the prompt LIKE TO PLAY AGAIN (Y OR N)? sets you up to battle the barbarians yet another time. Responding N returns you to the READY prompt in ATARI BASIC. |
| ADVANCED TECHNICAL INFORMATION (optional) |
|
If you think some users might want to modify your program or develop their own based on techniques you've used, you might want to include information that will help them understand what you did. Assume readers of this section have fairly extensive experience programming on an ATARI Home Computer System. Consider the following kinds of information, either for your complete program or for its particularly complex parts:
|
| QUICK REFERENCE SHEET |
|
Users will be grateful to see a one-page summary of the information needed to use your program! When writing this page, assume they've read through your instructions and need just brief reminders of commands, rules, and so on. |
| OUTLINE II |
|
Whether to include some of the following sections and the amount of detail to use depends to a large extent on your program's intended user. Form a mental portrait of your program's typical users and try to address them in your instructions. For example, a program designed for preteenagers with no programming experience needs very carefully worded explanations, using a more simplified vocabulary than does a program intended for adults with extensive programming experience. In general, the more explanation you include and the simpler you keep your vocabulary, the wider the potential market for your software. Many of the examples below come from a manual written for preteenage and teenage users. Notice how the explanations assume limited computer experience and avoid using specialized computer terms. Consider whether your program's instructions face these or similar restrictions. |
|
Overview |
|
|
Use this section to orient users. Describe your program's typical or sample applications, its most important features, and generally how to use it. The idea is to give your readers a frame of reference for all the details that follow, but not to overwhelm them with too many details at this point. Other aspects you might want to mention are the kinds of activities or functions your program performs; whether your program uses menus, prompts, controllers, or commands; the kinds of output it produces; program limitations (if they're likely to discourage some users); and background information for specialized programs. An example is: The NEWSPAPER ROUTE MANAGEMENT PROGRAM helps you manage a newspaper route by simplifying your record-keeping chores. It supports daily and Sunday routes of as many as 100 subscriptions. You use menu selections to enter, modify, and erase customers' addresses and class of service to reflect subscription changes, and you keep track of your customers on a computer-displayed map. You use a Joystick Controller to position and remove houses on the map. In addition, you can create several kinds of customer lists. You can display these lists on your TV screen, and if you have an ATARI 825 TM 80-Column Printer or an equivalent printer attached, you can print these lists. You can also print payment collection lists and customer receipts. |
|
Minimum RAM and Accessories |
|
|
A simple way to organize information about the RAM and accessories needed to use your program is to arrange it in a list. The corresponding section in OUTLINE I shows an example. |
|
|
Special Terms or Notation |
|
|
Note here any terms and symbolic notation you think most users will need explained, either because you use the term or notation in a special way or because the term or notation isn't known generally. Include terms and notation you use in either your program or your instructions. Examples help to clarify notation descriptions. An example of a special terms explanation is: The terms "START" and "ACTIVE" both refer to a customer who currently receives the paper, and the term STOP refers to a customer who is on vacation or has temporarily suspended service. |
|
Special Function Keys |
|
|
If your program uses function keys, such as the CTRL or ESC key or the directional arrow keys, note that information here, along with a brief description of their purpose. |
|
|
References to Related Publications |
|
|
If your program assumes users are familiar with another ATARI publication, mention the document here. If your program depends on users' having read some other, non-ATARI publication, cite the work as follows: author (last name first), full title, edition, volume, number of pages, publisher, and copyright year. If only some chapters or pages are important, mention these pages instead of the total number of pages for the work. |
|
| GETTING STARTED |
|
Loading Program into Computer Memory |
|
|
Please see the discussion under GETTING STARTED in OUTLINE I for suggested ways to describe how users should load programs. |
|
|
The First Display Screen |
|
|
Begin your detailed discussion of your program by describing the first display screen. At a minimum, tell users what to expect if the program loaded correctly. Better yet is to include an illustration of the first display screen. For example:
|
| FUNCTIONS/COMMANDS/MENUS |
|
|
This section is the heart of your manual. These are the step-by-step instructions for using your program. Organize your information in a way that's logical for your program's application. Some standard ways are (1) by menu and by selection within each menu, (2) by program function, or (3) in order of activity, if there's one usual order. For each unit, include the following information, as applicable:
Here is an example of instructions for a program using menus:
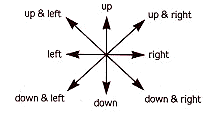
SELECTION 1: DISPLAY MAP Use this selection to look at maps of the houses on your route. When you first select DISPLAY MAP, an empty street map displays in the graphics area of your TV screen. The text window displays this Selection 1 Sub-menu: SELECT Enter 1 to display a map with house markers for only your active customers. Enter 2 to display one with markers for only your inactive customers. Enter 3 to display a map with markers for all your customers. An example of instructions for a program using controllers is: As long as the map displays, all-your commands are through the Joystick Controller. The map displays in the graphics area of your TV screen. The small flashing cursor indicates your current map location. Hold the Joystick with the red button to your upper left toward the TV screen. Position the cursor over an existing house marker or go to a new location by moving your Joystick in these directions:
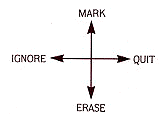
When the cursor is positioned where you want it, press the red button. Then move the Joystick as shown below to add a new house marker (MARK), erase an existing house marker (ERASE), do nothing with your current cursor position (IGNORE), or leave the map in its current state and return to the Customer Record display (QUIT):
Here is a sample instruction for a program using commands. One way to arrange commands is alphabetically, which makes reference searching fairly fast. Another way is by logical groups. In this example, the command's name, format, and one or more examples appear on separate lines, followed by a description of what the command does and explanations of the examples: JUMP TO NEXT PAGE
Example: .J10 The command ".Jn" moves the text following it to the next page if fewer than "n" output lines remain on the current page. Use this command when you want a block of text to appear on the same page or when you want to leave room for tables, figures, or illustrations. For example, to avoid breaking up a figure occupying 10 output lines, enter ".J10" prior to the block of text. If at least 10 lines remain on the current output page, the figure prints on that page; otherwise, the program leaves the remainder of the current page blank and prints the figure beginning at the top of the next page. Refer to ATARI's BASIC Reference Manual, pages 3 and 4, for the recommended punctuation to use when a command format contains optional items or requires one of a choice of items. |
| TROUBLESHOOTING |
|
Describe what could go wrong in your program and how users can recover. Consider mistakes users can make on program loading, during data input, and at other stages of program use. |
|
Error Codes and/or Messages |
|
|
If your program contains error codes or error messages, list each one, explain the code or message, common actions that trigger the code or message, and how to recover from the error. An example is:
You've requested that customer receipts or a collection or house list be printed, but the program can't carry out your instruction. Make sure your printer and interface are turned on, and then enter a 1 to print your data. If you've changed your mind about printing the information, enter 2 to return to the Main Menu. |
|
Program Operation Limitations and Warnings |
|
|
Describe potential problems users can encounter in your program. These problems might be the result of a user error, such as in this example: You might occasionally generate an error code if you're careless with your responses to the prompts. For example, if you press the RETURN key in response to the SELECT OPTION prompt, the message ERROR -12 (Line Not Found) displays. In these cases, you must rerun the program. Other limitations aren't the result of a user error, but instead pertain to a program's operational ability or accuracy. Again, be sure to suggest how to recover or how to avoid the problem altogether. An example of a program limitation is: Remember, your house numbers can be no longer than 4 characters and your street names can be no longer than 15 characters. An example of a program warning is: If you lengthen your variable names, you could cause some new lines to become longer than the logical line limit of the Screen Editor. When this happens, the program will still run, but you might not be able to edit those lines because the Screen Editor will truncate them at the logical line limit. |
| SAMPLE APPLICATION(S) |
|
|
Use this section to describe typical applications for your program or to instruct users with a step-by-step example of how to use your program. The section should include most of your program's essential features, (Note. This section is important not only to users but also to APX software reviewers, who use the sample applications you provide to help them evaluate your program.) An example of this approach is the following description, which first shows an application using program default settings, and then describes extensions of the simplest case: EXAMPLE 1. To renumber a program using the default settings.
The program renumbers your designated file using the default values described earlier in these instructions. EXAMPLE 2. To renumber an entire program, setting your own values (the numbers are samples; use your own values).
EXAMPLE 3. To move a block of code (you want to move lines 100 through 190 to lines 1000 through 1090, setting your own values).
|
| ADVANCED TECHNICAL INFORMATION (optional) |
|
|
Use this section for information that advanced users would need to modify your program or to use its more advanced features. The section describing ADVANCED TECHNICAL INFORMATION in OUTLINE I lists some of the kinds of information users will find helpful. A sample of a program listing explanation is: Lines 100-125 contain the timing loop that checks for legal input and waits for you to press the correct key before continuing. Lines 130-220 contain the strategy loop for the computer's move. Depending on which level you're playing, the computer checks from one to five moves ahead. Specifically, lines 150 and 160 check ahead and convert the results into numerical form, line 170 stores the value into an array, and lines 180-210 compare and evaluate the data. An example of a variable list is:
The numbers in parentheses are the array sizes. An example of advanced programming information is: You can alter the program to sort records greater than 185 bytes. To help you, both the source code for SUPERSORT - with filename SUPER2.ASM - and the source code for AUTORUN - with filename DVMOD.ASM - are on the disk. The variable TREC is a temporary storage variable residing on page six. Because it shares this area with other variables, it's only 185 bytes, but you can move TREC to a more open area to increase its byte size. The program accepts single byte record lengths even if you move TREC. In addition, you can modify the program to accept double byte records since the program uses record length (RLENG) only during additions. Because the addition is already double byte (to handle propagation), you need only change hi byte additions from ADC #0 to ADC RLENGHI. However, these modifications tend to slow down the program. |
| QUICK REFERENCE SHEET (optional) |
|
Users will be grateful to see a one- or two-page summary of the information needed to use your program. When writing this, assume they've read through your manual and need just brief reminders of menu selections, commands, options, and so on. |
|
HINTS FOR WRITING FRIENDLY, EASY-TO-USE INSTRUCTIONS |
|
A few simple style techniques can make your user instructions easy and more enjoyable to read. The following suggestions won't create order out of disorder, but they will remove a lot of unnecessary padding and lend an informal tone to your writing. Let's apply some style suggestions to this typical 15-word sentence to reduce it by more than a third, to 9 words. The sentence is: When option 7 is selected, then the user will be returned to the main menu. Hint 1: Use active voice instead of passive voice. INSTEAD OF: When option 7 is selected, then the user will be returned to the main menu. Hint 2: Use second person instead of third person. INSTEAD OF: When the user selects option 7, he or she will return to the main menu. Hint 3: Use present tense instead of future tense. INSTEAD OF: When you select option 7, you will return to the main menu. Hint 4: Use imperative sentences with "you" as the implied subject. INSTEAD OF: When you select option 7, you will return to the main menu. (Notice how the imperative sentence structure caused a complex sentence (When ... then) to change to a simple sentence with an infinitive (Select... to return). We've now reduced a 15-word sentence to nine words, without losing any information! Here are some other suggestions for making your instructions friendly and concise. Hint 5: intermix contractions with full verb forms. Doing so makes your writing friendlier and more informal. A good rule of thumb is to use them as you would if you were speaking instead of writing. Hint 6: Keep your paragraphs short. Breakup complex explanations into numbered items, when possible. A related suggestion is not to include too many ideas in one sentence. Hint 7: When you introduce general ideas or principles, include specific examples of how to apply the idea or principle. Hint 8: Whenever you have a choice, avoid using computer jargon. For example, instead of writing "power up your computer", try "turn on your computer". Another example is to use "computer memory" instead of "RAM". When you do use computer or other technical terms, defining them upon first reference and including examples or illustrations, when appropriate, increases the range of readers able to follow your instructions. Hint 9: Use headings for sections and even for paragraphs to guide users through complex explanations and for quick reference. If you then use your headings and subtitles to create a table of contents, the resulting structure often highlights whether you've ordered the material logically and whether you've left out important information. Hint 10: Use typographical devices to increase reading ease, such as indentions, numbered steps, lists, and underlining. |
|
PROGRAMMING PROCEDURES AND SUGGESTIONS |
|
Before sending a program to APX, look in the most recent APX Product Catalog for programs similar to yours. If you find a strong resemblance between an APX program and your own, you might want to look over the APX program. Check with your local ATARI Home Computer retailer, who may have the program in stock, or order the program from APX. If you think your program is significantly better than or different from any we now carry, we want to see it! We're interested in programs appealing to both a wide range of users and special interest groups. |
| PROGRAMMING PROCEDURES |
|
1. Label your program code and first display screen When you send your program to APX, include the following information in your program code if it's in BASIC (in the first remark statement), on the diskette or cassette label, and on the first display screen (if possible): (1) Program title (2) Revision number Revision numbers work as follows. Label your original submission "Rev. 0.0". If you submit a modified version of your program prior to its being listed in the APX catalog, increase the number to the right of the decimal point by one (e.g., Rev. 0.1) Increase this number each time you send us a revised cassette or diskette. The first published version of the program becomes "Rev. 1" (although this number doesn't appear as part of the program title). If you later submit revisions to the published version, label the first revision "Rev. 1.1", and so on. This second published version becomes "Rev. 2", and this and future revision numbers do appear as part of the program title. Follow this procedure whenever you send us a revised program cassette or diskette. (3) Revision date in the form MM/DD/YY Make this the date of your original submission. Change it whenever you submit a revised program cassette or diskette. (4) (Optional) Copyright notice in the form "Copyright year Program Author" (e.g., Copyright 1982 Dan Smith) or "� year Program Author" (e.g., �1982 Dan Smith). (Note: For further information about copyrighting your program, see the introduction to the Author's Guide.) An example of a display screen containing this information is: BUDGET BENDER 2. List your diskette files Some programs include sample files for APX software reviewers to use for program evaluation but not for final distribution. Therefore, be sure to send us a list of the files on the diskette, indicating which are to be included on the diskette to be marketed. 3. Include sample data for some kinds of programs You must send us sample data files for programs requiring extensive data, such as data bases and mailing lists. We cannot review your submission without this data. 4. Follow these procedures to facilitate our copy protecting your program So that APX can copy protect your program, when appropriate, please follow these procedures:
5. Thoroughly test your program and Instructions Test your program as thoroughly as possible for bugs and your user instructions for comprehension, completeness, and accuracy before submitting them to APX. You should enlist others to use your program and instructions as well as testing them yourself. |
| PROGRAMMING SUGGESTIONS |
|
How usable your program is depends to a great extent on how user-friendly you've made it. Consider your program's typical users at every stage of developing both your program and your user instructions. You're much more likely to produce an enjoyable, easy-to-use program if you do. In fact, some really user-friendly programs are usable with almost no reliance on the manual. When picturing your typical users, consider such factors as age range, knowledge of computers, and the intent of your program. For example, don't use a lot of text in a program geared toward preschoolers. Or, for a data base program intended for non-technical users, avoid using numbers (e.g., instead of using "field 4", refer to the field's name, such as "the zip code field") and technical terms (e.g., instead of using "boolean operators", use "logical operators"). In addition, the following techniques can greatly increase a program's usability. Consider whether these approaches can improve your program. 1. Write programs based on what you know Your chances of writing a good program increase if you select a subject you're well versed in, or solve a problem to your satisfaction, or write a program that makes your own life easier in some way. The odds are, others will want to use such programs, too. A program's success doesn't depend on its complexity. Frequently, the most important indication of potential success is attention to detail. If you're interested in writing games, we recommend an article by Thomas Malone titled "What Makes Computer Games Fun". See the Bibliography for more information about this article. 2. Make your program flexible Make your program flexible by offering alternatives to required accessories when possible. For example, if your program can run on either cassette or diskette, you'll increase the number of potential users. Also, if you use a printer's standard character set (unless you have a compelling reason to use other character sets) and if you avoid using special printer control features (such as underlining, reverse line feeds, and vertical printing), then your program can use any ATARI printer or equivalent printer, again increasing your market. 3. Guide users Let users know at every step what the program expects them to do. Users should be able to run your program with minimal reference to your user instructions. Ways to show users what to do include:
Approaches to avoid using include:
4. Keep users Informed Give users plenty of feedback while they're running your program. Avoid hiding in a visual and audio "hole" longer than two or three seconds. In general, the longer the wait, the more feedback you should give users. Some ways to tell users that the program is computing include:
In addition, display users' scores continuously, or at least frequently, in programs containing scores. 5. Make your program friendly and consistent Make the user interface as easy and enjoyable as possible. Consider these techniques:
6. Don't require inappropriate programming experience Don't expect your users to understand computer terms or concepts or to perform programming functions when such things are inappropriate for your program's typical user. For example, in most cases, requiring users to change program code or enter DATA statements to run a program is inappropriate. (However, in the "Advanced Technical Information" section of your user instructions, suggesting such activities to those wanting to use your program in exceptional ways is fine.) Note. Don't require users to enter ATARI BASIC statements. The appendix contains a utility you can incorporate into your program for prompting users for data, which your program can then use as needed. 7. Trap Errors Users should never receive SYSTEM ERROR or BASIC ERROR messages, no matter what they do with your program. Always use a TRAP statement (or equivalent) when your program does an I/O activity to prevent users from committing fatal errors. For example, if the program sends output to a printer, have a TRAP statement in case users forget to turn on the printer. Or, use a TRAP or ON ERROR (or comparable) statement for an I/O to diskette in case users have the wrong diskette inserted or are trying to write to a protected diskette, such as the unnotched diskettes on which APX distributes its programs. Your TRAP statement should trap to a place in your program that handles the error, and the message displayed on the TV screen should state in English what the problem is and what to do about it (e.g., "CAN'T WRITE FILE TO DISKETTE. CHECK DISK DRIVE."). Also try to prevent users from getting nonsensical results, even if they input nonsensical data. For example, if your program expects a dollar amount, code your program so that it won't accept negative amounts or numbers with more than two decimal places. At the very least, include a range check on all numeric input and trap for non-numeric input. In general, your program should anticipate and handle any likely response from an inexperienced user. 8. Limit your input device to one source To simplify program operation, avoid using both a controller and the computer keyboard in a program. When possible, limit the input device to the more appropriate one. 9. Preventive Measures Other preventive measures depend on the nature of your program. Some suggestions follow.
10. Use colors meaningfully Use various colors for different levels of your program and as a cue, such as red for an error screen. When creating colors for your program, keep these restrictions in mind:
11. Use sounds consistently As appropriate, use sounds to enliven your program, but be sure they convey the same meaning throughout. For example, use the same sound to signify input errors. Sound is also useful for regaining user's attention after a long delay or when displaying an unexpected message. However, too many sounds can be distracting. Don't include sounds in your program just for the sake of sound. And think about the impact of a sound (its melody, length, and volume) with repeated use. Warning. Never let the sum of the volume levels of the four sound channels exceed 15; doing so damages POKEY (the sound generating chip). 12. Use the START key for games If possible, have users press the START key both to begin a game and to restart it with current options intact if pressed during the game. 13. Use the OPTION key for each option and the SELECT key for option choices If possible, have users press the OPTION key to select each option in a game (e.g., number of players and difficulty level). Then have them press the SELECT key to cycle through the choices within each option (e.g., 1, 2, or 3 players; easy, moderate, or difficult game). The display should clearly indicate changes in game or option selection. 14. Make game speed challenging Make the speed of any game and the response of Joystick or Paddle Controllers fast enough for an enjoyable game. See "Assembler Joystick Driver," by James E. Korenthal in the July 1981 issue of COMPUTE! for a good machine-language, Joystick Controller polling routine. Or, in an ATARI BASIC program, you can create a 16 x 2 array containing 0's, 1's, and - 1's and then change the X,Y position of a cursor very quickly by inserting the following two statements wherever you want the Joystick Controller polled: X = X + A(STICK(0),1) 15. Make moving between menus easy At any point, users should be able to return to the current menu level, the next higher level, and the main menu. For multimenu programs, we suggest using the OPTION key to choose a menu, the SELECT key to choose items within a menu, and the START key to activate a selected item. 16. Let users display the diskette directory For programs in which users need to access files on the diskette, let users display the relevant portions of the diskette directory before requiring users to act. 17. Minimize diskette exchanges Try to minimize the number of times users with one disk drive have to change diskettes. 18. Make an editing program at least as capable as the ATARI Screen Editor Programs whose sole function is to edit should perform at least the functions the ATARI Screen Editor performs. In addition, don't use keys in a way that contradicts their intended use (e.g., use the arrow keys for cursor movement, not the "U" key for "up", the "D" key for down, and so on). 19. Support printing options Programs with printing options should let users (1) print a test form (e.g., a test label). (2) pause during the printing, and (3) abort the printing function, returning to the main program. 20. Investigate copyrights for tunes used Some popular tunes you want to use in your program may be copyrighted, such as common nursery rhyme songs and "Happy Birthday". Check such matters to avoid violating a copyright. Authors will often license use of their copyrighted tunes for a token payment. 21. Allow normal attract mode operation When possible, let the operating system's attract mode function normally to prevent users' TV screens from being damaged by static image burns. In addition, programs using a controller as its only input device should bring the screen out of the attract mode with a press of the red button or with any controller movement. The POKE statement to leave the attract mode is: POKE 77,0 22. Avoid cassette errors When you save programs or data to tape, an incorrect tone is sometimes saved on the tape leader. This tone prevents the tape from loading successfully. To avoid this problem, follow these steps:
|
|
BIBLIOGRAPHY OF ATARI & OTHER USEFUL PUBLICATIONS |
|
You can order ATARI publications through Customer Service by calling the toll-free number 800/538-8547 (for calls within California) or 800/538-8543 (for calls outside California). BASIC Reference Manual (C015307) ATARI Microsoft BASIC Instruction Manual (CX8126) Assembler Editor User's Manual (C014189-03) Operating System User's Manual and Hardware Manual (C016555) Operating System Listing (CAO16557) Disk Operating System Listing (C016558) The following publication is available from the ATARI Program Exchange. To order, call 800/672-1850 (for calls within California) or 800/538-1862 (for calls outside California). In addition, many personal computing magazines publish useful information about programming ATARI Home Computers. Some feature regular columns about ATARI Computers. Below is a partial list of these publications. COMPUTE! The Journal for Progressive Computing. (This journal has a regular section called "The ATARI Gazette".) Creative Computing (This magazine has a regular section called "Outpost: ATARI".) Personal Computing BYTE
Publications produced by local ATARI Home Computer users' groups are often another source of useful information. |
| APPENDIX |
Program to read a BASIC statement from user under program control:
10 REM *** PROGRAM WHICH READS A BASIC STATEMENT FROM THE USER UNDER PROGRAM CONTROL

20 REM *** DIMENSION STRING TO HOLD A BASIC STATEMENT WHICH WILL APPEAR AT LINE 1000

30 DIM A$(113)

35 REM *** CLEAR SCREEN AND INPUT THE BASIC STATEMENT (OR IN YOUR CASE, THE EQUATION TO BE INTEGRATED)

37 REM ALSO, TRAP ANY ERRORS IN THE ENTERED DATA BY RETURNING TO THE INPUT STATEMENT

40 ? CHR$(125);:POSITION 2,1:? "EQUATION";:TRAP 40:INPUT A$

50 REM *** CLEAR SCREEN AND MOVE CURSOR DOWN A FEW SPACES TO GET OUT OF THE WAY OF THE TEMPORARY "STOPPED AT LINE

60 REM XX" MESSAGE WHICH WILL APPEAR (SEE BELOW FOR EXPLANATION)

70 ?CHR$(125);:POSITION 2,4

80 REM *** PRINT THE LINE NUMBER (1000) AND THE BASIC STATEMENT (A$) TO BE ADDED TO THE PROGRAM.

90 REM ALSO, PRINT SEVERAL BLANK LINES BELOW THE STATEMENT. THIS PREVENTS AN ERROR MESSAGE FROM BEING PRINTED

100 REM OVER THE "CONT" COMMAND (SEE BELOW). IF THE ERROR MESSAGE TOOK THE PLACE OF "CONT", THE SCREEN

110 REM EDITOR WOULD NEVER STOP READING THE SCREEN, PUTTING THE PROGRAM IN AN ENDLESS LOOP

120 ? 1000;" ";A$:?:?:?:?:?

130 REM *** PRINT THE BASIC "CONT" COMMAND

140 ? "CONT"

150 REM *** PUT CURSOR AT TOP OF SCREEN

160 POSITION 2,0

170 REM *** PUT THE SCREEN EDITOR INTO A SPECIAL MODE BY POKING LOCATION 842

180 REM *** THIS MODE READS TEXT FROM THE SCREEN WITHOUT WAITING FOR THE USER'S RETURN KEY.

183 POKE 842,13

185 REM *** WHEN "STOP" EXECUTES, A BLANK LINE AND THE MESSAGE "STOPPED AT LINE XX" IS PRINTED.

190 REM ALSO,"STOP" MEANS THAT BASIC GOES INTO IMMEDIATE MODE. IT CALLS THE SCREEN EDITOR AND ASKS FOR CHARACTERS

195 STOP

200 REM SINCE THE SCREEN EDITOR IS IN A SPECIAL MODE, IT WILL AUTOMATICALLY READ EACH OF THE LINES BELOW THE

210 REM CURSOR AND SEND THEM TO BASIC.

220 REM *** THE SCREEN EDITOR READS THE LINE NUMBER (1000) AND BASIC STATEMENT (A$) THAT WERE PREVIOUSLY PRINTED.

230 REM *** NOTE: LINE 1000 HAD TO BE PLACED ON SCREEN LINE 4 BECAUSE THE MESSAGE "STOPPED AT LINE XX" MIGHT

240 REM BE PRINTED OVER LINE 1000.

250 REM ############################

260 REM *** THE SCREEN EDITOR SENDS THE STATEMENT TO THE BASIC INTERPRETER, WHERE IT IS MADE PART OF THE PROGRAM

270 REM *** IF THE STATEMENT CONTAINED A SYNTAX ERROR, AN ERROR MESSAGE WOULD HAVE BEEN PRINTED ON THE SCREEN.

280 REM WE LEFT A FEW LINES BETWEEN LINE 1000 AND THE "CONT" STATEMENT TO AVOID WRITING OVER "CONT" WITH ANY

290 REM ERROR MESSAGES.

300 REM *** IF AN ERROR OCCURS, THE PROGRAM WILL JUMP IMMEDIATELY TO THE INPUT STATEMENT WHICH ASKS FOR THE

310 REM EQUATION (BECAUSE THIS IS WHERE THE TRAP WAS SET ABOVE). THE USER WILL THEN HAVE ANOTHER CHANCE TO ENTER

320 REM THE CORRECT FORM OF THE EQUATION

330 REM ############################

340 REM IF THE SYNTAX OF THE EQUATION WAS CORRECT, THE SCREEN EDITOR THEN READS THE "CONT" STATEMENT.

350 REM THIS CAUSES THE BASIC INTERPRETER TO CONTINUE EXECUTING THIS PROGRAM ON THE NEXT LINE (LINE 400).

360 REM LINE 400 PUTS THE SCREEN EDITOR BACK INTO NORMAL MODE (INPUT ONLY ACCEPTED WHEN FOLLOWED BY A RETURN)

400 POKE 842,12

410 REM *** CLEAR THE SCREEN TO DESTROY THE EVIDENCE OF WHAT HAPPENED
420 ? CHR$(125);

990 REM *** IF THE EQUATION HAD INCORRECT SYNTAX, THE ERROR RESULTING FROM TRYING TO EXECUTE THE STATEMENT:

992 REM 1000 ERROR - XXXXXXXXXX ETC. WILL CAUSE THE PROGRAM TO JUMP TO THE INPUT STATEMENT (WHERE THE TRAP WAS

993 REM SET ABOVE).

995 REM *** IF YOU LIST THE PROGRAM AFTER RUNNING IT, THE STATEMENT OR EQUATION YOU ENTERED WILL BE AT LINE 1000

1010 REM *** RESET TRAP

1020 TRAP 40000
Download (LISTed BASIC)
Download (SAVEd BASIC)